Smooth Ambience System With Voice Command
by Naran in Circuits > Raspberry Pi
3432 Views, 37 Favorites, 0 Comments
Smooth Ambience System With Voice Command

![[DIY] Smart Smooth Ambience System using Voice Command](/proxy/?url=https://content.instructables.com/FLH/Y6LP/J3UFDU6F/FLHY6LPJ3UFDU6F.jpg&filename=[DIY] Smart Smooth Ambience System using Voice Command)
Smart home should not only make your experience at home more efficient and more useful.Why not making your time at home more relaxing, more enjoyable?
We aim to do just that with our ‘Smooth Ambience system’!
When you need to have a more relaxing time, simply ask your home to create the perfect ambience for you! Let relaxing lights and smooth music soothe you from a tiring day of work.
Feature
- Use voice command to trigger your system
- The system will automatically turn your room’s lights off
- Integrate nice visual effects with LEDs and Philips Hue
- Connect old speakers to play automatically your favorite relaxing music
NECESSARY COMPONENTS

- Raspberry Pi 2 or 3 // ~$10~$35
- 16 GB SD card // ~$8
- Breadboard with jumper wires // ~$2
- LEDs // <$2
- Old speakers with AUX cable // ~$0
- USB stick // ~$0
- Philips Hue bulb // ~$10-$20
- RF socket + RF transceiver // ~$8
Total should be below $50
SET UP PROTA OS FOR RASPBERRY PI
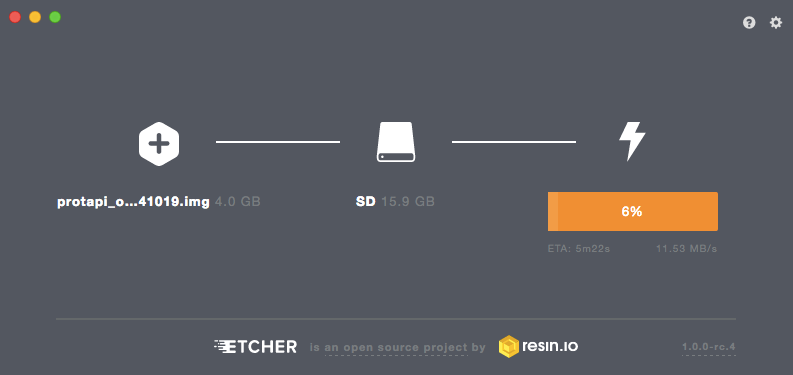
Prota OS can be downloaded for free on https://prota.info/prota/pi/. It’s only 3.8GB and easy to burn on a SD card (make sure to use a 16GB card).
Follow the instructions of Raspberry Pi foundation to write the OS image on your SD card. Extract the .img file from the zip folderPlug in your SD cardDownload and open Etcher, select the image and the drive and start the process. That’s it!
Once Prota OS is burned on the SD card, you can follow this simple installation guide to set up your Prota hub (less than 1 minute!). You only need to define its name and password, your time zone and your email address and the rest is completely automatic!
That’s it! In less than 15 minutes and with no hassle, you transformed your Raspberry Pi into a Smart Home automation hub!
CONNECT YOUR SPEAKERS AND YOUR MUSIC STORAGE

Do you have old speakers that you don’t use anymore? You can connect them very easily with your Prota Pi to automatically play music stored on it and give them a second life.
First, put your favorite songs on your USB stick. Next, plug your USB stick to your Prota Pi.
Set up Volumio
- Go to App Libraries and download Volumio app
- Open Volumio
- Click on the bottom left button “Browse”
- There you will be able to select the songs and radio stations you want to play. Add them to your playlist.

The shared folder contains the audio files added on your USB stick.
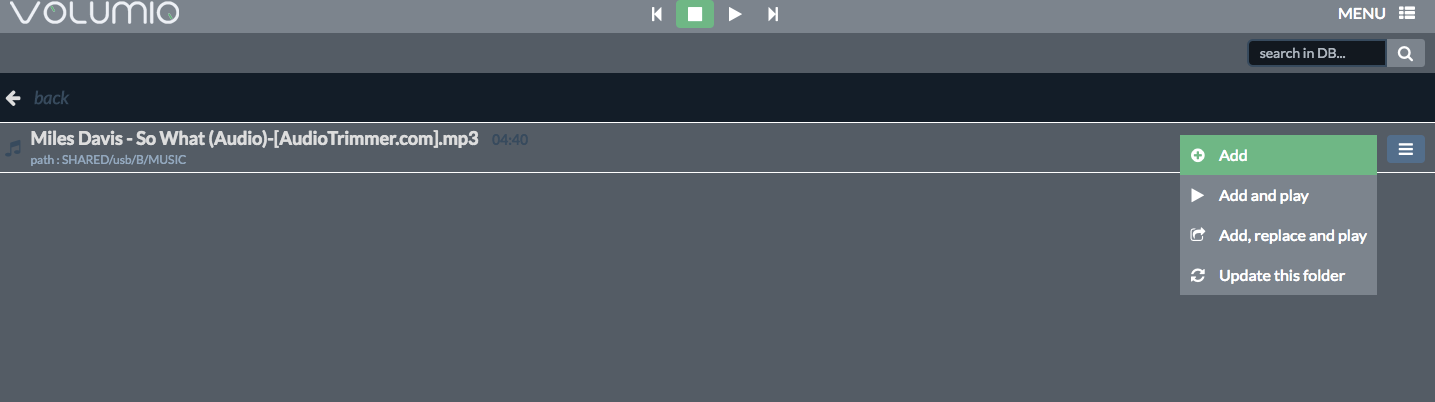
Volumio app will play the music added to the playlist from the USB stick.
If you don’t want to always plug out your USB stick to connect it to your computer when you want to add new songs to your playlist, you can connect the USB storage and turn it into a Network File System (or NFS) that you will be able to remotely update like a cloud.
Follow the instructions below if you want to connect your USB stick or go directly to the next step if not.
- Go to App Libraries
- Download the NFS app
- Open NFS app and change the password as explained on the interface. The current one is written in red.
- Make sure to note down your ID and password + the IP of your Prota (you can find it in Settings app)


Once your app is configured, you will need to connect your computer to the NFS network from which you can access & modify the content of the USB stick.
On iOS devices:
- Open Finder and click on Go > Connect to server (in the top bar)
- Type in smb:// + the IP of your Prota
- Select “media”
- Your name will be “nfs” and previously setup password
- Click on “connect”. You can now access the files on your USB stick/hard drive from Finder.

On Windows computers:
- Go to the Network menu of File Explorer
- The neighboring networks will start appearing. You should find in the list the name of your Prota Pi.
- Enter NFS as ID and the password you created on the NFS app
- Click on Media and you will be able to access the files on the USB stick

You will now be able to change the songs of your Playlist directly from your computer by simply drag-and-dropping your mp3 files. You can of course also use this feature as a NAS, so that you can access your favorite files stored on an external drive connected by USB to your Prota Pi from wherever you are.
CONNECT YOUR MAIN LIGHTS TO REMOTELY TRIGGER THEM
The objective of this step is to connect your room’s lights so that when triggering your smooth ambience system by voice command, the main lights in the room will turn off to let you better enjoy the soft lights of your Philips Hue and LEDs.
If you already use Philips Hue lights as your main source of light in the room, you can directly skip to step 5.
Otherwise, three options are possible to connect your lights depending on the specific situation of your room:
- Your main lights are linked to a power plug via a power cord ⇒ you can use RF switches
- If not, you can use MicroBot Push placed on your light switch to turn them on and off
- Alternatively, you can use Emberlight’s system or any other smart bulbs like LIFX, Belkin, Lutron etc.
We will detail below the option of using RF sockets, which is a very affordable option.
What you need:
- An RF transceiver module to be soldered to a homemade antenna
- An RF switch using those frequencies 433MHZ, 477MHZ or 315 MHZ

You need to solder the RF transceiver and home-made antenna together. Make sure the soldering connects the antenna to the ANT port on the RF transceiver.

You can have more information on how to make an external antenna in this article.
Keep in mind that the required length of your antenna will depend on the frequency of your RF socket. Our OS supports 433, 477 and 315 MHZ.
Once soldering is done, plug three jumper wires to your RF transceiver (433/477/315 MHZ).
VDD = Electric current (5V)
GND = ground (select a ground PIN)
DATA = has to be connected to GPIO23

You can connect those three jumper wires as we did on PIN 2 (5V), PIN 6 (GND) and PIN 16 (GPIO 23). Use this map of GPIO pins if you are lost.

The last step is to connect the configured antenna with the RF socket.
- Open App Libraries and download ON/OFF app
- Click on “Add socket”
- Type-in the details, select “On Board” and click on “Done”

- The app will start scanning the surrounding sockets. Press and hold on the socket’s button until the LED blinks
- When the LED stops blinking and stays on solid red, it means your Prota Pi has paired with your socket. You can then press on “Remember”

You can now try turning it on and off via the app interface.
Once you plug your light’s cord on this socket, they will be remotely triggerable and can be integrated into automation workflows!
CONNECT YOUR PHILIPS HUE TO YOUR HUB
You can connect Philips Hue light bulbs to your Prota Pi to add some nice light effects to your smooth ambience system.
To do so:
- Go to App Libraries and download the Philips Hue app
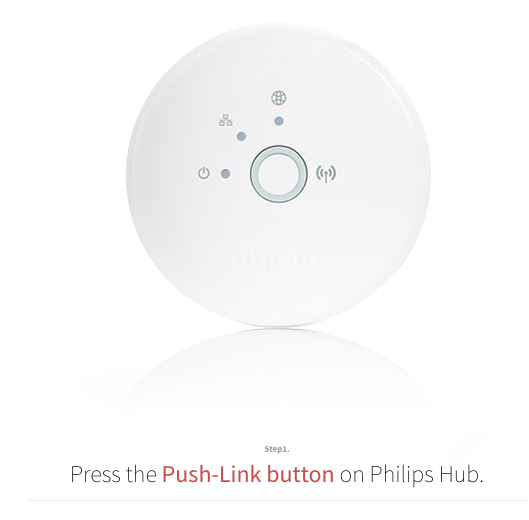
- Open the Philips Hue app. You will be requested yo press on the Push-link button of your Philips Hue bulb. As soon as you do that, the lights paired to your Hue hub will be integrated to your Prota Pi Hue app.
Make sure your bulbs have been paired with your Hue hub beforehand. You can follow this guide to better understand how to use and pair Hue bulbs with Prota Pi.
Now that it’s paired, you can directly control your Hue bulbs through the app interface. We will now be able to integrate those bulbs in automation workflows, including controlling their color depending on the song played.

INTEGRATE LEDs TO YOUR AMBIENCE SYSTEM
LEDs are very cheap components. You can buy a pack of 300 for around $10 ( here for instance). If you’re willing to put more money into it, you can find interesting LED cubes kits or modules (like this one and this one).
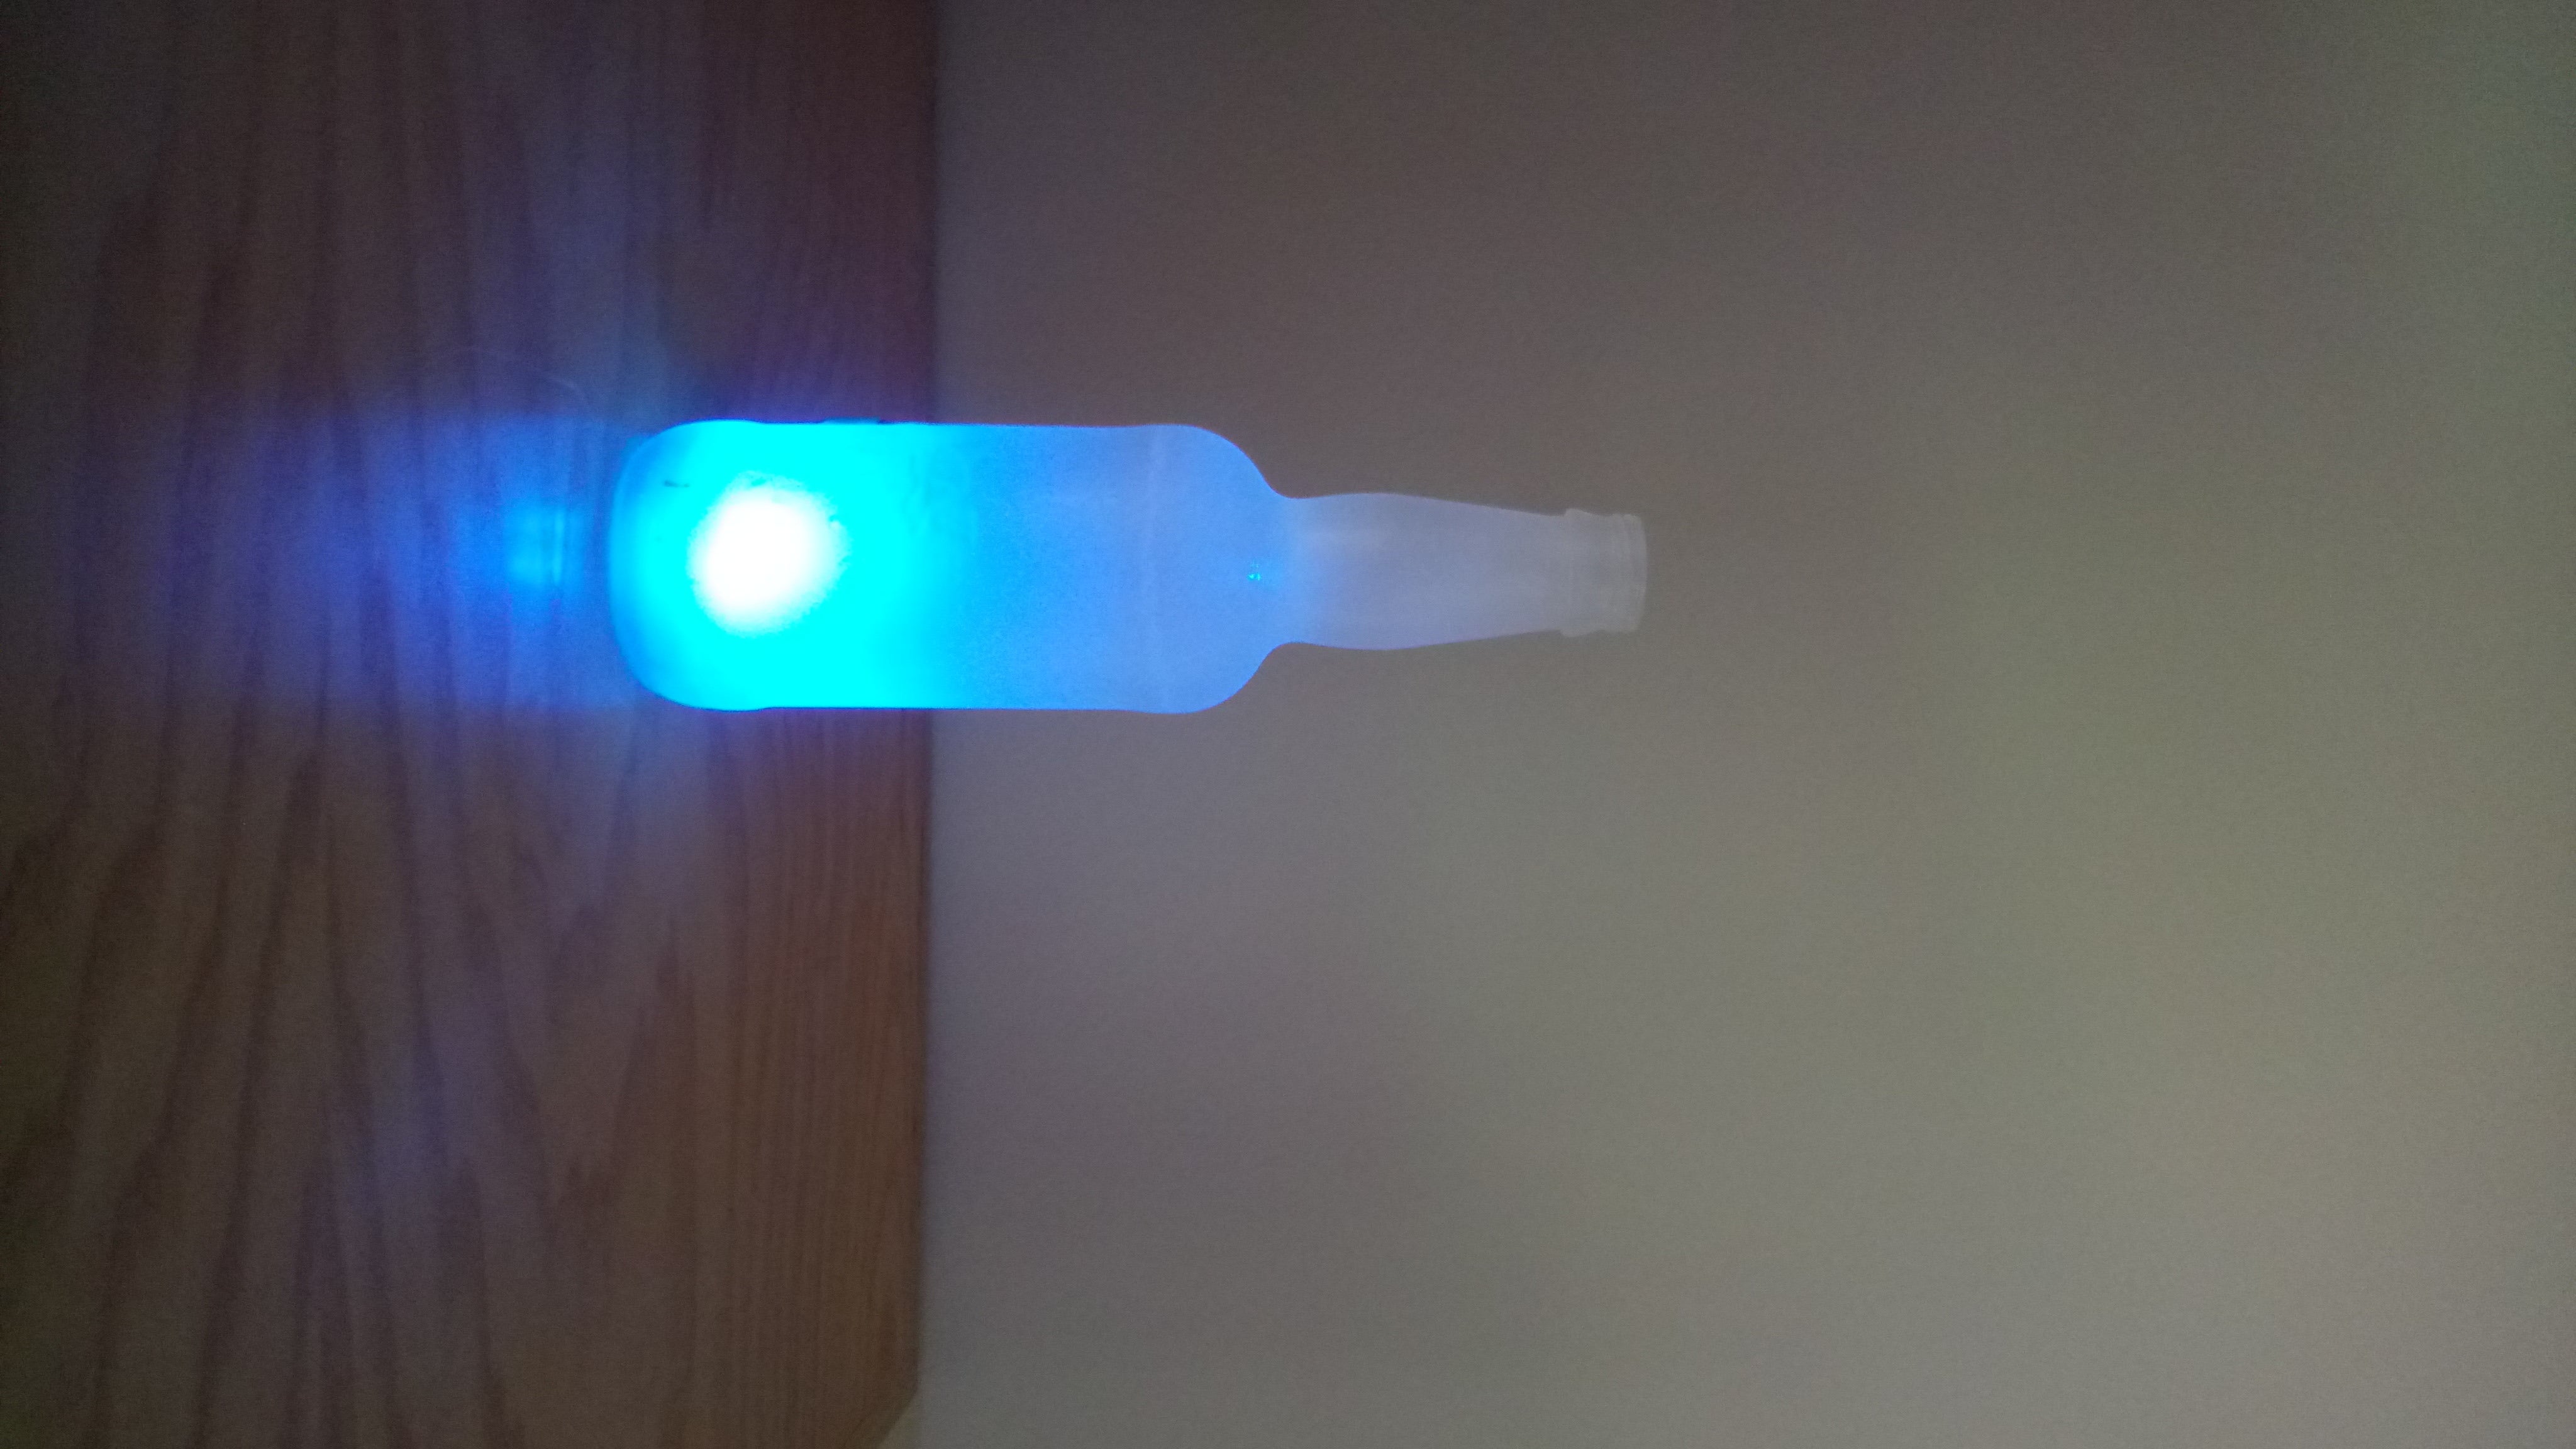
In order to make your LEDs more visible, we suggest that you insert them in used glass bottles, perforated with a glass drill and covered with a frost glass spray as explained in this great Instructables. This step 6 aims at showing you how you can reproduce the LED part of this project via Prota OS. Please refer the Color Changing bottle project for transforming used glass bottles into lamps (as seen below).
Connecting LEDs via your GPIO breadboard is very easy. A breadboard is a board that helps you connect electronic components with your micro-computer Raspberry Pi (here we want to connect the LED lights via the breadboard). By connecting your board to the GPIO pins of your Raspberry Pi, you will bring the current to turn them on.
The only requirement for connecting LEDs is that one leg (the longer one) is connected to a source of electric current (we suggest GPIO18) and that the other is connected to a ground pin (GND). Using the breadboard as an intermediary between your LEDs and RPi allows you to use only one GPIO pin and one GND pin to electrify all your LEDs.

In order to connect LEDs from a long distance and cover a bigger part of your room, you can connect electric wires between the LEDs and the breadboard. This will allow you to put the LEDs into the bottles and spread the bottles in several corners. Make sure to hide the cables behind furniture or find creative ways to do so.

Once everything is connected, you can set up GPIO 18 on “output”. Test it by writing 1 or 0 in the value box. Typing 1 should bring current to your LEDs and turn them on, and they should turn off when writing 0.

AUTOMATE!
Requirements: Make sure to download the IFTTT app on Prota OS (via App Libraries) and to also create an account on IFTTT if you don’t have one. You will need to connect your voice assistant to IFTTT, by using the Amazon account linked to your Echo device or the Google account linked to your Google Home/Google Assistant device.
Time to automate everything!
Below are the complete workflows we need to set up:
- When saying “smooth ambience” to your voice assistant (Google Home, Amazon Alexa), trigger your main lights to be turned off, your LEDs and Philips Hue to turn on and smooth music to start playing
- When saying “stop smooth ambience”, the system turns off and your main light is turned back on
To do so we need to create storylines on Stories app and to create applets on IFTTT that will connect our workflows to our voice assistant. We created links for you to import directly the prepared storylines (via the Cite feature). Make sure to complete them with personalized fields:
- Storyline 1 - LINK : “When IFTTT runs a Prota applet, ON/OFF smart socket is turned off, Philips Hue is turned on random color, Volumio starts playing, GPIO writes 1 to pin 18”
- Storyline 2 - LINK : “When IFTTT runs a Prota applet, ON/OFF smart socket is turned on, Philips Hue is turned off, Volumio stops playing, GPIO writes 0 to pin 18”
It is now necessary to create IFTTT applets that will connect your voice command with the storylines we just created. It’s necessary to create two applets, one for starting the “smooth ambience system” that we will connect to storyline 1 and one applet to stop the “smooth ambience system” that we will connect to storyline 2. Follow the directions below to make the applets.
Google Voice Assistant:
Applet 1:
IF I say “OK Google, smooth ambience” THEN Prota execute the storyline 1
Applet 2:
IF I say “OK Google, stop smooth ambience” THEN Prota execute the storyline 2

Amazon Alexa:
Applet 1:
IF I say “Alexa, trigger smooth ambience” THEN Prota execute the storyline 1
Applet 2:
IF I say “Alexa trigger stop smooth ambience” THEN Prota execute the storyline 2

RELAX!
![[DIY] Smart Smooth Ambience System using Voice Command](/proxy/?url=https://content.instructables.com/FO8/IS7Y/J3UFDUU4/FO8IS7YJ3UFDUU4.jpg&filename=[DIY] Smart Smooth Ambience System using Voice Command)
Time to set it all up and test the result!
The LED are not very bright on the video, but using the technique mentioned earlier of frosting your bottle should give you a nice DIY way of creating smooth lights, which of course can be replaced by any other smart light alternative you’d prefer.
You can of course integrate many other elements to your smooth ambience system, for instance more smart lights or LED strips, smart shutters that would go down, an electric diffuser connected via an RF socket… You should now have all the tools and understanding to create the ambience that suits you best and automate it so that relaxing times at home can start in just a voice-command!
We hope you enjoyed reading and replicating this project and automating your home. If you liked this project, make sure to have a look at our previous projects, to follow us on both Instructables and Twitter.
BETA PROGRAM
You like Prota OS and want to test our newest apps before their release?
Subscribe your email address here to enroll or get further information on our Beta program.
You like our projects? Make your own!
We are currently (and until July 30) running a maker contest. Show us the creative projects you can do with Prota OS and win awesome prizes!
More info here - https://support.prota.info/hc/en-us/community/top...
