Solid Wood Bench/coffee Table
by NutandBolt in Workshop > Furniture
35936 Views, 246 Favorites, 0 Comments
Solid Wood Bench/coffee Table
![DSCN3529 (Medium).JPG](/proxy/?url=https://content.instructables.com/FZ4/ELO2/GDMUSCQZ/FZ4ELO2GDMUSCQZ.jpg&filename=DSCN3529 (Medium).JPG)
![DSCN3526 (Medium).JPG](/proxy/?url=https://content.instructables.com/FM9/OHFU/GDMUSCQW/FM9OHFUGDMUSCQW.jpg&filename=DSCN3526 (Medium).JPG)
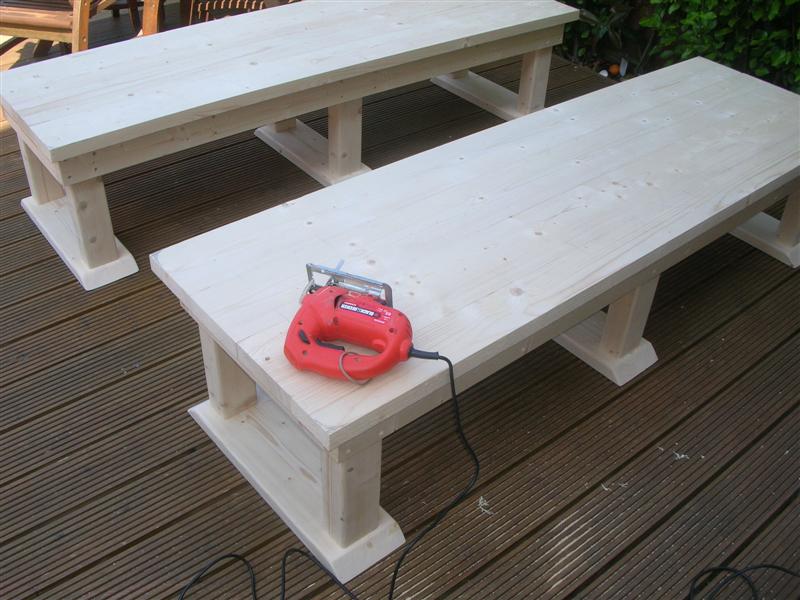
The finished product can be painted, stained, varnished or juse left natural.
Cushins can be attached to it, legs base is optional. Whatever way you do it you will end up with an awesome solid and heavy piece of furniture.
Safety : When using electric tools use ear and eye protection.
Keep body parts away from sharp blades.
WORK SAFE!
Construction of the Bench Frame.
![DSCN1577 (Medium).JPG](/proxy/?url=https://content.instructables.com/FLV/BJ1Q/GDMUSCRK/FLVBJ1QGDMUSCRK.jpg&filename=DSCN1577 (Medium).JPG)
![DSCN1573 (Medium).JPG](/proxy/?url=https://content.instructables.com/FZH/HVQG/GDMUSCRG/FZHHVQGGDMUSCRG.jpg&filename=DSCN1573 (Medium).JPG)
![DSCN1598 (Medium).JPG](/proxy/?url=https://content.instructables.com/FMV/K27N/GDMUSCS2/FMVK27NGDMUSCS2.jpg&filename=DSCN1598 (Medium).JPG)
![DSCN1601 (Medium).JPG](/proxy/?url=https://content.instructables.com/FCT/G8GV/GDMUSCSJ/FCTG8GVGDMUSCSJ.jpg&filename=DSCN1601 (Medium).JPG)
![DSCN1578 (Medium).JPG](/proxy/?url=https://content.instructables.com/FKD/0CWL/GDMUSCRP/FKD0CWLGDMUSCRP.jpg&filename=DSCN1578 (Medium).JPG)
![DSCN1596 (Medium).JPG](/proxy/?url=https://content.instructables.com/F3F/YVJG/GDMUSCRV/F3FYVJGGDMUSCRV.jpg&filename=DSCN1596 (Medium).JPG)
![DSCN1599 (Medium).JPG](/proxy/?url=https://content.instructables.com/FBJ/O2DS/GDMUSCSA/FBJO2DSGDMUSCSA.jpg&filename=DSCN1599 (Medium).JPG)
![DSCN1604 (Medium).JPG](/proxy/?url=https://content.instructables.com/FUS/3114/GDMUSCST/FUS3114GDMUSCST.jpg&filename=DSCN1604 (Medium).JPG)
![DSCN1610 (Medium).JPG](/proxy/?url=https://content.instructables.com/FQF/CNCO/GDMUSCRD/FQFCNCOGDMUSCRD.jpg&filename=DSCN1610 (Medium).JPG)
After the frame is secured connect the inner width support parts. Mark the center length point and space two 4x2 the exact same size of the bench leg thicness. To get a good fitting use scrap timber the same size as the leg.
Bench Top and Biscuit Jointer.
![DSCN1616 (Medium).JPG](/proxy/?url=https://content.instructables.com/F5Q/BVYV/GDMUSCUI/F5QBVYVGDMUSCUI.jpg&filename=DSCN1616 (Medium).JPG)
![DSCN1618 (Medium).JPG](/proxy/?url=https://content.instructables.com/FQH/4X3Y/GDMUSCUM/FQH4X3YGDMUSCUM.jpg&filename=DSCN1618 (Medium).JPG)
![DSCN1620 (Medium).JPG](/proxy/?url=https://content.instructables.com/FVC/5TAI/GDMUSCUR/FVC5TAIGDMUSCUR.jpg&filename=DSCN1620 (Medium).JPG)
![DSCN1621 (Medium).JPG](/proxy/?url=https://content.instructables.com/FZP/9UFH/GDMUSCUX/FZP9UFHGDMUSCUX.jpg&filename=DSCN1621 (Medium).JPG)
![DSCN1622 (Medium).JPG](/proxy/?url=https://content.instructables.com/FHO/9IWI/GDMUSCV4/FHO9IWIGDMUSCV4.jpg&filename=DSCN1622 (Medium).JPG)
![DSCN1624 (Medium).JPG](/proxy/?url=https://content.instructables.com/FME/7Q2H/GDMUSCVC/FME7Q2HGDMUSCVC.jpg&filename=DSCN1624 (Medium).JPG)
![DSCN1626 (Medium).JPG](/proxy/?url=https://content.instructables.com/FLI/KAA8/GDMUSCVL/FLIKAA8GDMUSCVL.jpg&filename=DSCN1626 (Medium).JPG)
![DSCN1627 (Medium).JPG](/proxy/?url=https://content.instructables.com/FLX/B4GW/GDMUSCVV/FLXB4GWGDMUSCVV.jpg&filename=DSCN1627 (Medium).JPG)
![DSCN1630 (Medium).JPG](/proxy/?url=https://content.instructables.com/FPG/L7ZF/GDMUSCW6/FPGL7ZFGDMUSCW6.jpg&filename=DSCN1630 (Medium).JPG)
![DSCN1631 (Medium).JPG](/proxy/?url=https://content.instructables.com/FJ8/PX0K/GDMUSCW7/FJ8PX0KGDMUSCW7.jpg&filename=DSCN1631 (Medium).JPG)
![DSCN1633 (Medium).JPG](/proxy/?url=https://content.instructables.com/FOG/2R2Q/GDMUSCWV/FOG2R2QGDMUSCWV.jpg&filename=DSCN1633 (Medium).JPG)
![DSCN1635 (Medium).JPG](/proxy/?url=https://content.instructables.com/FO4/UKCS/GDMUSCX9/FO4UKCSGDMUSCX9.jpg&filename=DSCN1635 (Medium).JPG)
![DSCN1637 (Medium).JPG](/proxy/?url=https://content.instructables.com/FMT/SZLH/GDMUSCXO/FMTSZLHGDMUSCXO.jpg&filename=DSCN1637 (Medium).JPG)
Next thing to do is adjust the height of the blade so that it is the same height as the center of the timber thickness. After the jointer is set take 2 scrap pieces of timber and test your setting.
Aligne all plankes accurately against each other and mark the location of the joints with long set squares and make a mark between all planks incase you forget what goes where.
Hold the jointer tight to the wood plank against the pencil line and using the router red guiding line create all the joints in one go after finishing one plank do the next using same setting of the jointer.
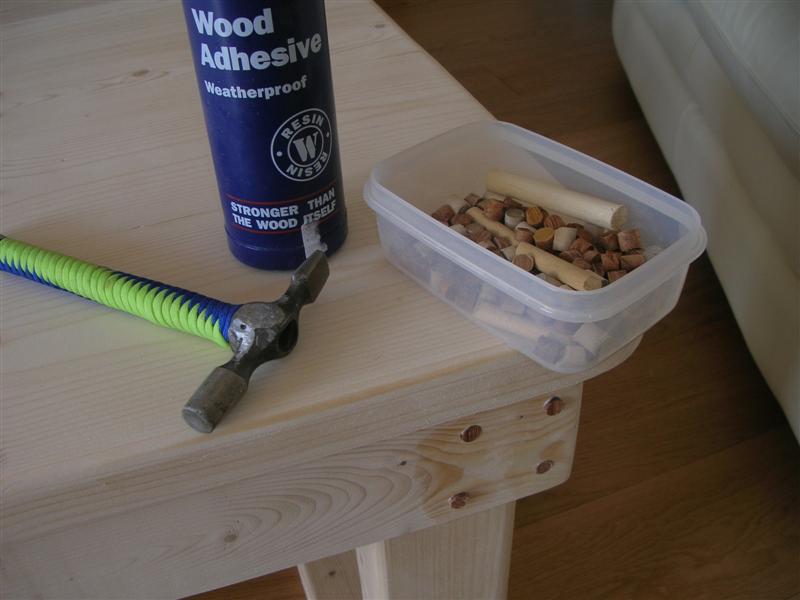
After all joints are ready fit you biscuit without glue and cheak if all is fitting well. If you are happy with the results glue all joints and planks using wood adhisave and glue roller for even glue sprad and tap plankes into place with rubber mallet.
Secure all plankes with ratchet strap or long clamp which I dont have in my images. And VERY important use small clamps to pull planks down on a flat surface to pravent twist.
Here I made a video how to use the biuscuit jointer.
Bench Legs
![DSCN1652 (Medium).JPG](/proxy/?url=https://content.instructables.com/F9U/WUBX/GDMUSCZR/F9UWUBXGDMUSCZR.jpg&filename=DSCN1652 (Medium).JPG)
![DSCN1661 (Medium).JPG](/proxy/?url=https://content.instructables.com/FRN/5H5Q/GDMUSD0M/FRN5H5QGDMUSD0M.jpg&filename=DSCN1661 (Medium).JPG)
![DSCN1638 (Medium).JPG](/proxy/?url=https://content.instructables.com/F3E/X3VU/GDMUSCUF/F3EX3VUGDMUSCUF.jpg&filename=DSCN1638 (Medium).JPG)
![DSCN1653 (Medium).JPG](/proxy/?url=https://content.instructables.com/F4Q/V81D/GDMUSCZV/F4QV81DGDMUSCZV.jpg&filename=DSCN1653 (Medium).JPG)
![DSCN1654 (Medium).JPG](/proxy/?url=https://content.instructables.com/FRL/8G1M/GDMUSD00/FRL8G1MGDMUSD00.jpg&filename=DSCN1654 (Medium).JPG)
![DSCN1655 (Medium).JPG](/proxy/?url=https://content.instructables.com/FTL/GB3S/GDMUSD06/FTLGB3SGDMUSD06.jpg&filename=DSCN1655 (Medium).JPG)
![DSCN1656 (Medium).JPG](/proxy/?url=https://content.instructables.com/F8R/6IAC/GDMUSD0D/F8R6IACGDMUSD0D.jpg&filename=DSCN1656 (Medium).JPG)
![DSCN1662 (Medium).JPG](/proxy/?url=https://content.instructables.com/FUM/YXS4/GDMUSD0V/FUMYXS4GDMUSD0V.jpg&filename=DSCN1662 (Medium).JPG)
![DSCN1663 (Medium).JPG](/proxy/?url=https://content.instructables.com/F80/UZGH/GDMUSD15/F80UZGHGDMUSD15.jpg&filename=DSCN1663 (Medium).JPG)
![DSCN1665 (Medium).JPG](/proxy/?url=https://content.instructables.com/FNB/SVFC/GDMUSD16/FNBSVFCGDMUSD16.jpg&filename=DSCN1665 (Medium).JPG)
![DSCN1668 (Medium).JPG](/proxy/?url=https://content.instructables.com/FQR/2Y79/GDMUSCZO/FQR2Y79GDMUSCZO.jpg&filename=DSCN1668 (Medium).JPG)
After legs are cut place them into place and mark the location of where the reccess are to be cut.
The purpose of the reccess is to support the frame to take the weight of who sits on it.
Every mitre saw make is a bit different but the same idea apply to all by adjusting the height of the blade using the height setting bolt. I set my blade to 25mm deep cuts.
With my mitre saw I could not run the blade all the way back when doing a shallow cut so clamping a block of timber sorts that matter.
Start with scrap timber for practice if the setting is good make many cuts and keep on until reccess is complete. This is very quick method once you have everything marked and set, another way is to use a hand saw, band saw or even electric router.
Cut reccess for all leg on one side then change blade setting and do the oher side.
Attaching Bench Legs and Base
![DSCN1671 (Medium).JPG](/proxy/?url=https://content.instructables.com/F5T/9HAY/GDMUSD49/F5T9HAYGDMUSD49.jpg&filename=DSCN1671 (Medium).JPG)
![DSCN1676 (Medium).JPG](/proxy/?url=https://content.instructables.com/F8C/6PGX/GDMUSD4K/F8C6PGXGDMUSD4K.jpg&filename=DSCN1676 (Medium).JPG)
![DSCN1678 (Medium).JPG](/proxy/?url=https://content.instructables.com/FSP/TQ3X/GDMUSD4Q/FSPTQ3XGDMUSD4Q.jpg&filename=DSCN1678 (Medium).JPG)
![DSCN1680 (Medium).JPG](/proxy/?url=https://content.instructables.com/FQM/LDQX/GDMUSD4X/FQMLDQXGDMUSD4X.jpg&filename=DSCN1680 (Medium).JPG)
![DSCN1683 (Medium).JPG](/proxy/?url=https://content.instructables.com/FX1/Z5OO/GDMUSD55/FX1Z5OOGDMUSD55.jpg&filename=DSCN1683 (Medium).JPG)
![DSCN1684 (Medium).JPG](/proxy/?url=https://content.instructables.com/FN9/CB1O/GDMUSD48/FN9CB1OGDMUSD48.jpg&filename=DSCN1684 (Medium).JPG)
![DSCN1672 (Medium).JPG](/proxy/?url=https://content.instructables.com/FXA/RXIA/GDMUSD4F/FXARXIAGDMUSD4F.jpg&filename=DSCN1672 (Medium).JPG)
To get rid of that square look use the round bit on the table router and round all leg corners.
Next give the legs a bit of a sanding and use wood adhesive over the joint parts, wipe acces glue with damp cloth.
Use a 90deg set square to check that the leg is straight and screw into place with 4 screws into the shallow pilot holes that will be closed later with hard wood plugs.
Legs base:
This step is optional if you want to add base for the legs: I used the left overs from the bench top 170x40mm and used my mitre saw to bevel the edges and rounding them after with a sander.
Secure legs base with a few screws into pilots holes, don't use glue incase you want to remove them in some stage.
Finishing Touches
![DSCN1687 (Medium).JPG](/proxy/?url=https://content.instructables.com/FCY/MIQL/GDMUSD8P/FCYMIQLGDMUSD8P.jpg&filename=DSCN1687 (Medium).JPG)
![DSCN1689 (Medium).JPG](/proxy/?url=https://content.instructables.com/F8G/B3ZP/GDMUSD8T/F8GB3ZPGDMUSD8T.jpg&filename=DSCN1689 (Medium).JPG)
![DSCN1692 (Medium).JPG](/proxy/?url=https://content.instructables.com/F3E/07AL/GDMUSD8Y/F3E07ALGDMUSD8Y.jpg&filename=DSCN1692 (Medium).JPG)
![DSCN1695 (Medium).JPG](/proxy/?url=https://content.instructables.com/FC5/4376/GDMUSD94/FC54376GDMUSD94.jpg&filename=DSCN1695 (Medium).JPG)
![DSCN1696 (Medium).JPG](/proxy/?url=https://content.instructables.com/FUZ/1N9V/GDMUSD9B/FUZ1N9VGDMUSD9B.jpg&filename=DSCN1696 (Medium).JPG)
![3084 (Small).JPG](/proxy/?url=https://content.instructables.com/FLN/6DP0/GE8ACJAY/FLN6DP0GE8ACJAY.jpg&filename=3084 (Small).JPG)
![DSCN1698 (Medium).JPG](/proxy/?url=https://content.instructables.com/FUN/GNHZ/GDMUSD9J/FUNGNHZGDMUSD9J.jpg&filename=DSCN1698 (Medium).JPG)
![DSCN1705 (Medium).JPG](/proxy/?url=https://content.instructables.com/FYZ/EIZ2/GDMUSD9S/FYZEIZ2GDMUSD9S.jpg&filename=DSCN1705 (Medium).JPG)
![DSCN3522 (Medium).JPG](/proxy/?url=https://content.instructables.com/FAK/E5O4/GDMUSDA2/FAKE5O4GDMUSDA2.jpg&filename=DSCN3522 (Medium).JPG)
![DSCN3526 (Medium).JPG](/proxy/?url=https://content.instructables.com/F9Q/H2HH/GDMUSD8M/F9QH2HHGDMUSD8M.jpg&filename=DSCN3526 (Medium).JPG)
![DSCF2614 (Medium).JPG](/proxy/?url=https://content.instructables.com/FBI/N1JD/GEI98HNA/FBIN1JDGEI98HNA.jpg&filename=DSCF2614 (Medium).JPG)
![DSCF2615 (Medium).JPG](/proxy/?url=https://content.instructables.com/FQC/6133/GEI98HO1/FQC6133GEI98HO1.jpg&filename=DSCF2615 (Medium).JPG)
![DSCF2612 (Medium).JPG](/proxy/?url=https://content.instructables.com/F05/RC0B/GEI98HNB/F05RC0BGEI98HNB.jpg&filename=DSCF2612 (Medium).JPG)
Aftrer rounding all edges I used an electric router running it all around the bench top to have nice round edges.
Next I used my sander to sand all parts of the bench going up with grit levels to get a good finishing. Do it in a well ventilated place and wear mouth and eye protection.
This is the fun part of the project, I made a box full of 10mm hard wood plugs for closing all the holes. Use a drip of glue on the wood plug and tap it into place with pin hammer leave a 2-3mm over hang, wipe access glue with a damp cloth, after glue is set use a block plane to sand it smooth.
Last part is to secure the top bench to the frame for that I used 90deg metal plates incase I want to take the top off at later on stage.
Bench is finished it can be left natural painted or stained what ever is you taste.