TerraHaven Housing - Make It Home Student Design Contest
by kbarun11 in Design > Architecture
46 Views, 2 Favorites, 0 Comments
TerraHaven Housing - Make It Home Student Design Contest

Hello, my name is Kavin. I am a 13-year-old and rising 8th grader from North Carolina. As a member of my robotics team, I have developed a true passion for solving real world problems through CAD and design. I am participating in the Autodesk Make It Home Student Design Contest because I wanted to develop something that was genuinely meaningful.
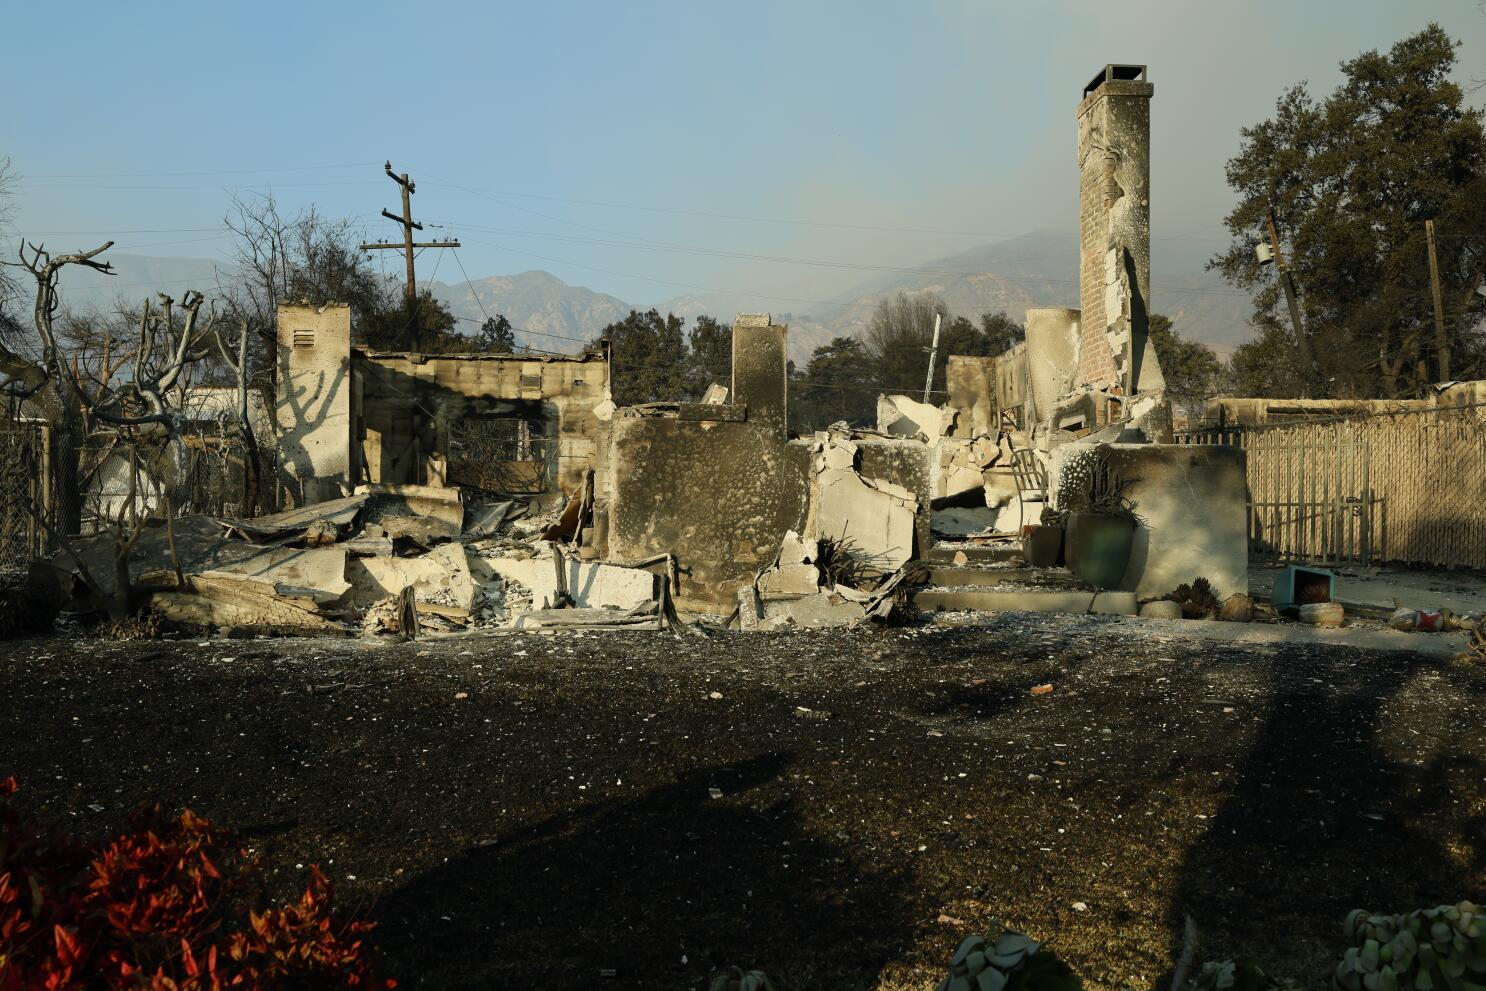
Los Angeles is the center of my project, and stood out to me not only because of its unique structures and innovations, but also because of the growing challenges this beautiful city faces. The inspiration to choose this well-known area wasn’t just because of its majestic sites, however. A couple years back, my family and I had chosen to visit California on a summer trip, and I was ecstatic to finally see the other side of the country. Nevertheless, a large California wildfire had overtaken the premise, and restricted me from going on my dream vacation. I chose this project not just because of how miserable I felt at that moment, but also because of a vivid realization: people actually lived in these wildfire-prone areas year-round. It made me understand how important it was to assist these locals, and to help them build homes that can fiercely withstand those conditions.
As I learned more about LA, I realized that I needed to create a housing solution that addressed both affordability and resilience. I noticed that while LA was known for its creativity and ambition, it was also deeply affected by challenges like housing shortages and environmental risks. Discovering both of these challenges pushed me to design something that could genuinely reflect the city’s spirit while also solving real issues. I present to you my design, which uses natural materials and clean energy to directly respond to the needs of the Los Angeles communities today.
Table Of Contents
Research
- Step 1 - Understanding the Problem
- Step 2 - Investigation
- Step 3 - Impact
- Step 4 - The Tesseract
Sketching and CAD
- Step 5 - Sketching
- Step 6 - Designing in Revit
- Step 7 - Revit: Final Floor Plan
- Step 8 - Feedback From Experts
- Step 9 - Rendering and FEA (Finite Element Analysis)
Building
- Step 10 - Preparing to Build
- Step 11 - Building the Model
Analysis
- Step 12 - Testing the Model
- Step 13 - LEED Certification
- Step 14 - Cost Analysis
Closing
- Step 15 - Conclusion
- Step 16 - Acknowledgements
Supplies
Software
- Autodesk Fusion
- Autodesk Revit
- Autodesk Robot Structural Analysis
- Bambu Studio Slicer
Hardware
- Clay
- Sand
- Portland Cement
- Water
- PolyMaker PLA Filament(2 kgs total)
- Paper
- Pencil
- Mixing Bowl
- X-acto knife
- Allen Key(2.5 mm and 3 mm)
- Bambu Labs X1 Carbon Printer
- Box Cutter
Understanding the Problem
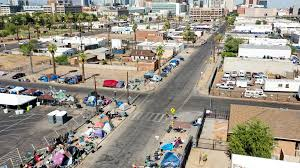
1.1 Housing Affordability and Homelessness
Los Angeles has an affordable housing crisis. But why? Income inequality, a lack of supply, and cost have all played a role. In recent years, average home prices have spiked to over $900,000. But the median household income is less than $75,000. Families can no longer afford to own homes and many are unable to pay rental costs.

Source: Wolf Street
Over 60% of renters in the city of Los Angeles are rent burdened, paying more than 30% of their income on housing costs. Tens of thousands of tenants face eviction or displacement each year. The result: over 75,000 people in Los Angeles County are experiencing homelessness, with many living on the streets. It also strains city services and points to a vast unmet need for more sustainable, affordable housing alternatives.
Source: Smart Cities Dive
1.2 Environmental Hazards and Infrastructure Strain
Simultaneously, L.A. faces increasing environmental risks. Each year, wildfires destroy thousands of homes, particularly in hillside communities where wooden-frame construction dominates. Over 1.5 million residents live in areas marked as “Very High Fire Hazard Severity Zones.”

Source: Sacramento Bee
Due to the the urban heat island effect, the ground can feel up to 7 times hotter in L.A. than nearby country areas. Vulnerable groups like the elderly and the homeless are at much higher risk of being affected by this.

Source: Los Angeles GeoHub
In the summer, the city's old electrical grid cannot supply enough power. Blackouts happen more often and become dangerous when it gets very hot. People in vulnerable neighborhoods face safety problems if they lack electricity or air conditioning. Recovery from a disaster is also harder.

Source: Los Angeles Times
Investigation
2.1 Inspiration
My idea started in a classroom. We learned how ancient people, like the Egyptians in addition to Mesopotamians, built houses from mudbricks and natural things. I found it interesting that old methods still work now, and these methods could solve some of our problems.

Source: History Defined
I soon found rammed earth construction. This method uses layers of dirt. Workers mix lime or cement with the dirt; they press the mixed dirt inside a frame to build walls. The walls last a long time and do not burn. The walls take in heat when the sun is out. They let out heat when it is dark - this controls the temperature inside the building.
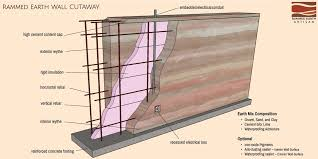
Source: Rammed Earth Artisan
I realized this could be a game-changer for Los Angeles.
2.2 TerraHaven - Energy Efficiency
TerraHaven is a rammed earth housing design - it uses shared wall systems to lessen expenses and save energy. The outside walls are 8 inches thick. Inside walls are 5 inches thick. Both wall types contain high density earth materials; they also contain natural insulation, such as straw or cork.

Source: Clifton Schooley
These walls are non-flammable, require little maintenance, and are highly durable, potentially lasting over 100 years.

Source: Eco Homes
By reducing the surface area exposed to outside temperatures and sharing walls between townhome units, the overall energy required to cool or heat each home is significantly decreased. Combined with local soil sourcing, TerraHaven becomes one of the most affordable and low-carbon housing options possible.

2.3 TerraHaven - Physical Durability
TerraHaven also has exceptional compressive strength and durability, making it a viable structural material even in modern construction. Typically, well-engineered rammed earth walls exhibit compressive strengths ranging from 300 psi (2.07 MPa) to over 1,000 psi (6.89 MPa), depending on the soil composition, compaction method, and the use of stabilizers like cement or lime. When stabilized with 5–10% Portland cement, the structural integrity of rammed earth increases significantly, meeting or exceeding the minimum requirements for load-bearing walls in residential buildings. These high-density walls not only resist vertical loads effectively but also provide excellent lateral resistance, allowing them to perform well in seismic zones when properly reinforced.
Beyond compressive strength, rammed earth is highly resistant to fire, rot, and insect damage due to its mineral composition and density. A standard 8-inch thick wall can achieve a fire resistance rating of over 4 hours, far surpassing typical timber-frame structures. With low thermal conductivity and high thermal mass, rammed earth walls store and slowly release heat, creating a naturally stable indoor temperature with reduced need for insulation. This combination of structural robustness, fire resistance, and energy efficiency makes rammed earth an ideal material for sustainable, disaster-resilient housing.
Impact
3.1 Environmental and Economic Impact
TerraHaven homes reduce carbon emissions by 50–70% compared to traditional concrete or wood-framed buildings.
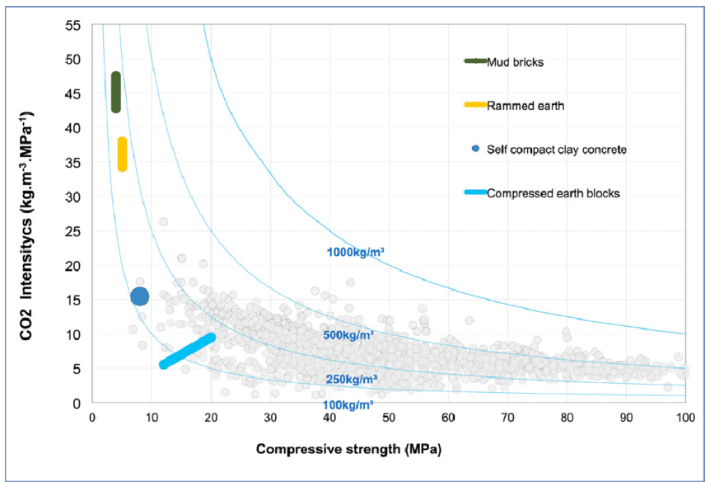
Source: Research Gate
Since the materials are local, transportation emissions drop significantly. Rammed earth also eliminates the need for drywall, insulation, and extensive HVAC systems, further reducing costs and complexity.
The passive thermal regulation built into TerraHaven designs means lower utility bills for residents.
Source: YourHome
This helps residents remain safe during heatwaves or blackouts without relying on systems requiring high amounts of energy.

Source:Georgia Blinds
For communities in wildfire zones, TerraHaven offers a safer and more durable housing alternative.
Source: Los Angeles Times
Because the walls are heat-resistant and non-combustible, the homes are more likely to survive a wildfire, reducing long-term rebuilding costs and insurance claims.

Source: DeepSky
3.2 Social and Community Impact
TerraHaven is about more than just housing. These versatile modular units can be configured into townhomes and assembled into walkable neighborhoods that instill connectedness and belonging. Shared green spaces, community gardens and solar plazas can be integrated to nurture a healthy community.
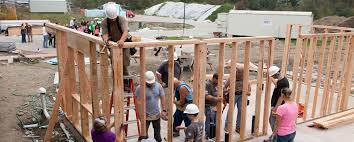
Made by local labor and easy to assemble, TerraHaven puts power back in the hands of communities. It paves the way for affordable homeownership, rebuilds communities after a disaster and guides unhoused individuals to a new level of modern living.
Source: Pacific Lutheran University
The Tesseract
4.1 What is A Tesseract
The Tesseract is a new clean energy source that reliably and sustainably powers TerraHaven homes using a combination of two already existing renewable technologies, solar panels and miniature wind turbines. Standard solar set-ups rely on daylight hours to generate power but with the Tesseract, solar and wind power are collected for a significant increase in power generation - day and night, in all seasons and weather conditions. I developed the Tesseract a few years ago for a different project but want to use it for my solution for this challenge.
4.2 How It Works
This hybrid approach allows the Tesseract to deliver consistent electricity, even during cloudy days or calm nights when solar panels alone would be less effective.

The miniature wind turbines are compact and quiet, designed specifically for residential rooftops or nearby outdoor spaces, working alongside the solar arrays without requiring large installations.

Source: Statista
The system is sized to completely power an average TerraHaven home's electrical needs such as lighting, appliances, air conditioning and charging electronics, and greatly reduces or completely eliminates reliance on the outside electric grid. It is modular, which means it can be sized to the owner's needs and site constraints.
Source: New Atlas
4.3 Effectiveness
One of the best parts about the Tesseract is its quick ROI. Solar Panel systems typically take 10 years or more to recoup their initial costs, but due to the Tesseract's more efficient solar/wind hybrid technology the ROI period shrinks to around 5 years. By making clean energy more available and affordable to low and moderate income families the Tesseract has the potential to decrease long term living costs and promote energy independence.

Source: Paradise Energy Solutions
Beyond affordability, the Tesseract contributes to environmental sustainability by producing zero emissions during operation and reducing reliance on fossil fuels.

Source: Vox
In wildfire-prone areas like Los Angeles, this clean energy system supports a safer, more resilient lifestyle by enabling homes to maintain power during grid outages and reducing carbon footprints.
By integrating the Tesseract with TerraHaven’s rammed earth homes, the combined solution addresses both housing affordability and energy resilience, paving the way for a sustainable, equitable future.
Sketching
5.0 - Sketching
5.1 Rooms
First, I made a list of rooms that needed to be included in the design, and split them into the ones I wanted on the first floor and the ones I wanted on the second floor.
First Floor
- Kitchen
- Dining Room
- Living Room
- Laundry
- 0.5 Bathrooms
Second Floor
- 2 Bedrooms
- 1 Bathroom
5.2 First Floor Sketch
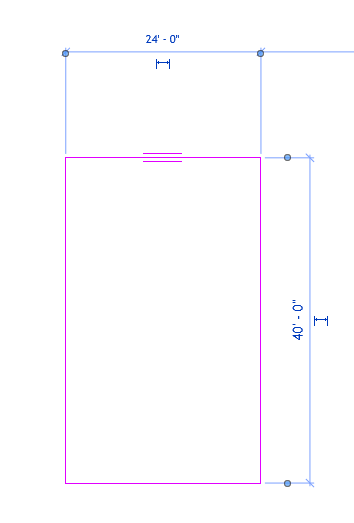
Then, I started sketching the first floor, and the dimensions I chose were 24 feet by 40 feet, which equated to around 1920 square feet, when accounting for both floors.

5.3 - Second Floor Sketch
Lastly I sketched the 2nd floor, which was built to the same exterior dimensions as the first floor to save space.

Designing in Revit
6.1 Defining levels
I chose a floor height of 9 feet, as it's a common standard in many homes and allows the staircase to fit seamlessly within my floor plan.

6.2 Defining First Floor Outline
6.3 Adding exterior walls (8 inch thick)

6.4 Adding interior walls(5 inch thick), stairs, doors, and windows

6.5 Defining 2nd Floor Boundaries

6.6 Adding 2nd Floor Exterior Walls

6.7 Adding 2nd Floor Interior Walls, Doors, Windows, and Railings
6.8 Final 3D View

Revit: Final Floor Plan
7.1 First Floor
This is the final design for the first floor.

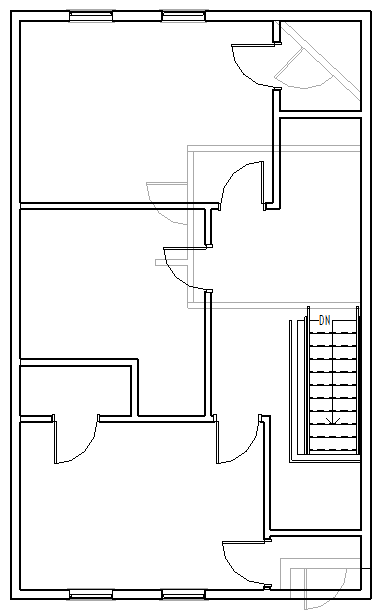
7.2 Second Floor Plan
This is the final design for the second floor.

Both of these designs reflect the sketches with the separation of rooms between the first and second floor.
Rendering and FEA(Finite Element Analysis)
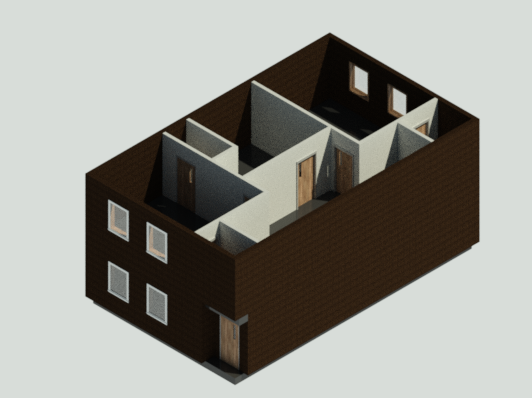
8.1 Rendered Views
Here are some rendered views of my proposed TerraHaven home.


8.2 FEA - Purpose of Analysis
To ensure TerraHaven homes can withstand both vertical loads and lateral stresses from seismic activity and environmental forces, I conducted a Finite Element Analysis (FEA) on the rammed earth wall system. FEA is a powerful computational tool that breaks a complex structure into small elements, allowing us to simulate real-world conditions like weight, stress, and deformation. This method helps verify the strength, stability, and resilience of the design before physical construction, especially when using unconventional materials like rammed earth.
8.3 FEA - Analysis Setup
The model used for simulation represented a single structural module of TerraHaven—a segment of both exterior and interior walls, including their junction points. I defined material properties based on high-end stabilized rammed earth with a compressive strength of 800 psi, density of 130 lb/ft³, and Young’s modulus of 1,000 MPa. Boundary conditions were applied to simulate the foundation's fixed base, and loads were introduced representing roof dead load, live load, and lateral forces such as wind or earthquake shear.
8.4 FEA - Results and Interpretation
The FEA showed uniform stress distribution along the base and corners of the wall, which was expected due to load concentration, but all values remained well below the material’s failure threshold. Maximum stress occurred near door and window openings, prompting minor design refinements like arch supports and reinforced lintels. Deflection across all areas remained under 0.2 inches, demonstrating excellent stiffness and structural integrity even under simulated seismic loads.
These results confirm that TerraHaven’s rammed earth construction not only meets structural safety criteria but also maintains its shape and strength under real-world conditions. This simulation reinforces the design’s capacity for long-term durability in environments like Los Angeles, where earthquakes, high heat, and wind loads are significant concerns.
Preparing to Build
I wanted my physical model to be as close to the real product as possible, so I decided to create a model out of rammed earth material.
Each of the following components were designed in Autodesk Fusion.
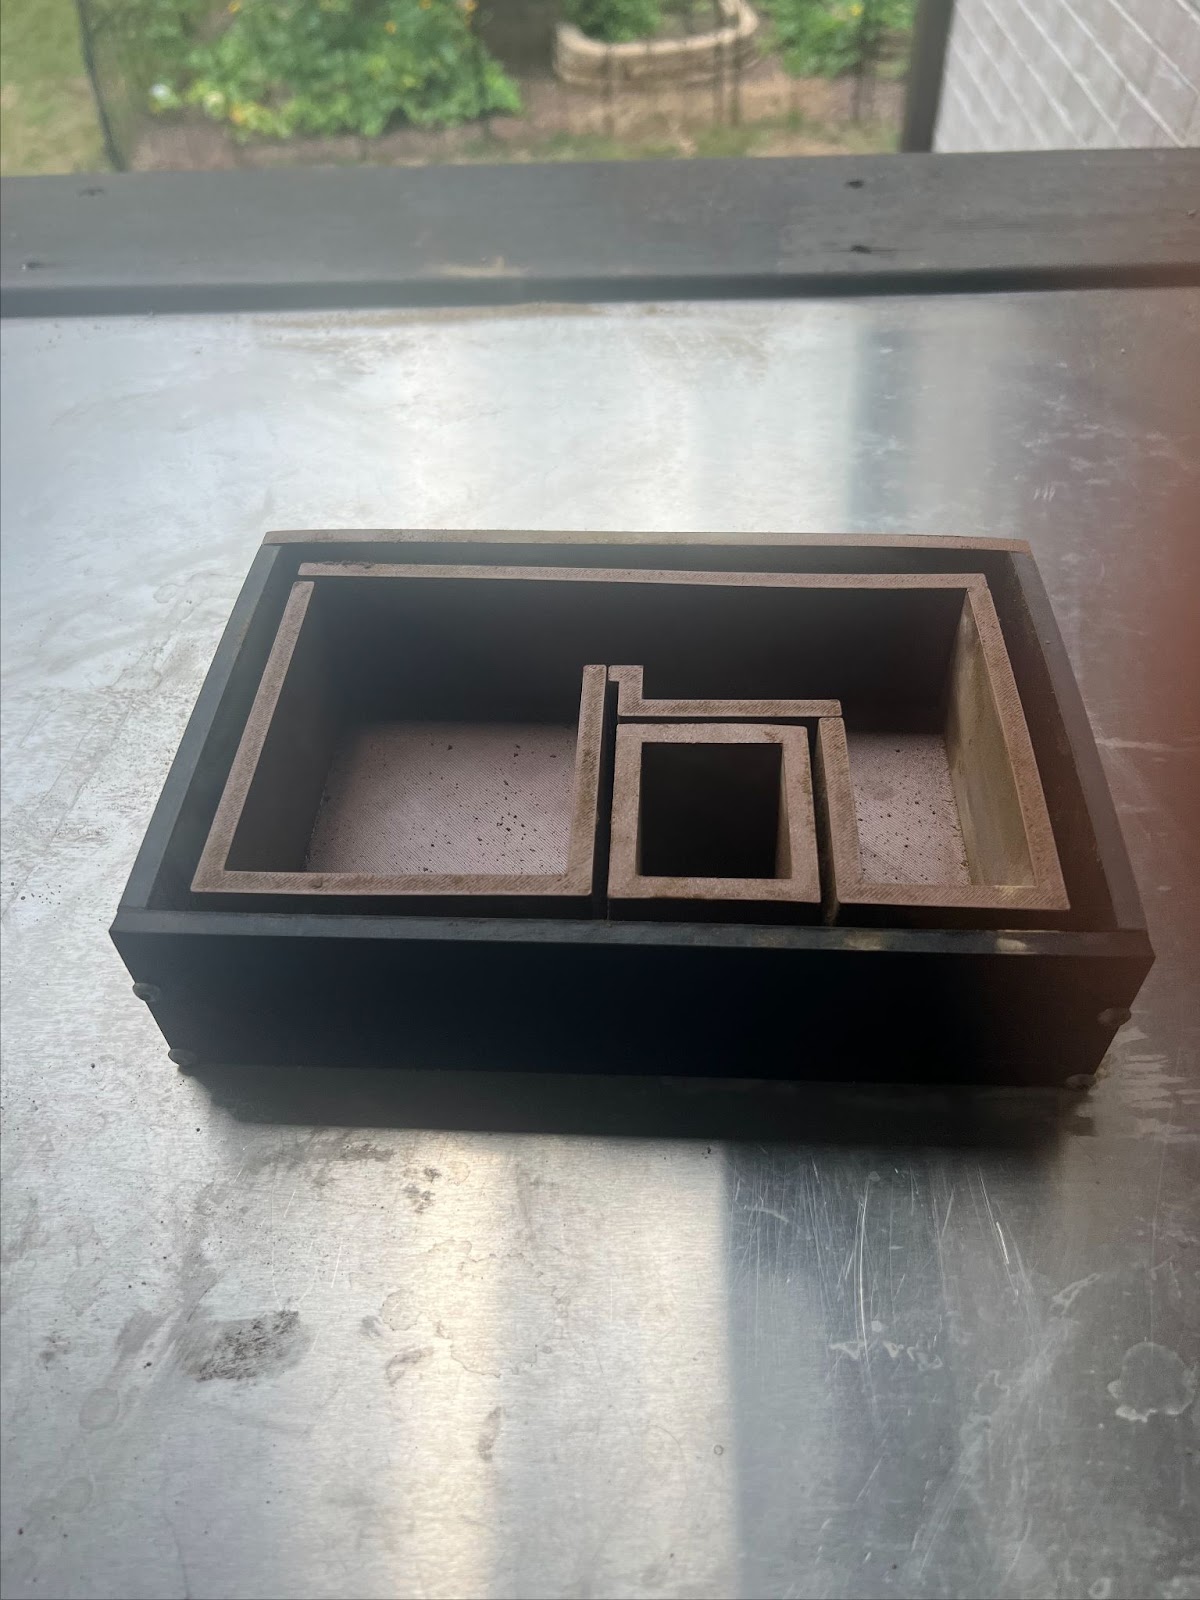
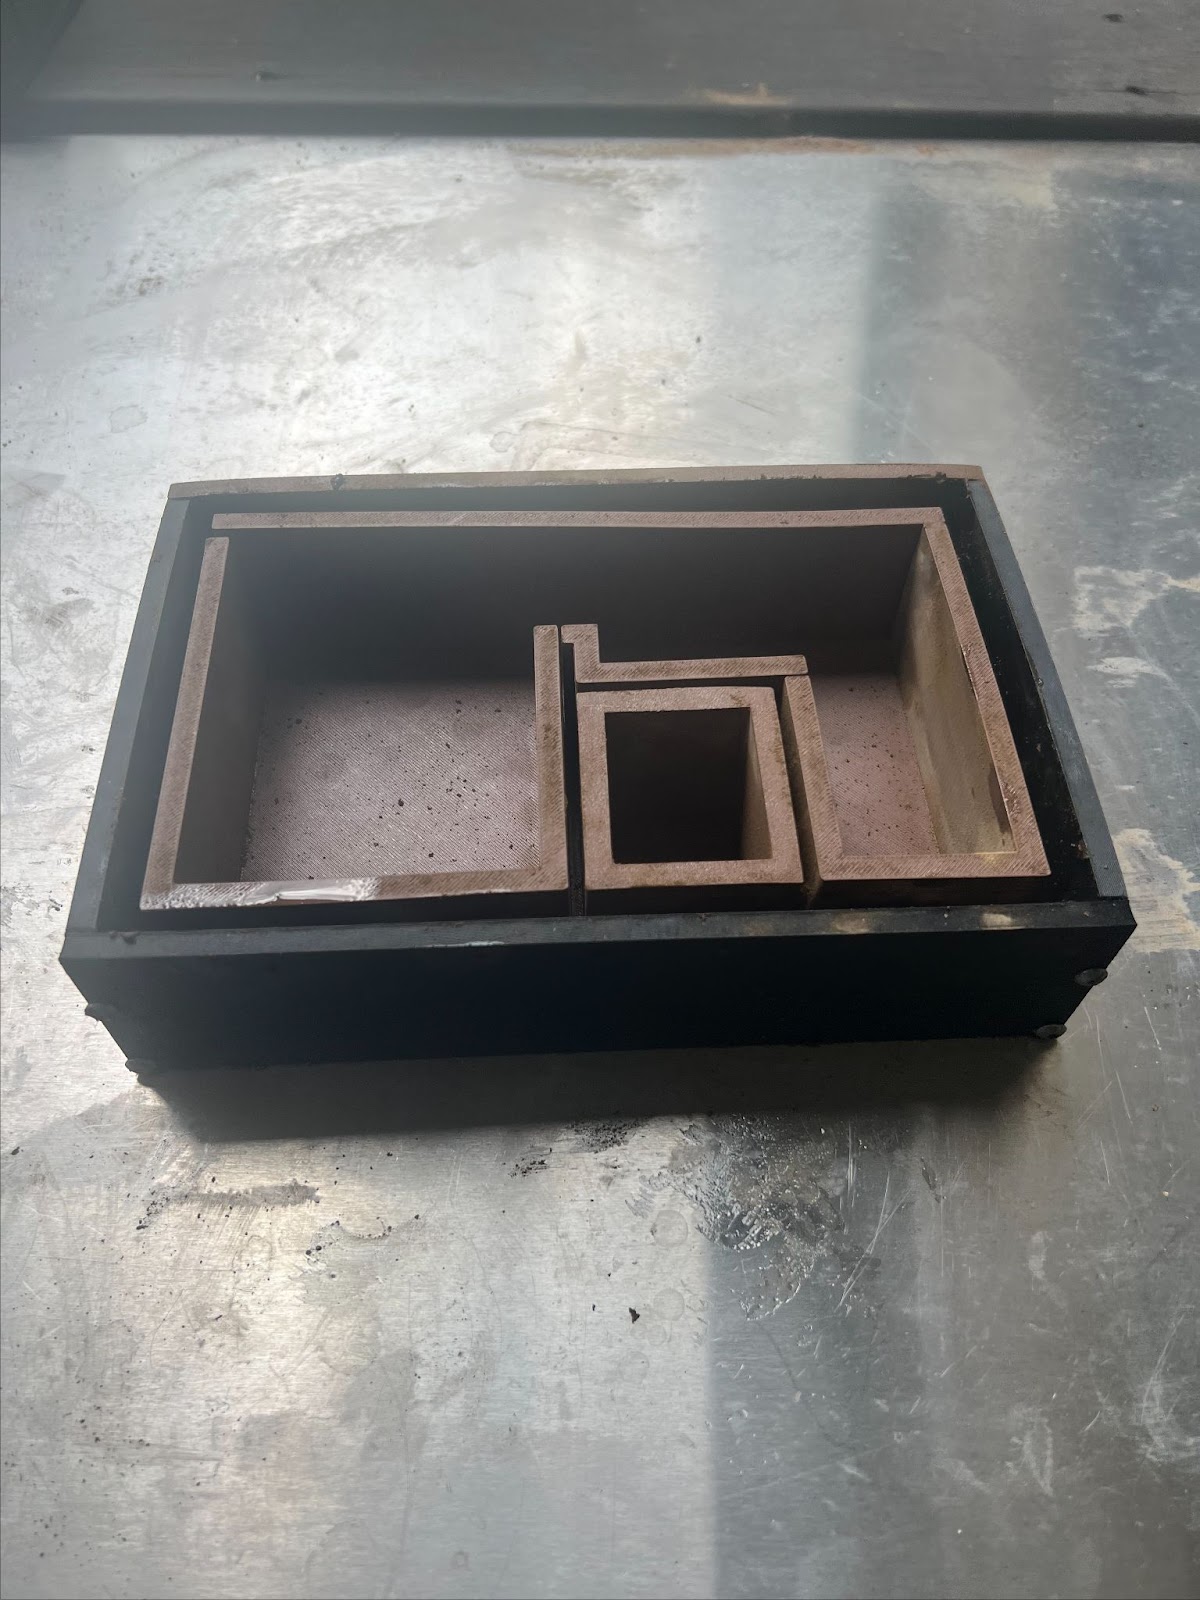
9.1 Designing the Mold - First Floor
I designed a mold of the floor plan for the first floor, where the rammed Earth will be shaped and dried.

Holes were added on the sides to be able to remove the panels, for easy extraction of the product. This way I could screw the panels together and unscrew when done.

Additionally, the interior mold walls are separate removable pieces with the flooring having slots to hold each individual piece.

All of these allow the finished product to be easily removable when done.
9.2 Designing the Mold - 2nd Floor
I designed another mold to go with the 2nd floor floor plan.

I did the same thing for the 2nd floor mold, I added screw holes to the side of the outside walls and made the interior mold walls separate pieces with the flooring having slots to hold them.

The interior walls in the mold are slightly larger than to scale to increase sturdiness, as the model is extremely small compared to the actually size.
9.3 Designing the Roof
I designed a standard hip roof to be glued on top of my finished model.
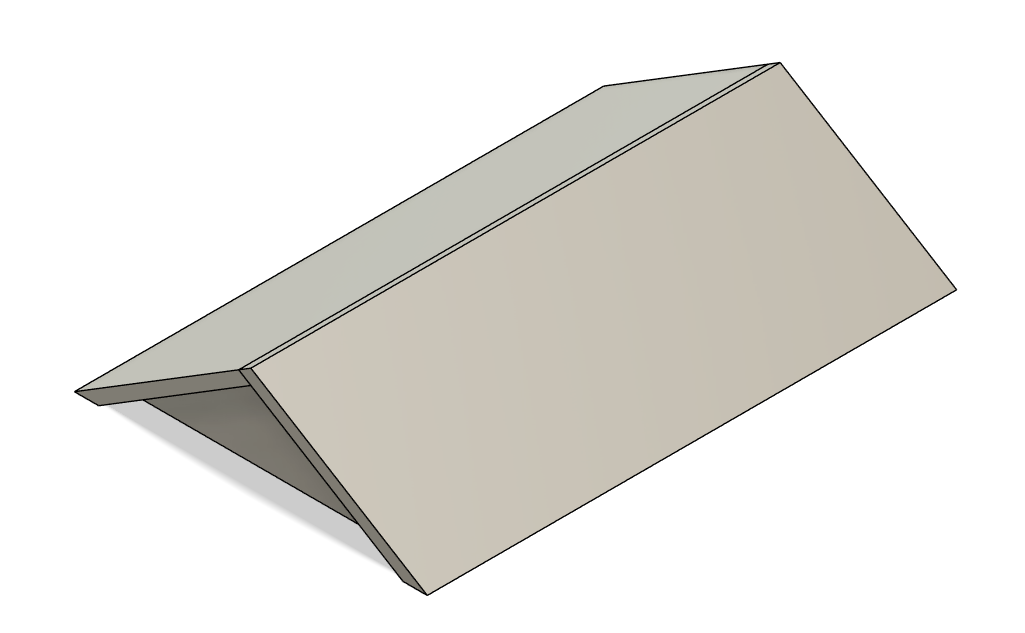
The roof was made from 4 separate panels that could be printed and attached easily.
9.4 Designing A Model Tesseract
I also designed a miniature static model of a Tesseract unit to install on the house when finished.
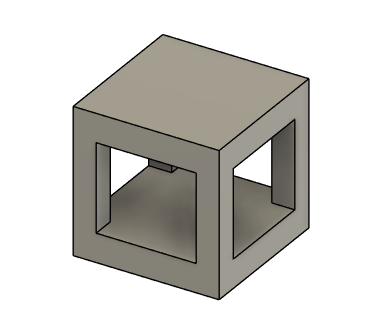
Dimensions were 1 inch by 1 inch by 1 inch.
Building the Model
10.1 Preparing the Mold
First, I printed out the first floor mold and assembled it.
10.2 Coating in Non-Stick
Then, I coated each surface of the mold with cooking oil to prevent stickage.
10.3 Creating and Pouring the Mixture
Then I created a mixture of 65% clay, 25% sand, and 10% cement, and poured it into the molds, before pouring water onto the sand. The water is meant to activate the cement to hold the whole mixture together. I only poured about ¾ of the outer wall to leave an opening into the first floor to view inside. I added stoppers around where I wanted the opening to block the mixture from spilling inside.
10.4 Removing the Product
After waiting 24 hours I removed the outer layer of the mold, and the first floor was ready. I added some tape to the model to keep it together while building.

10.5 Repeating, Flooring, Ceilings, and Roofing
Steps 10.1-10.4 were repeated, this time using the 2nd floor mold to shape the house. This time, for the 2nd floor, I did not leave an opening on the side. Then I stacked the 2nd floor atop the first. I used 3D printed PLA panels as the flooring as rammed earth flooring in such a small scale model would not be structurally sturdy, though full scale rammed earth houses could incorporate rammed earth flooring as well. I also printed out all 4 roof panels, assembled them into the roof, and glued it onto the model house.

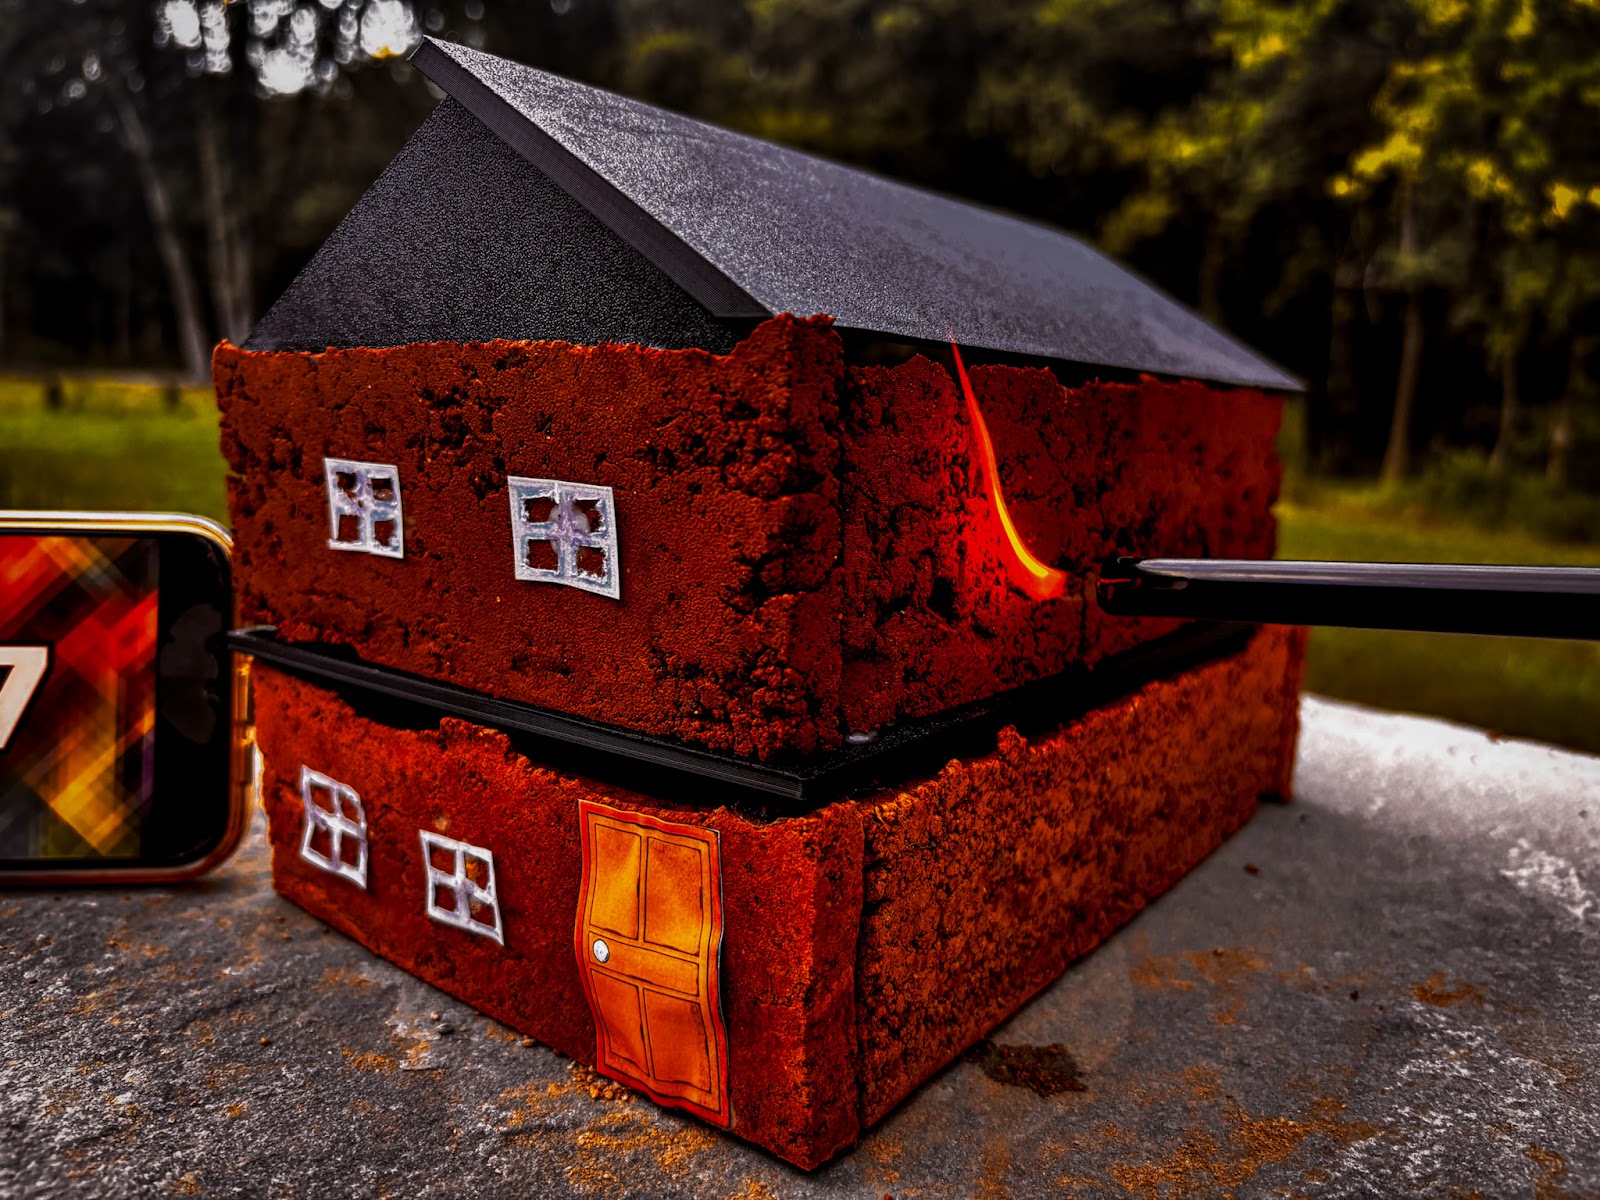
10.6 Detailing
For detailing I glued images of the door and windows to improve realisticity. I also printed out the miniature Tesseract models and stuck them atop the house. I then added some background decor.

Note: As the rammed earth model walls were constructed small scale, with an expedited timeline, some cracking occurred in walls but did not impair the structural integrity of the model. This would not happen in a full-scale home.
Testing the Model
11.1 Defining Metrics For Success
The primary thing I needed to test in my model was fire resistance, as the house was developed to be able to resist wildfires in L.A.
To conclude if my model was fully fire-resistant, I first needed to define what exactly fire resistance meant. After conducting some research, I stumbled upon the industry standards for determining the fire resistance of structural components, these being the ASTM E119 (or its equivalent UL 263) standard, created by the NFPA (National Fire Protection Agency). ASTM E119 is a widely recognized standard test method used to determine the fire resistance of building elements like walls, floors, and roofs. It assesses how long these elements can withstand exposure to fire without losing structural integrity or compromising their ability to contain fire. The standard involves subjecting the building element to a controlled fire exposure, gradually increasing in temperature according to a specific time-temperature curve, and observing its performance against defined criteria.
1. Structural Integrity (Load-Carrying Ability)
Requirement: The tested element must support the applied structural load throughout the test duration without collapsing.
Applies to: Load-bearing elements like floors, beams, and columns.
Failure occurs if: The element deforms excessively or collapses under load during or immediately after the fire test.
2. Integrity (No Flame or Hot Gas Passage)
Requirement: For assemblies like walls and floors, flames and hot gases must not pass through the assembly.
Test method: Observers check for visible cracks, sustained flaming on the unexposed side, or cotton pad ignition.
Failure occurs if: Sustained flaming occurs on the unexposed side or gaps allow flame/hot gas to escape.
3. Thermal Insulation (Temperature Rise Limitation)
Requirement: The temperature rise on the unexposed (cold) side of the test specimen must stay within specified limits:
- Average temp rise: ≤ 250°F (140°C).
- Max single-point rise: ≤ 325°F (181°C).
- Failure occurs if: These temperature thresholds are exceeded.
4. Test Duration and Rating
Requirement: The test assembly must maintain all of the above performance measures for the entire specified time (e.g., 1 hour, 2 hours, 4 hours).
The resulting fire-resistance rating (e.g., “2-hour rated wall”) corresponds to the maximum duration it withstood the test.
5. Standard Time-Temperature Curve
The fire exposure follows a standard furnace curve, increasing temperature over time to simulate building fire conditions:
- ~1000°F (538°C) at 5 min
- ~1700°F (927°C) at 1 hour
- ~2000°F (1093°C) at 3-4 hours
11.2 Testing the Model
Though I was not able to recreate the ASTM E119 testing conditions in my own home. I was able to conduct my own test to prove the fire-resistance of my model using a lighter, which was to be held for long periods of time against the model.
Typical butane lighters burn at around 1125 degrees fahrenheit, or 607 degrees celsius. This value corresponds to around 15 mins in the ASTM E119 Standard Time-Temperature Curve to simulate a real wildfire.
I held the lighter to the model for around 15 mins and unsurprisingly, the model was fine. Additionally the model was able to maintain structural integrity the entire duration of fire exposure, there was no sustained ignition on the unexposed side, and though the model exhibited visible cracks, it was not due to fire exposure, meaning my model passed 3 out of 5 criteria for success in ASTM E119, as I did not have the capacity to test the other 2 with my current environment and resource capacity.


Here is a video showing the fire testing.
LEED Certification
To ensure my design aligned with modern sustainability and efficiency standards, I chose to evaluate it using the LEED (Leadership in Energy and Environmental Design) certification framework. LEED is a globally recognized system that measures the environmental performance of buildings based on categories like energy use, material selection, water efficiency, and indoor environmental quality.
Throughout the design process, I focused on strategies that aligned with LEED criteria, such as using rammed earth for low embodied carbon, integrating the Tesseract system for renewable energy generation, and designing for natural lighting and ventilation to reduce operational energy demand. Additionally, I prioritized local material sourcing, low-flow fixtures, and landscape features that help manage stormwater runoff and promote biodiversity.

After compiling all components of my project like my site plan, energy systems, material choices, and sustainable strategies. I submitted the design for a simulated LEED evaluation. Based on the criteria met across the major LEED categories, my design received a final score of 104/110 points, qualifying it for the Platinum certification level (Certification is defined as, Silver, Gold, or Platinum).
This certification not only validated the environmental responsibility of my design but also confirmed that affordable housing can be sustainable, efficient, and scalable without compromising on resilience or quality.
Cost Analysis
13.1 Defining Metrics for Success
Evaluating the financial feasibility and cost-effectiveness of the TerraHaven housing solution is critical to validating its potential impact. Success is measured by comparing the total construction and outfitting costs of TerraHaven homes against conventional residential buildings constructed with standardized, industry-typical materials such as wood framing or concrete block. A key goal is to demonstrate significant cost reductions without compromising durability, safety, or livability.
To achieve this, a detailed material quantification and cost estimation was performed, incorporating the unique characteristics of rammed earth construction, along with realistic appliance and system costs necessary for fully functional residential units.
13.2 Material Cost Assessment
The primary material expense centers on the volume of rammed earth required for both the structural walls and flooring. Precise dimensional analysis was conducted based on the building design specifications:
- Exterior walls: Approximately 1,540 cubic feet of rammed earth, based on the measured perimeter length, height (9 feet), and thickness (5.5 inches converted to feet).
- Interior walls: Approximately 350 cubic feet, accounting for partition walls of the same thickness and height.
- Summing these components, the total volumetric requirement of building materials is approximately 1890 cubic feet (walls plus flooring).
Based on extensive market research and industry sources, the cost of rammed earth material, including stabilized soil mixes with cement additives, is estimated at approximately $6.00 per cubic foot. This figure reflects a conservative, high-end estimate inclusive of raw materials, stabilizers, formwork usage, and onsite processing.
Multiplying the material volume by unit cost yields a total material cost estimate of $11,340 for the entire structural envelope and floor slab.
13.3 Appliance and Systems Cost Assessment
Transforming the raw structure into a fully functional, livable home requires the installation of essential household systems and appliances. The following appliances were selected based on commonly available low-to-mid-range market options, optimized for affordability and energy efficiency:
- Refrigerator: $1,000
- Oven (electric or gas): $700
- Microwave: $150
- Dishwasher: $500
- Washing machine: $700
- Clothes dryer: $600
- Tankless water heater: $800
- HVAC system (heating, ventilation, and air conditioning): $4,000
- Ceiling fans and lighting fixtures: $300
The aggregated cost of these essential appliances and systems totals approximately $8,750.
When combined with the material costs, the total estimated cost for constructing and equipping a TerraHaven home is approximately $20,110.
13.4 Considerations and Exclusions
It is important to note that the above calculations do not include a number of additional expenses commonly incurred in residential construction projects, such as:
- Land acquisition costs, which vary significantly based on location and zoning.
- Building permits and fees, which depend on municipal regulations and environmental assessments.
- Labor costs, including skilled and unskilled construction workers, equipment operators, and site supervisors.
- Site preparation and foundation work, including excavation, grading, and drainage.
- Utility connections, including water, sewer, electricity, and communications infrastructure.
- Finishing materials and interior design, such as flooring finishes, cabinetry, paint, and trim.
Despite these exclusions, the estimated $26,000 figure represents a fraction of the total cost for traditional homes of comparable size and functionality. Typical conventional construction often ranges between $150,000 to $350,000 or more, depending on region and specifications.
This contrast highlights the cost efficiency and scalability of the TerraHaven system, indicating strong potential to significantly reduce barriers to homeownership and affordable housing development.
Feedback From Experts
14.1 Civil Engineer Feedback
I was able to get in contact with a civil engineer from my area, who has chosen to remain anonymous. He gave me some valuable feedback that I was able to implement into my solution. Each of these changes are not made to the model but are more as next steps to further advance the integrity of the design. Here is a list of the feedback he gave me:
- Low Tensile Strength: Susceptible to cracking under tension or seismic activity, often requiring reinforcement.
- Moisture Vulnerability: Without proper sealing or maintenance, walls can erode or weaken when exposed to prolonged moisture.
- Insulation Challenges: Provides poor thermal insulation compared to modern materials, requiring additional insulation in extreme climates.
- Limited Design Flexibility: Best suited for simple, straight-walled designs, limiting architectural complexity.
14.2 Low Tensile Strength and Seismic Resistance
Rammed earth naturally excels in compression but performs poorly under tension, making it vulnerable in seismic regions like Southern California. To combat this, I embedded horizontal and vertical reinforcement systems into the structure using recycled steel rebar and natural basalt mesh. These reinforcements are concentrated at high-stress locations—such as wall intersections, openings, and the connection between walls and roofs.
Additionally, I integrated a ductile ring beam system at the top of each wall segment. These reinforced concrete or compressed earthen bond beams allow the entire structure to flex slightly under lateral loads, dissipating energy from earthquakes without cracking. The roof is also mechanically isolated with flexible wall-plate connections that allow movement while maintaining airtightness.

This image was AI generated
To further improve seismic performance, the foundation includes isolated pier footings connected by grade beams, which anchor the walls while allowing them to move semi-independently during seismic events. The design follows best practices in low-rise seismic-resistant construction using earth materials.
14.3 Moisture Vulnerability and Water Protection
Prolonged moisture exposure can degrade rammed earth by softening or washing away fine particles, especially in unsealed walls. To protect against this, I employed a multi-layered moisture defense system that begins at the ground level:
- The foundation features a raised gravel trench base with a vapor barrier, improving drainage and separating walls from rising damp.
- Exterior walls are coated with breathable lime-based plasters which resist rainfall while allowing internal moisture to escape, preventing trapped humidity and mold formation.
- I designed wide roof overhangs and drip edges to direct rainwater away from vertical surfaces and included rain diverters for high-exposure wall sections.
- The top of the wall includes a capillary break layer, such as a water-repellent slate or polymer flashing beneath the parapet or roof edge.

This image was AI generated
In areas prone to flooding or splash back, walls can be constructed with a sacrificial bottom layer made of water-resistant stabilized earth mix, which can be repaired or replaced independently from the entire wall.
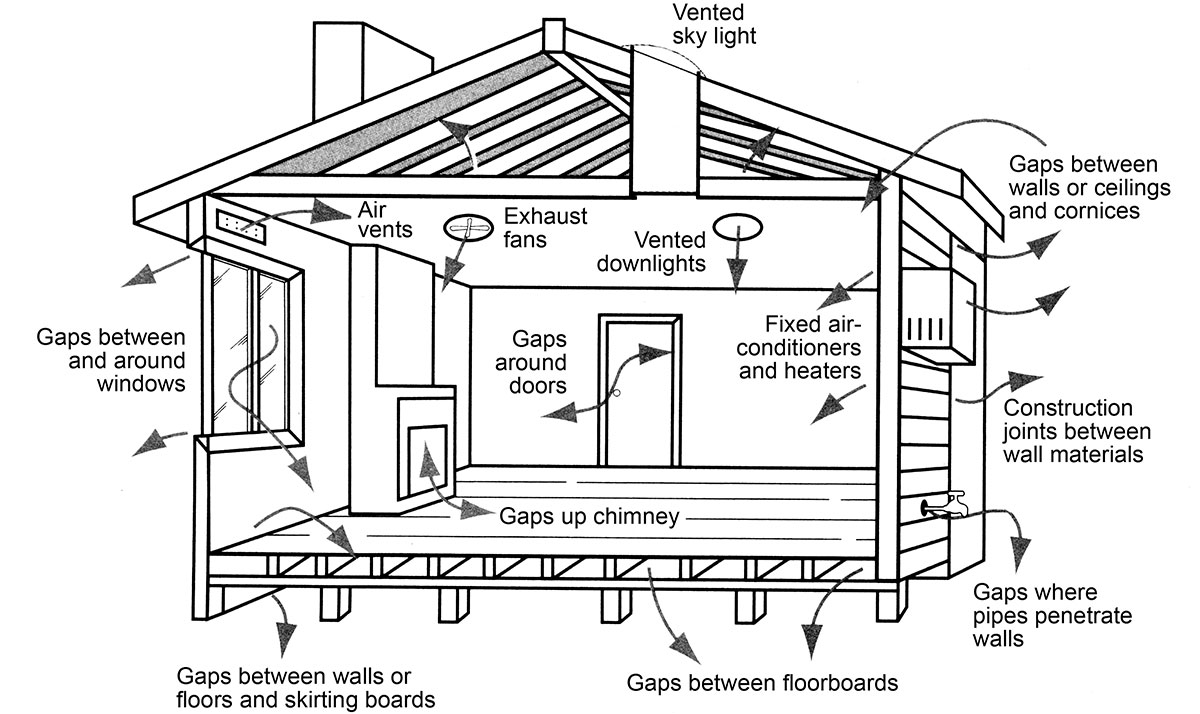
14.4 Insulation Challenges and Thermal Performance
While rammed earth has strong thermal mass properties, absorbing heat during the day and releasing it at night, it has low intrinsic insulation (low R-value), which can be problematic in temperature extremes. To overcome this, I adopted a composite wall system that enhances insulation without losing the benefits of thermal mass.
The improved wall system consists of:
- An 8-inch thick exterior structural rammed earth layer
- A 2–3 inch thick insulation core made from natural cork panels or hempcrete, selected for their high thermal resistance and sustainability
- A 2-inch interior clay or lime plaster layer, which provides finish, indoor humidity regulation, and fire resistance
This layered approach balances insulation resistance and thermal mass capacity, significantly reducing the need for active heating and cooling in Los Angeles’ hot, dry summers and cool nights. Building orientation, shading fins, and passive cross-ventilation paths are also optimized to further enhance thermal comfort and reduce energy use.
14.5 Limited Design Flexibility
The limited design flexibility in rammed earth need not be addressed as in fact, the inherent simplicity of rammed earth construction aligns well with the goals of affordability and scalability. To keep costs low and maximize accessibility, the TerraHaven housing concept intentionally prioritizes straightforward, functional layouts over complex architectural features.
Simple, rectangular designs not only reduce material waste and labor requirements but also streamline the construction process, making it easier for communities to adopt and replicate. Therefore, the architectural constraints posed by rammed earth are not a drawback in this scenario as they support the very objectives of cost-efficiency, resilience, and replicability that this project aims to achieve.
Conclusion
Through TerraHaven and the Tesseract, this project offers a sustainable, resilient, and affordable solution to Los Angeles’ housing and energy crises. By reimagining ancient construction techniques with modern engineering, TerraHaven proves that nature-based housing can meet the demands of today’s urban challenges. Rammed earth’s strength, fire resistance, and thermal performance make it especially suited for the city’s wildfire-prone and heat-exposed areas. The Tesseract complements this with a reliable, hybrid clean energy system that drastically lowers long-term costs and environmental impact.
To ensure the feasibility of the concept, a scale model of the TerraHaven unit was successfully built and tested. Physical trials confirmed the wall’s structural integrity under compression and demonstrated the material’s passive cooling benefits. Meanwhile, the cost analysis showed that homes built with locally sourced rammed earth could be constructed for 30–40% less than traditional methods—especially when townhome-style shared walls are incorporated. The Tesseract system also showed promising results, with a return on investment in under 5 years and the capacity to meet off-grid energy demands entirely.
This project is more than an idea, it’s a tested and replicable blueprint for the future of housing. With the right support, TerraHaven and the Tesseract could scale to meet the real-world needs of vulnerable communities and redefine how we live, build, and power our homes.
Recognitions
I would like to thank the following individuals and corporations for their support throughout my journey.
The civil engineer, who looked over my project and gave me valuable insights to include.
My parents, for their love and assistance throughout this project.
My sister, for her thoughtful feedback on my writing and the overall development of the project.
PolyMaker, for sponsoring filament used during the project.
Autodesk, for providing free tools under an education license, allowing me to pursue my ideas.
To the Make It Home judges, for devoting time and effort to make this competition an enjoyable experience.
Thank you for taking the time to read through my project. Countless hours were spent developing everything you see here today, and it means a lot to me to have the opportunity to share my work with you.