USB Hub Hidden Password Vault With Encryption & EEPROM Storage
by Ahmed_Ragab in Circuits > USB
2463 Views, 6 Favorites, 0 Comments
USB Hub Hidden Password Vault With Encryption & EEPROM Storage


So, Gather your most 10 important passwords and let's make a gadget to hide them in !!!
This password vault we're going to build is based on an Arduino Nano board then we'll hide it in a USB hub that's a non-suspicious daily used gadget around your desk.
We will add a reed switch to turn on the Arduino so it will need a magnet to activate to switch as an extra safety feature.
These password are stored on the Arduino's EEPROM storage so no external storage device is needed and they will be encrypted so if even someone managed to read this Arduino EEPROM data, nobody can decrypt these passwords back except you.
This password vault can be accessed using a serial terminal program or the Arduino IDE serial monitor, You can even access it using your mobile phone.
You'll be able to add/delete/change 10 passwords using this serial terminal interface.
Supplies


You don't need a lot of supplies for this project:
Just grab:
1 - An Arduino Nano (preferably not soldered so it is as slim as possible)
2 - A reed switch
3 - USB Hub (preferably with On/Off switches)
4 - Heat shrink tubing
The tools you will be using are:
1 - Soldering iron and thin solder wire
2 - Hot glue gun
and you may need to use a hot-air gun
Gather Your Code Pieces Together

In this step we download the needed library, compile and upload the code and that's it !!
If you want to dig through the code, then you can see step 6 where I am talking about many parts of the code
To upload the code you need to make sure your Arduino Nano EEPROM memory is completely cleared (All the bytes are storing 0xFF)
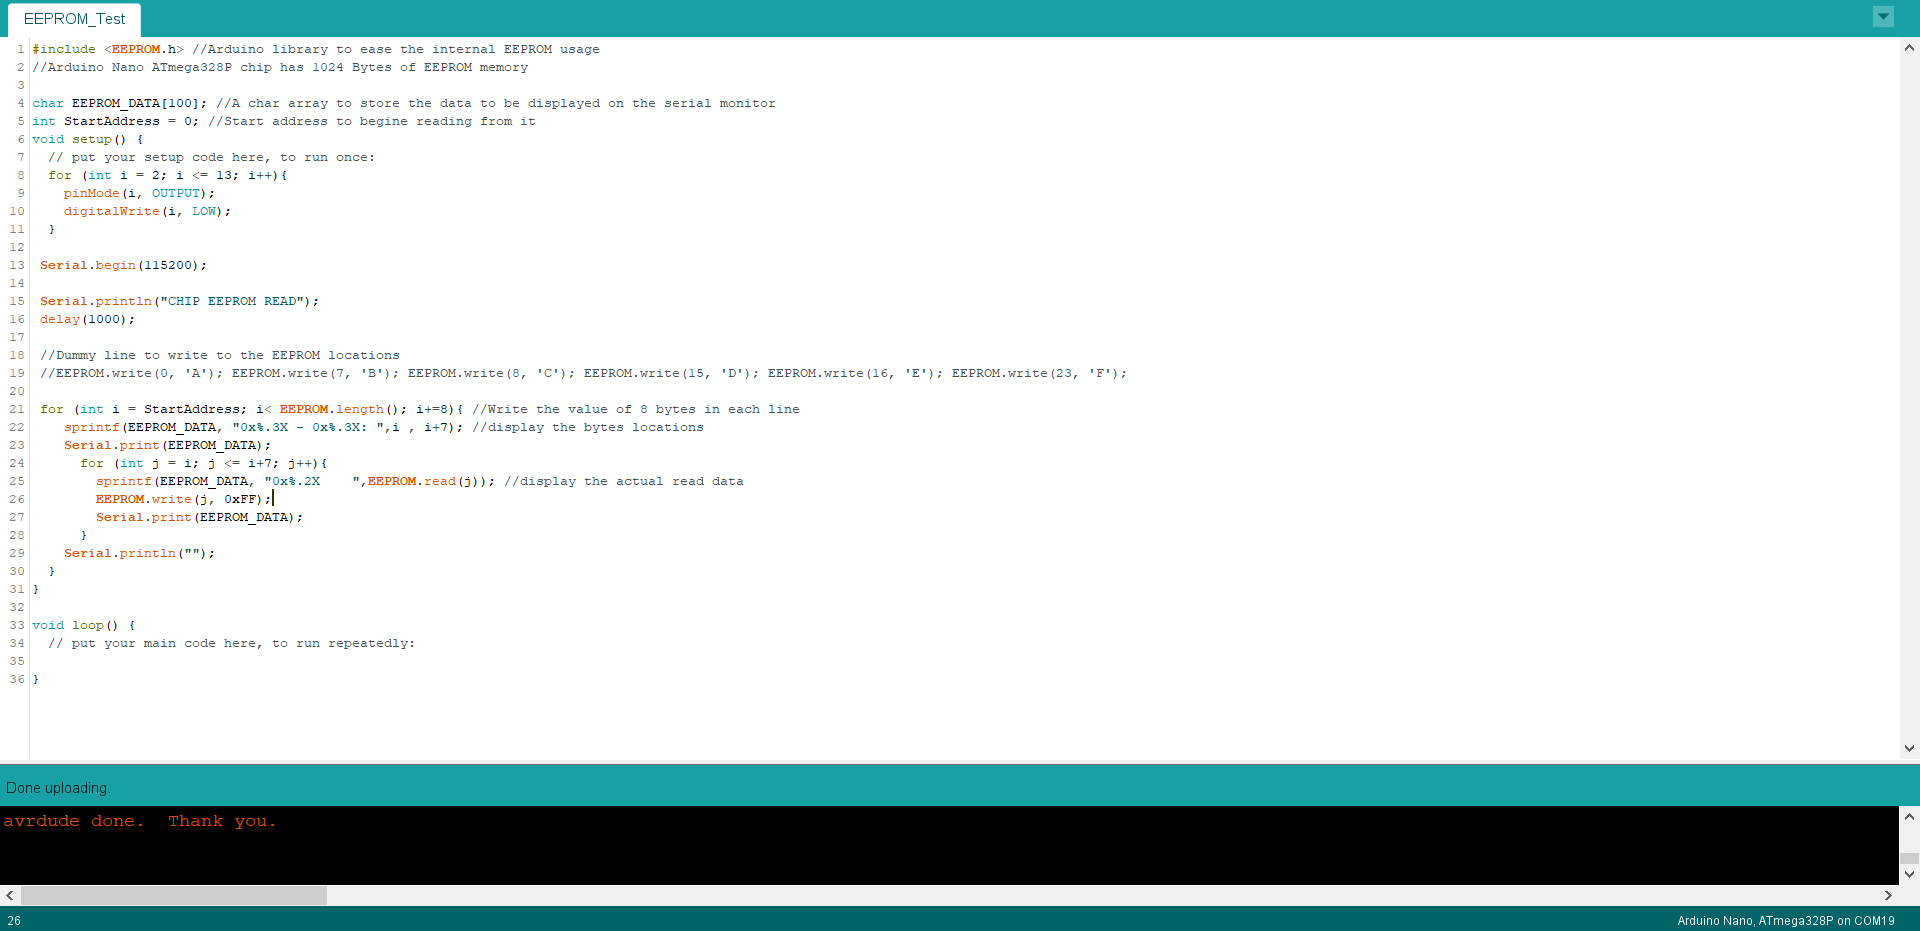
You can clear the EEPROM memory content by uploading this code
1 - For just reading the EEPROM content without clearing it, comment the line number 26 ( //EEPROM.write(j, 0xFF); )
2 - If you want to read the EEPROM content in ASCII format instead of Hexadecimal format then change line number 25 to ( sprintf(EEPROM_DATA, "%c ",EEPROM.read(j)); //display the actual read data )
#include <EEPROM.h> //Arduino library to ease the internal EEPROM usage
//Arduino Nano ATmega328P chip has 1024 Bytes of EEPROM memory


char EEPROM_DATA[100]; //A char array to store the data to be displayed on the serial monitor
int StartAddress = 0; //Start address to begine reading from it
void setup() {
  // put your setup code here, to run once:
  for (int i = 2; i <= 13; i++){
    pinMode(i, OUTPUT);
    digitalWrite(i, LOW);
  }


 Serial.begin(115200);

 Serial.println("CHIP EEPROM READ");
 delay(1000);


 //Dummy line to write to the EEPROM locations
 //EEPROM.write(0, 'A'); EEPROM.write(7, 'B'); EEPROM.write(8, 'C'); EEPROM.write(15, 'D'); EEPROM.write(16, 'E'); EEPROM.write(23, 'F');

 for (int i = StartAddress; i< EEPROM.length(); i+=8){ //Write the value of 8 bytes in each line
    sprintf(EEPROM_DATA, "0x%.3X - 0x%.3X: ",i , i+7); //display the bytes locations
    Serial.print(EEPROM_DATA);
      for (int j = i; j <= i+7; j++){
        sprintf(EEPROM_DATA, "0x%.2X    ",EEPROM.read(j)); //display the actual read data
        EEPROM.write(j, 0xFF);
        Serial.print(EEPROM_DATA);
      }
    Serial.println("");
  }
}


void loop() {
  // put your main code here, to run repeatedly:


}
Downloads
Download the Main Arduino Sketch

After downloading the Main Arduino sketch, make sure to change:
1 - key[] array at line 25 to your own 16 byte key, This key is used to encrypt and decrypt your password data
2 - devicePassword[] array at line 26 to your own password, This password is used to open the password vault and start using it over the serial terminal
Downloads
Download the AESLib Files and Upload the Code

The AESLib library by DavyLandman is very handy and simple to use to encrypt your password text into another encrypted format, you can just download the library from here.
After downloading the files make sure to extract them in the same folder that contains the " USB_Hub_Password_Vault.ino" file as you can see in the picture.
After changing the encryption key, device password and combining all files in one folder you can now compile the sketch and upload it to your Arduino.
You might as well try to start using it. See user guide at step 5
Assemble the Arduino in a USB Hub


I chose to hide it inside a USB hub because it is just a daily used gadget on my desk and a non-suspicious one
1 - After choosing which USB hub model to work with you can start opening it and assemble your Arduino in it.
The chosen USB hub should have enough space in it to fit the Arduino board, a reed switch and 4 wires for connections
2 - Choose a USB port to solder your Arduino USB interface internally to it, you will disconnect this port and it will be unusable from outside the hub
3 - Test to see if the components will fit inside and their most suitable orientations
4 - I removed the chosen USB port LED so it will appear as a broken USB port to any user
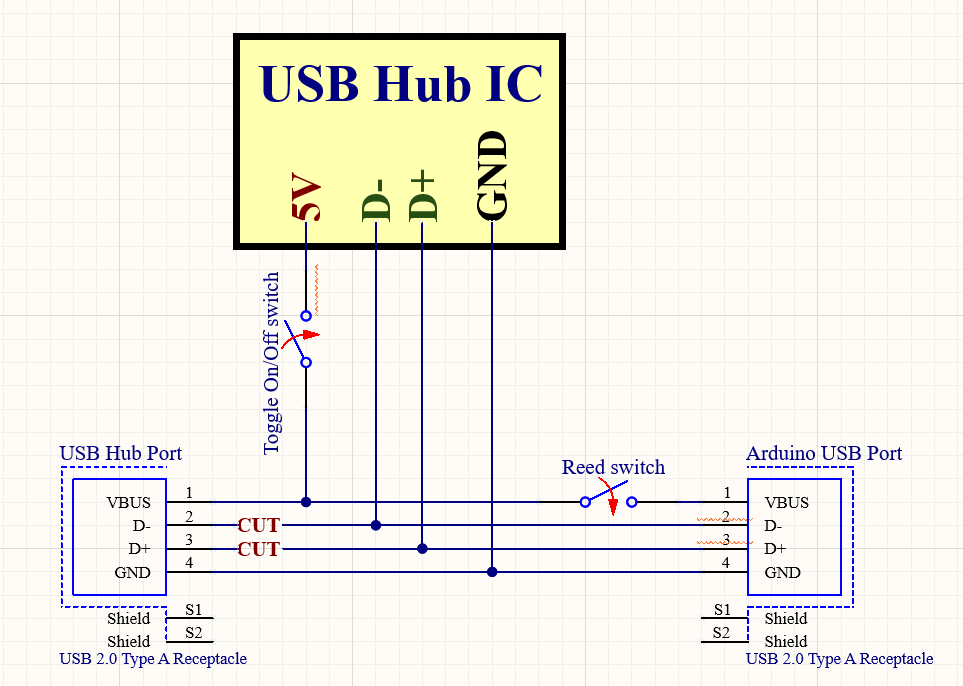
5 - Cut the D+ and D- Lines connecting the USB hub IC and the USB port
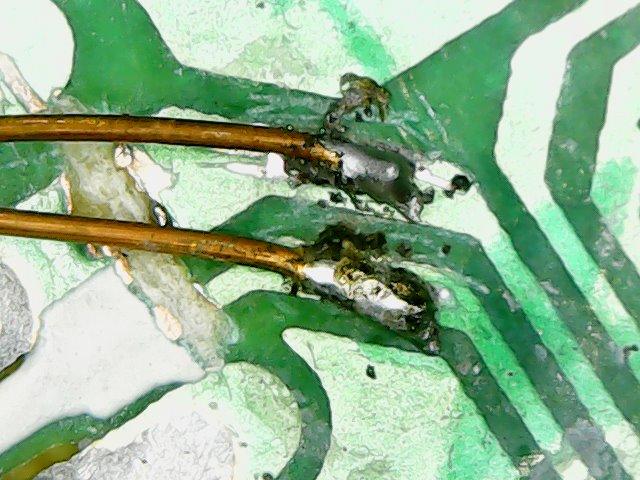
6 - Scratch these two lines (from the IC side not from the USB port side) and solder them to two enameled thin copper wires (enameled copper wires are coated with thin transparent layer of isolating material so they are isolated from each other), You will need to add some hot glue over these wires because they can break easily from their solder pads.
7 - Make sure you know which wire is D+ and which is D- (The pin closer to the 5V pin is D- and the the pin closer to the USB Ground pin is the D+)
8 - Desolder the USB Mini connector from the Arduino Nano (You might need a hot air gun for that or just a soldering iron, some solder wire and patience)
9 - Add a ground wire to the Arduino GND pin and solder it to any ground point on the USB hub, then solder the USB port enameled wires to the USB pads on the Arduino
10 - Isolate the Arduino Nano using electrical tape but keep the 5V pin out of the tape because we will solder the reed switch to it
11 - Isolate the reed switch terminals and be cautious when bending its terminals because the switch glass can break easily
12 - Connect one terminal to the USB port 5V pad and the other terminal to the Arduino Nano 5V pin
More about reed switches here
13 - Completely isolate the Arduino Nano using many layers of electrical tape
14 - Test if every thing is fitting inside the USB hub case, If they fit then close it and see the next step for how to use it.
The Arduino didn't fit from the first time so I had to desolder the reset button to decrease its thickness.
How to Use the Vault


PC Instructions:
1 - Connect the USB hub to your PC
2 - Turn On the chosen USB port switch
3 - Attach a magnet near the hidden reed switch (If the Arduino is not powered on yet then try moving the magnet along the reed switch or use a stronger magnet)
4 - The Arduino now should be powered on and recognized by the PC
5 - Open Arduino IDE and select the Arduino com port then open the serial monitor
6 - When serial monitor opens, Select 115200 baud rate and select Newline option next to it
7 - Now you are ready to communicate with your password vault
Android phone instructions:
1 - Your phone should support USB OTG connection
2 - Download a USB serial terminal application ( I used this one: USB Serial Console )
3 - Connect the USB hub to your phone using a USB Type A female to USB micro OTG adapter (Or to USB type C adapter depending on your phone)
4 - After turning on your Arduino using the switch and a magnet the new com port should be recognized by your phone
5 - The phone will ask you to connect device ( Click OK )
6 - Click on the gear icon at the top right corner --> Connection --> Under send menu choose Line feed code option
7 - Go back to the serial monitor and now you are ready to use the vault on your phone
Password Vault Usage Instructions:
1 - The Arduino will not respond back to any input unless you enter the correct device password (You changed it back at step 2)
2 - Enter the correct password, then the vault should respond with ("Correct Password")
3 - You can type ( L ) to list your saved password names
4 - You can type ( D ) to delete a password, the vault will ask you to enter the password name
5 - You can type ( C ) to change a password, the vault will ask you to enter the password name and the new password
6 - You can type ( A ) to add a new password, the vault will ask you to enter the password name (Max. 19 characters), the password login data/username (Max. 29 characters) and the new password (Max. 49 characters)
7 - You can type ( R ) to request a password data, , the vault will ask you to enter the password name
8 - You can type ( M ) to go back to Main menu
9 - You can type ( F ) to go back to vault password request page and close the vault
10 - Any other unrecognized character will turn the vault off and request you to enter the device password again
Software
You can totally use the device from just reading the previous steps.
This step just adds some additional information so you can understand and edit the code for this project.
1 - The ATmgea328P used in the Arduino Nano has 1024 Bytes of EEPROM memory space so I decided to divide these 1024 bytes into 10 sections each storing a single password data.
2 - Password data are divided into 5 sections:
a - (20 Bytes) for Password site or title ( Don't enter more than 19 Character ) ( Example: Facebook.com )
b - (30 Bytes) for Password login data or username ( Don't enter more than 29 Characters ) ( Example: LOGINMAIL@yahoo.com )
c - (50 Bytes) for The Actual password ( Don't enter more than 49 Characters ) ( Example: 123456789@AAbb )
d - (1 Byte) for password status byte
e - (9 Bytes) left empty for feature updates
3 - When password get saved to the EEPROM, they are not saved as they are because if someone had access to the EEPROM content, He will not be able to extract the passwords from it.
Password are encrypted using AES128 Encryption Algorithm. Read more about it here.
4 - The AES128 Encryption needs a unique key to encrypt and decrypt input data, this key is the 16 byte you should have changed in step 2
5 - Data is stored in the EEPROM after encryption and gets decrypted back when user requests it
6 - The code uses (0x00 Character) to determine the end of the saved string data to and from the EEPROM
7 - Don't forget to set the Newline option in the serial monitor because the code uses the ('\n' Character) to determine the end of a user input string
8 - The main Arduino sketch is commented as much as possible so it can be easier to understand and modify
Now I think you are ready to give this device a try, Happy hacking and don't forget to change device password and key with your own text :D