Undertale Sans Costume & Gaster Blaster Candy Bag
by dadwithtowel in Craft > Costumes & Cosplay
983 Views, 2 Favorites, 0 Comments
Undertale Sans Costume & Gaster Blaster Candy Bag

heya. … remember when?
Four years ago, we built a full Sans costume from Undertale; hoodie, bone-painted pants, paper mâché skull, and a glowing blue LED eye. With Undertale’s 10th Anniversary trending now, it felt like the perfect time to dust it off and re-animate the process as a stop-motion instructables DIY build.
But Sans doesn’t go trick-or-treating empty handed. Alongside the costume, we also created a Gaster Blaster candy bag: part skull shell, part storage pouch, and fully candy collection ready.
This Instructable will walk you through both builds:
Part 1: Sans costume (hoodie, pants, gloves, and skull head).
Part 2: Gaster Blaster candy bag.
Above is the project done in about a minute in HD quality and game ready sound effects; because no body has ever won a skeleton race, and we like creeping it real, below are the steps we took in more detail.
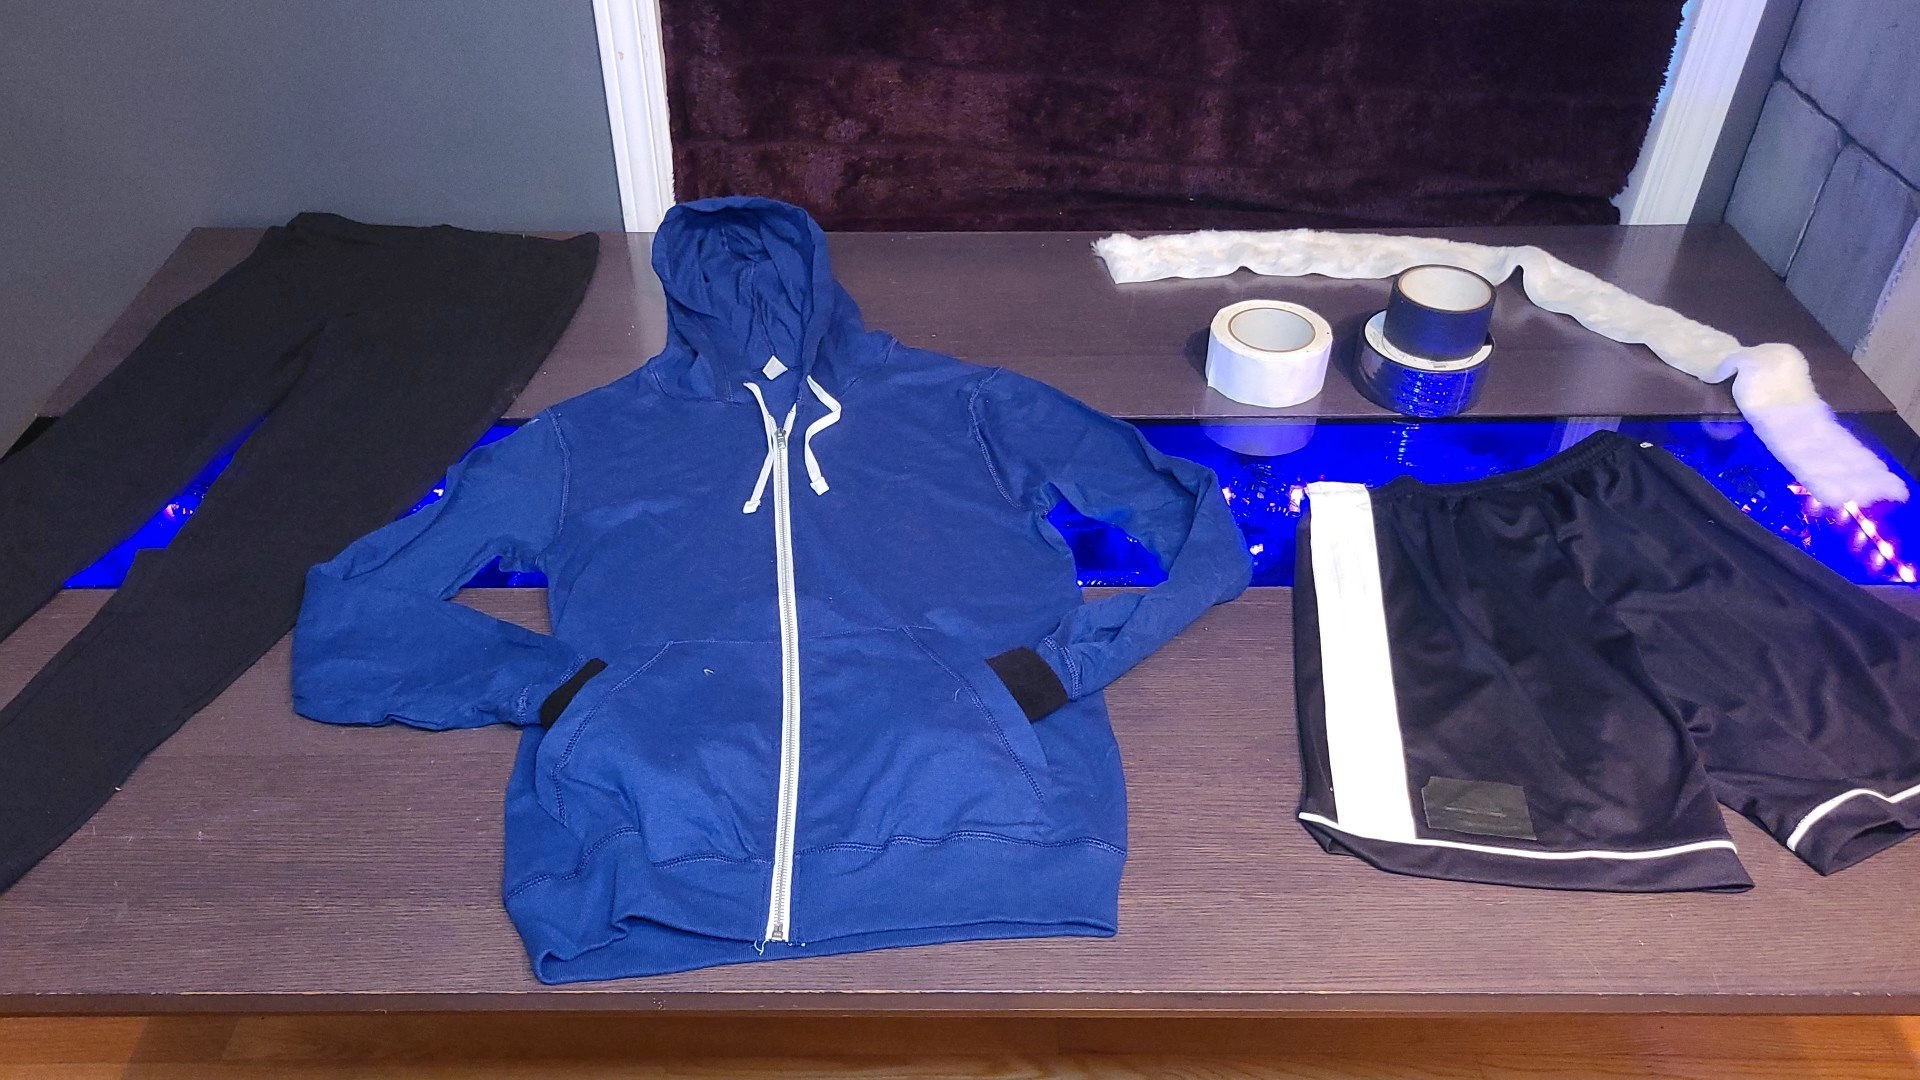
Supplies
Costume (Sans)
- Blue front zip hoodie
- Pink House slippers
- Black shorts
- Black snug fit leggings or pants
- Gloves (painted with skeleton hand bones on back)
- White faux fur strip (for hoodie trim)
- White and black gaffer/fabric tape
- Blue painter’s tape (for masking)
- White spray paint (for bone details on pants)
- Pins and sewing machine/ Needle and Thread (to attach fur trim)
- Scissors
- Measuring tape
Skull Head
- Two plastic jack-o-lantern trick-or-treat buckets
- Plastic wrap
- Packing tape
- Sharpie
- Paper strips (newspaper or printer paper)
- Flour and white glue and water (for paper mâché paste)
- Sandpaper
- Floor polish or clear sealer (Pledge, Mod Podge, etc.)
- Utility knife / craft knife (for cutting holes)
- Black mesh fabric (for eyes)
- Super glue
- Blue LED with battery (for glowing eye)
Gaster Blaster Candy Bag
- Large cardboard sheets
- Sharpie
- Glue (hot glue or craft glue)
- Black fabric (pillowcase works)
- Black poster board
- White spray paint
- Scissors / utility knife
Shorts

We discovered the fabric Gaffer tape sticks very well, so we voted to not sew it. It was a boneified experience.
Steps
- Find Black shorts
- Use black fabric tape to cover any logos on shorts
- Add white tape stripes on side
Tips
- Tape vs. Paint: If you want a longer-lasting finish, use white fabric paint instead of tape but tape gives that crisp edge and is faster.
- Washability Warning: Fabric/gaffer tape will hold for wear, but it won’t survive many washes treat these as cosplay-only shorts.
Hoodie

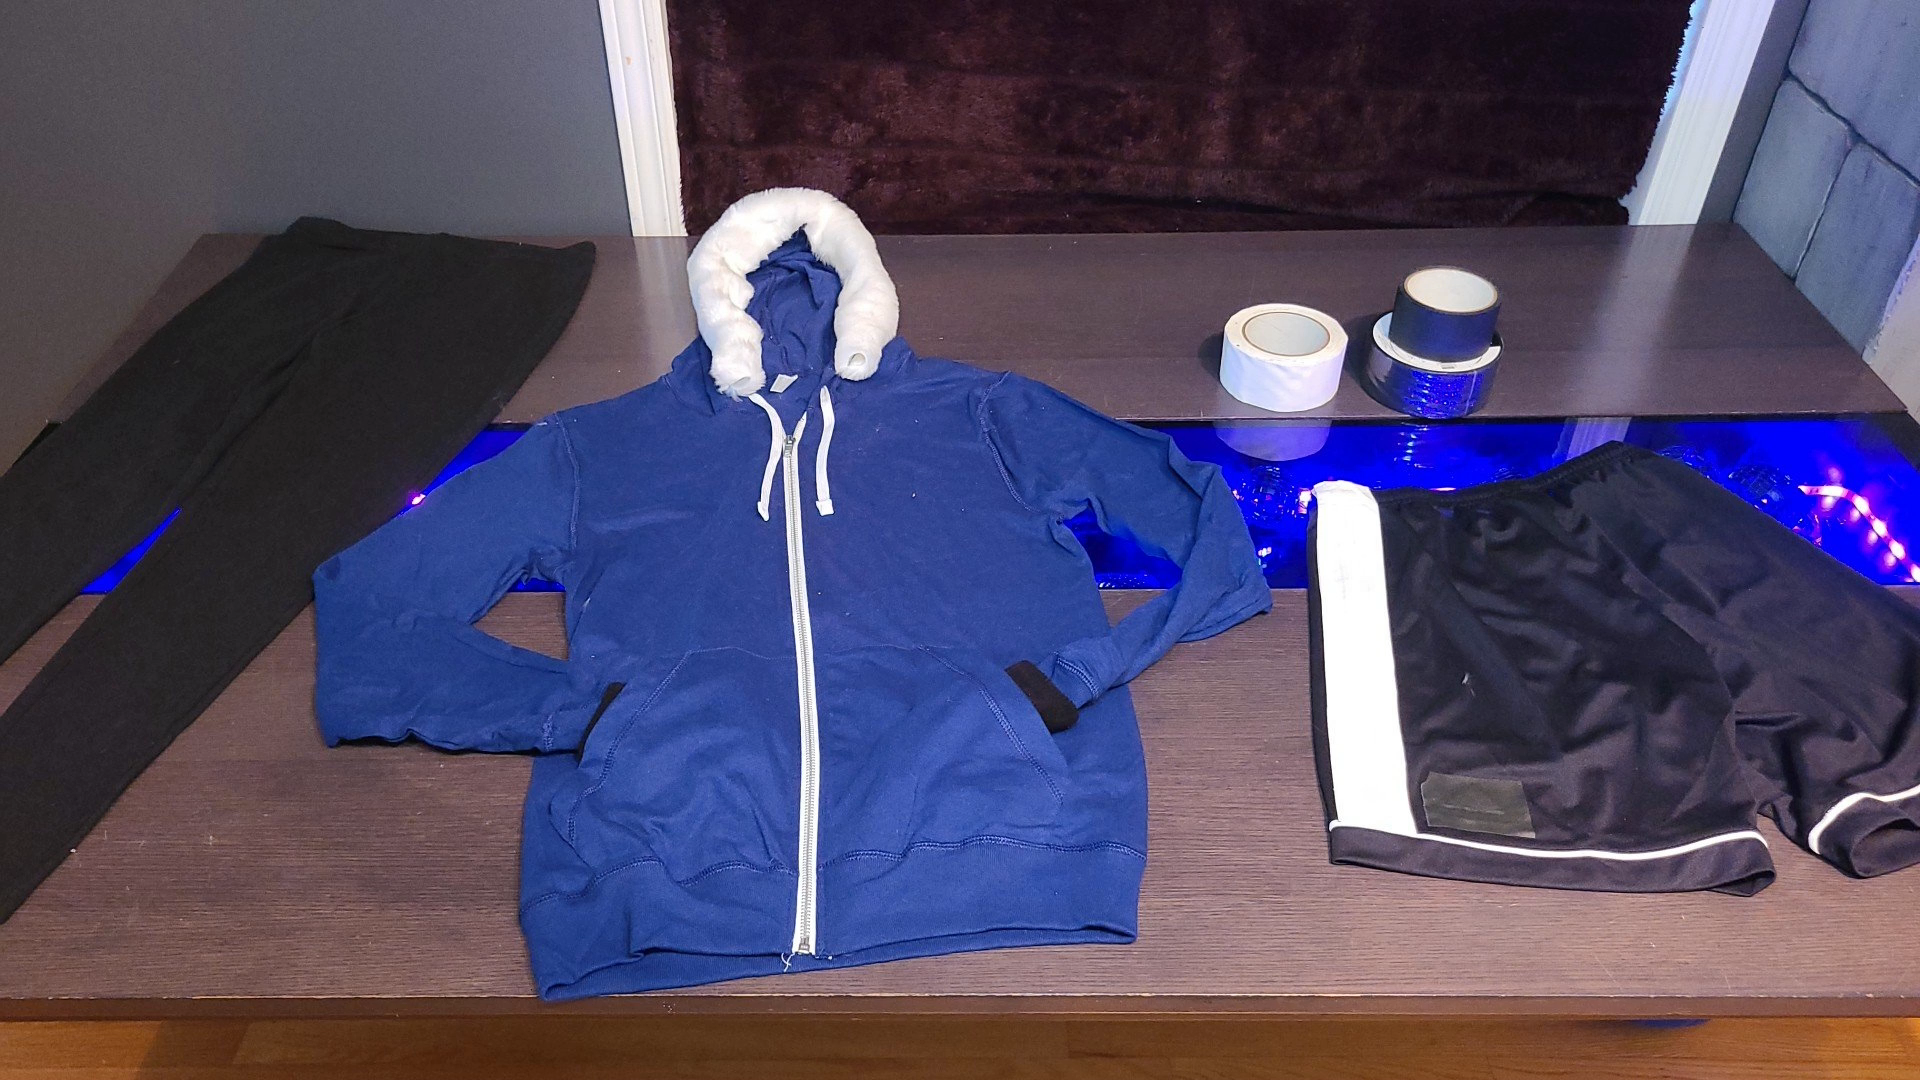
We measured the hoodie circumference and cut a piece of white fur to fit. I love this measuring tape, it rules.
Steps
- Find Blue Hoodie
- Measure hood
- Measure and cut Faux Fur
- pin in place
- sew along hood opening. (watch to not stitch over drawstring)
Tips
- Pinning: Pin with the fur pile pointing away from the stitch line so it doesn’t get caught under the presser foot.
- Sewing Machine Settings: Use a long straight stitch; shorter stitches can jam when sewing fur.
- Drawstring Safety: If the hoodie has a drawstring, pull it out or pin it safely away before sewing so you don’t trap it.
- No-Sew Option: If you don’t want to sew, fabric glue or fusible tape can hold fur trim for a cosplay piece.
Pants/Legs

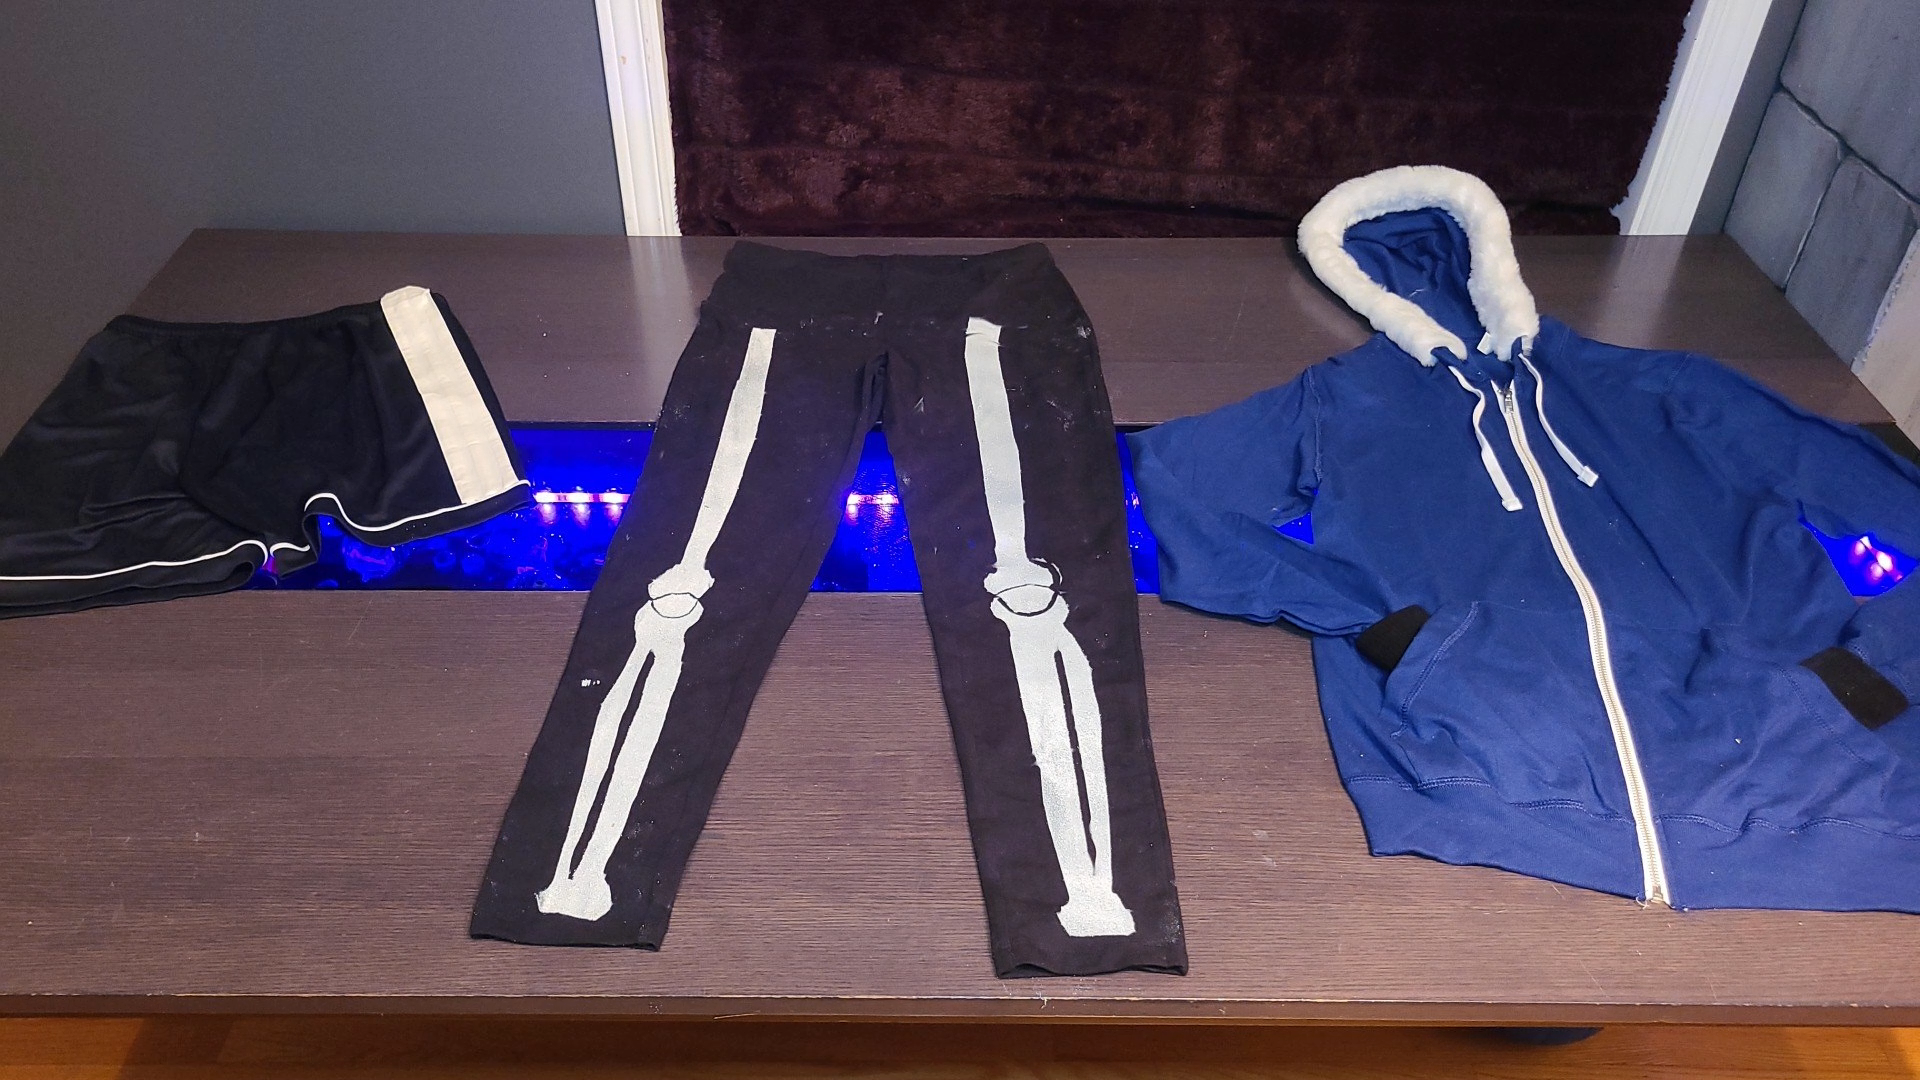
San's has exposed bare bone legs under his shorts, we masked and painted some skeletal legs onto a cheap pair of leggings. Next was the head, it was only going to be a femur steps before we were done.
Steps
- Find black leggings
- Mask black leggings with tape to leave exposed “bone” sections (shin, knee, thigh).
- Spray paint exposed areas white let dry
- remove tape to reveal skeleton bones.
Tips
- Inside Layer: Put cardboard or scrap paper inside the leggings while painting this prevents paint bleed through to the back.
- Spray Paint Choice: Look for fabric spray paint (Tulip, Krylon, or Rust-Oleum for fabric) regular spray paint can crack if the leggings stretch.
- Stretch Test: Gently stretch the leggings before painting to see how much the fabric moves it helps place bones so they look right when worn.
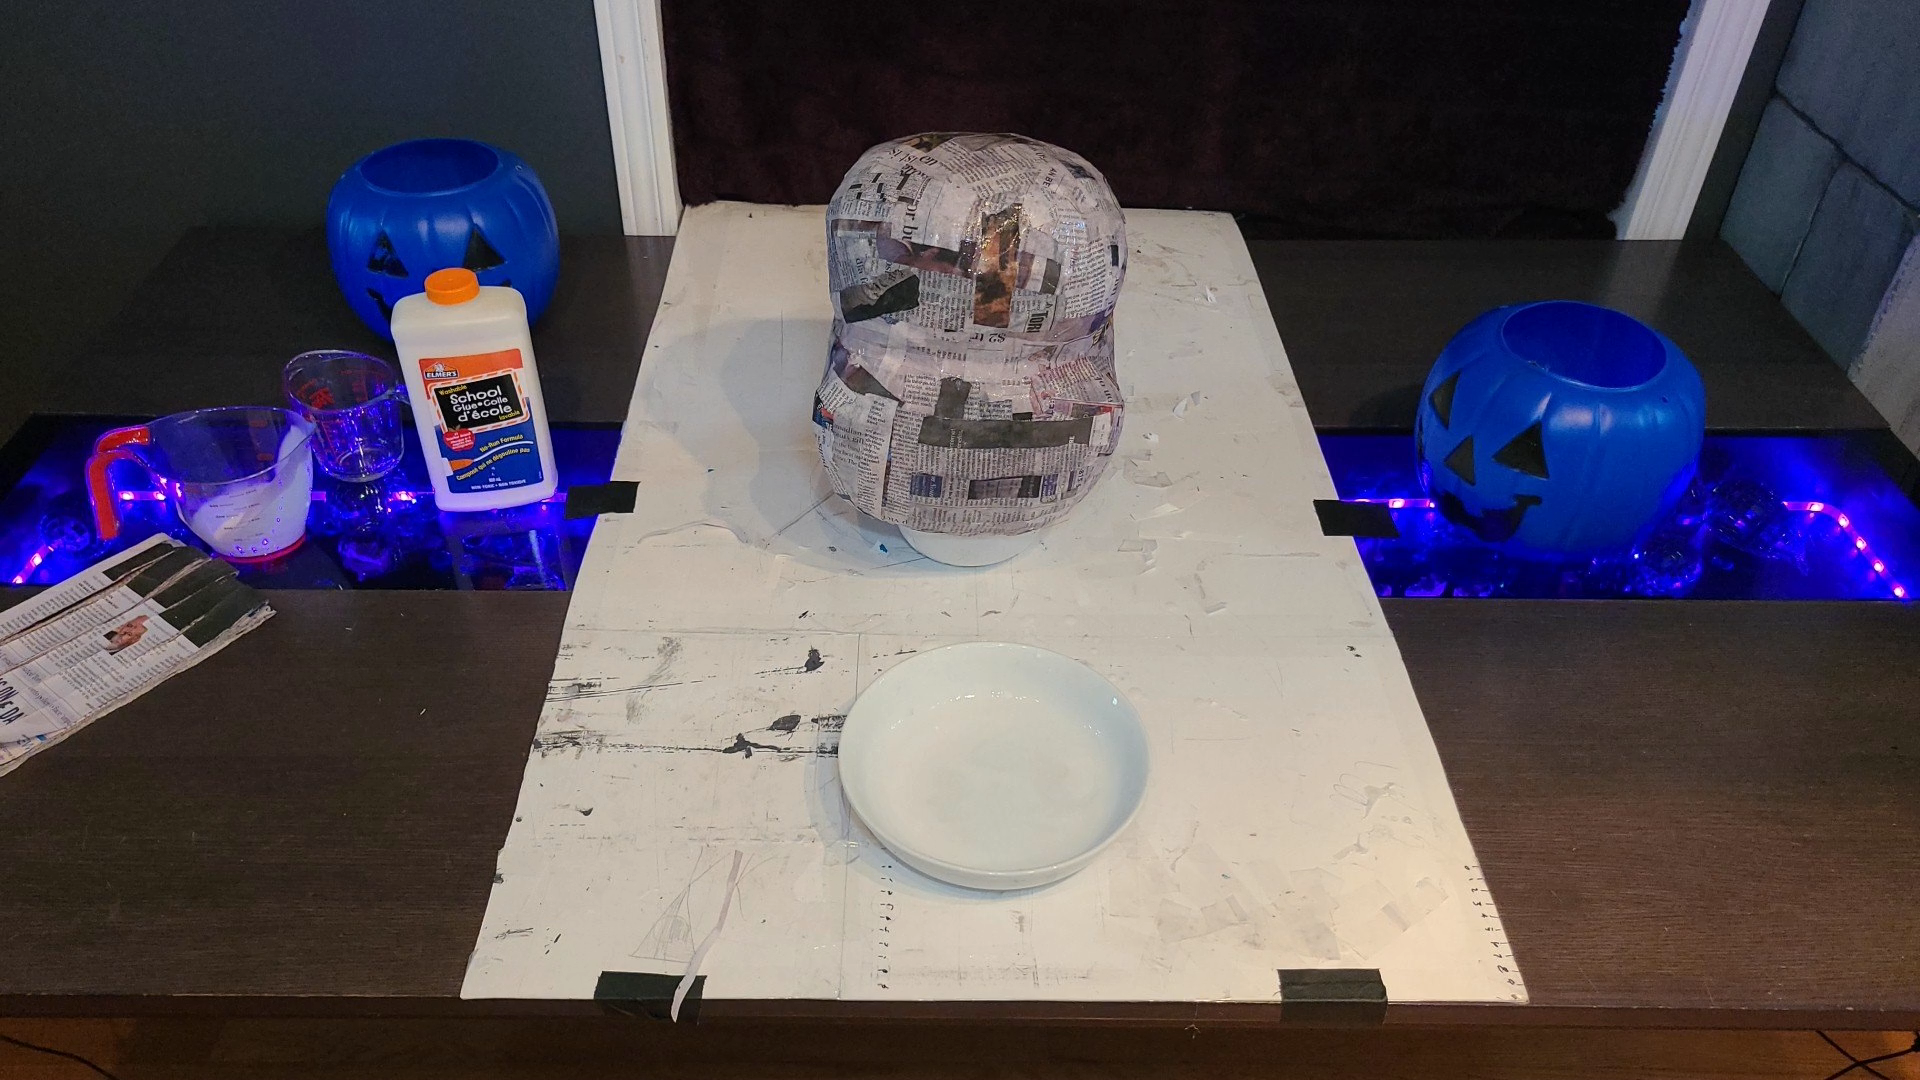
Head (Packing Tape Base)

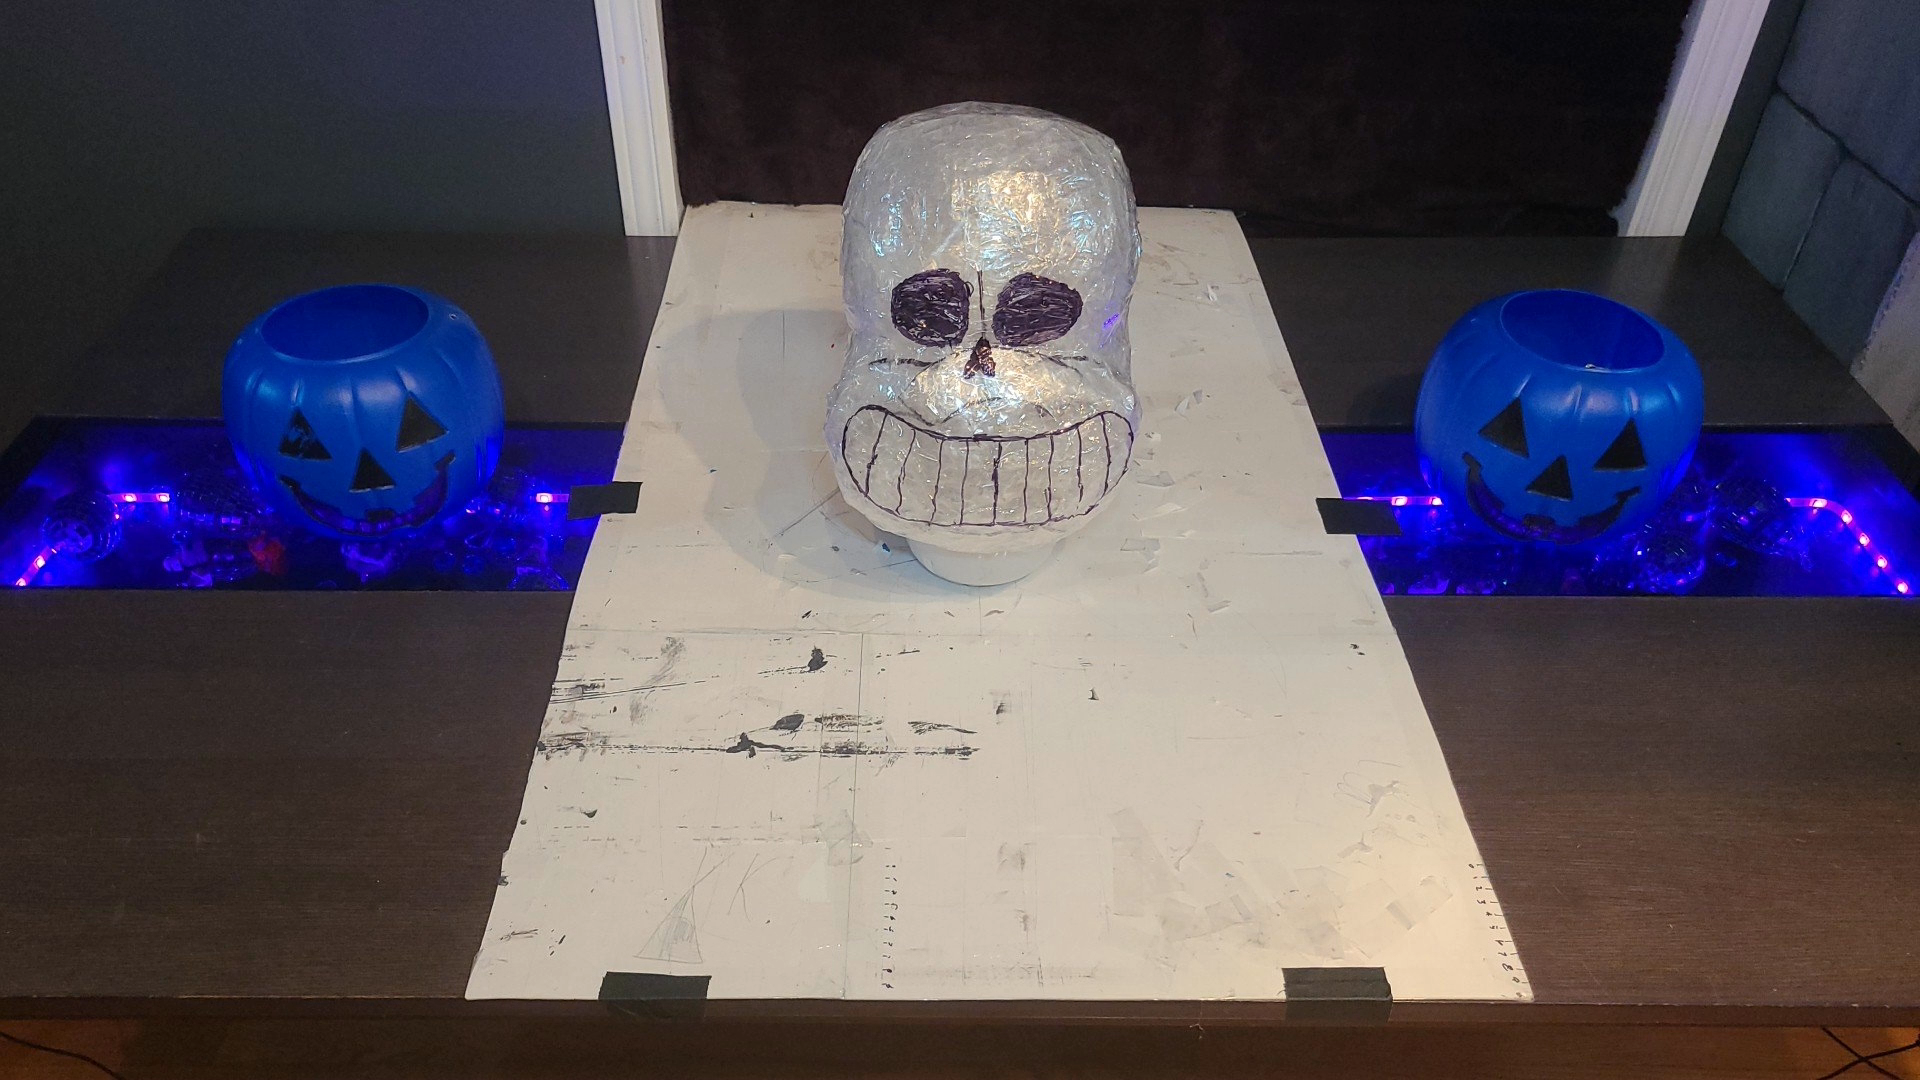
We found two sphere's that, when stacked, would fit over my sons skull. For the first step in the form construction, we food wrapped the pumpkins to keep the packing tape from sticking to them. After, we used a generous amount of packing tape to create the form we would need.I kinda boned my measurements and we ended up with too large a forehead. We fixed it before the next step.
I made the kids use two types of packing tape and told them, I used to really be into mix tapes. ...neither kid understood why that was humerus
Steps
- Wrap two plastic pumpkins with plastic wrap so you can remove them easy
- Cover with multiple layers of packing tape.
- Cut circular openings on the bottom
- Remove pumpkin forms
- Tape halves together
- Use the removed tape pieces to shape the jawline
- Draw eyes, nose, and mouth with Sharpie.
Tips
- Tape Layers: At least 3-4 layers of packing tape makes a stronger shell that won’t warp when the pumpkins are removed.
- Cutting Safety: Use a craft knife for clean circular cuts.
- Jaw Shaping: Build the jaw with smaller tape strips, overlapping short pieces makes curves easier than wrestling with long strips.
- Mark Before Cutting; Draw your cut lines with Sharpie before slicing the tape this saves headaches if the circles end up uneven.
Paper Mâché

When I was a kid I used school glue to stick my grandfathers false teeth to a boomerang; that came back to bite me.
Steps
- Mix 1/2 cup of flour with 1 cup of white glue and 1.5 cups of water in a bowl
- Cut news print into 2 cm wide by 15 cm long strips
- Apply 7 or 8 layers of paper strips dipped in flour-glue paste over tape skull.
Tips
- Ratio tweak: For a thinner paste (faster drying), use half cup of flour. For thicker/stickier, bump flour to 1.5 cups.
- Smooth finish: Use thinner printer paper on the last layer for less sanding.
- Durability: Seal finished piece with floor polish, Mod Podge, or diluted glue to lock fibers and add water resistance.
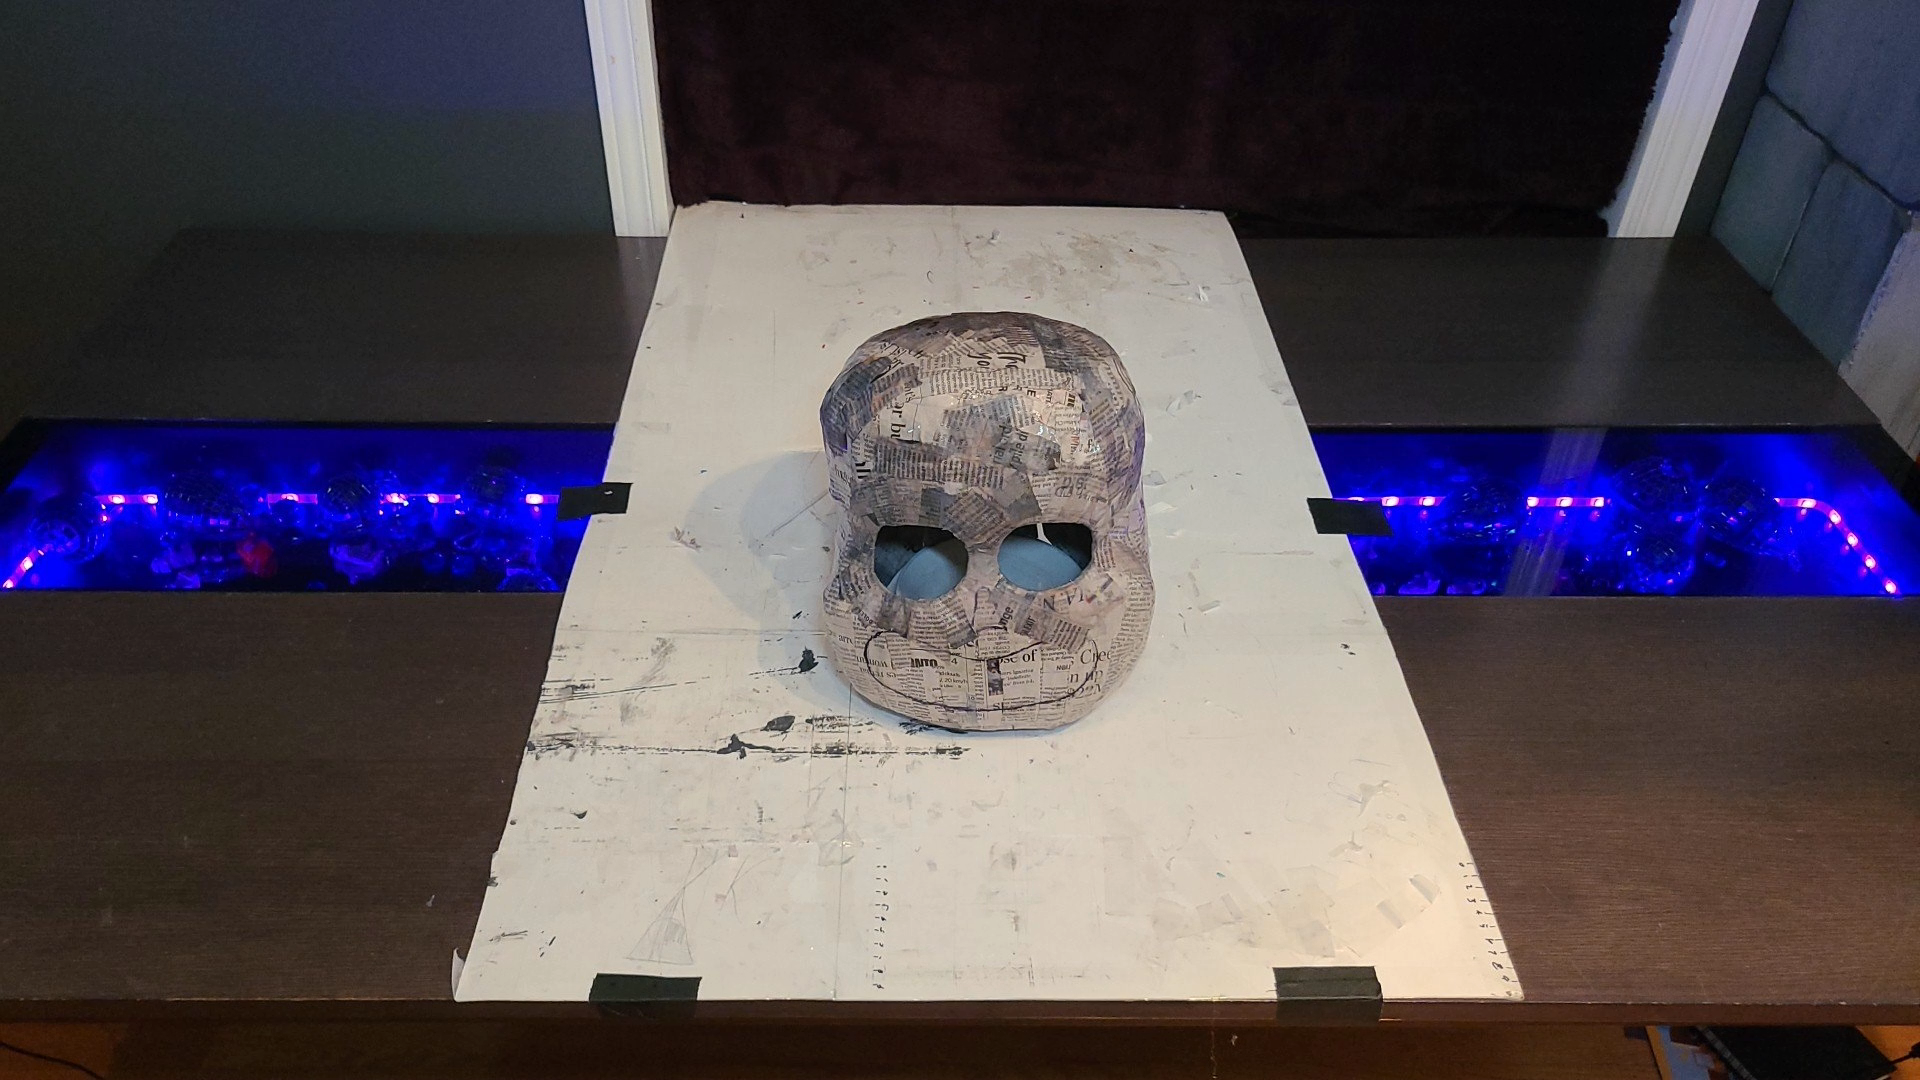
Sanding and Sealing

If we do another paper mache project I'll ghost the school glue and use this floor polish instead. It dried faster and harder than the school glue. The floor polish also leaves a nice bone-afied shine.
Steps
- Once Dry, Sand till smooth
- We used Pledge Floor polish to seal the head and keep it smooth
- Cut out neck hole and hinged flap in back. (use fabric tape to make the hinge)
- remove the packing tape base
- Cut eye holes, reinforce with more paper strips.
Tips
- Sanding: Don’t over-sand, just enough to knock down bumps.
- Sealing Alternatives: Pledge Floor Polish works great, but Mod Podge or even diluted white glue can substitute.
- Cutting Clean Edges: Use a sharp craft knife/X-Acto for the neck hole and flap. Dull blades can tear the paper layers.
- Hinge Durability: Reinforce the hinge inside and outside with strips of tape or glued fabric for smoother movement.
Painting and Eye Mesh

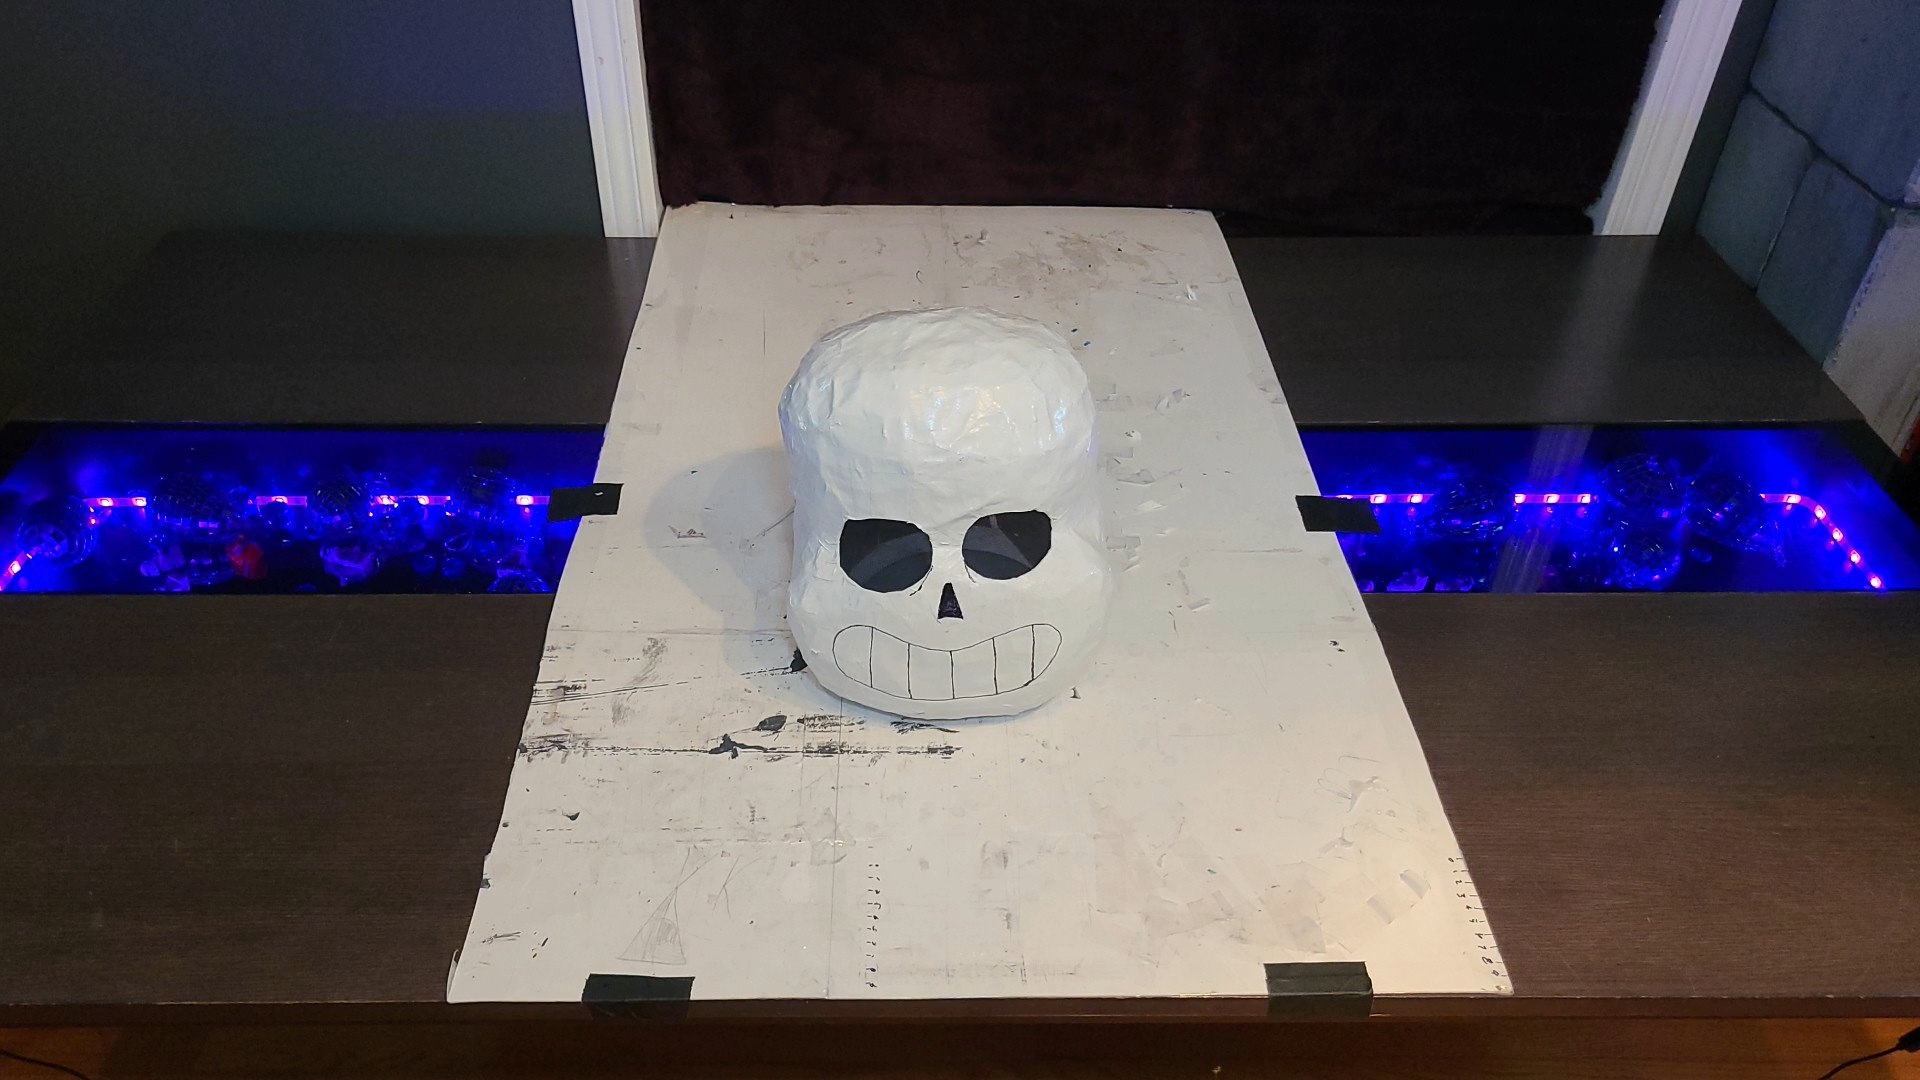
After painting it, we added a layer of sheer black fabric to hide my sons eyes. Finally, I added a blue LED ring for that eye-conic finish.
Steps
- Paint white.
- Glue black mesh behind eye holes.
- Add blue LED in one eye.
Tips
- Paint Choice: Flat or matte white spray paint works best, gloss can make it look toy like instead of bone like.
- Thin Coats: Apply 2-3 thin coats of paint instead of one heavy coat to avoid drips.
- Mesh Placement: Glue mesh from the inside of the skull so edges aren’t visible from the outside.
- Visibility: Black sheer fabric is a great way to hide the wearer’s eyes, but test it in good lighting first darker mesh can reduce visibility.
- LED Safety: If you’re using a ring light or LED, tape or hot glue down all wires/battery packs securely inside so they don’t shift while wearing.
Gaster Blaster Candy Bag
)
But wait, there's more; we also made a Gaster Blaster Candy bag. Again, above is the whole Gaster Blaster build in HD with sound effects and music, below are the detailed steps.
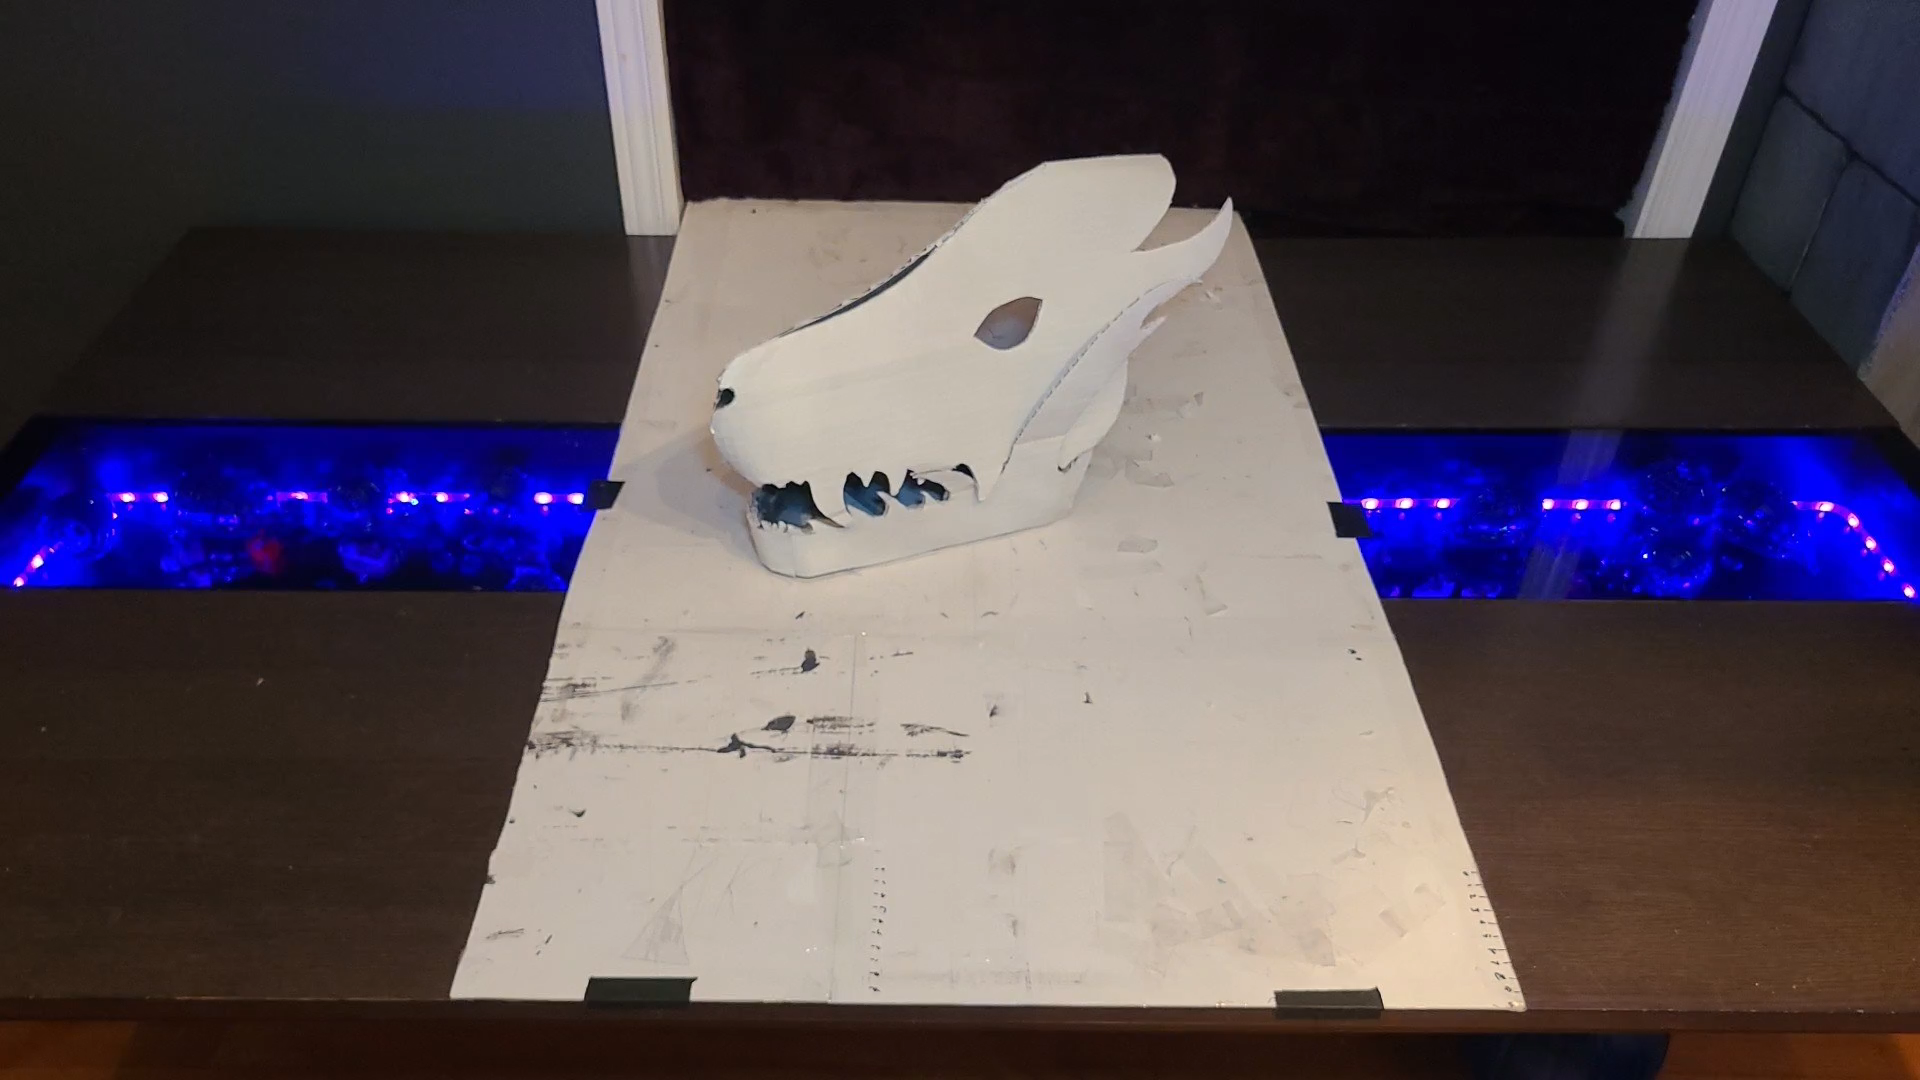
Skull Top and Jaw

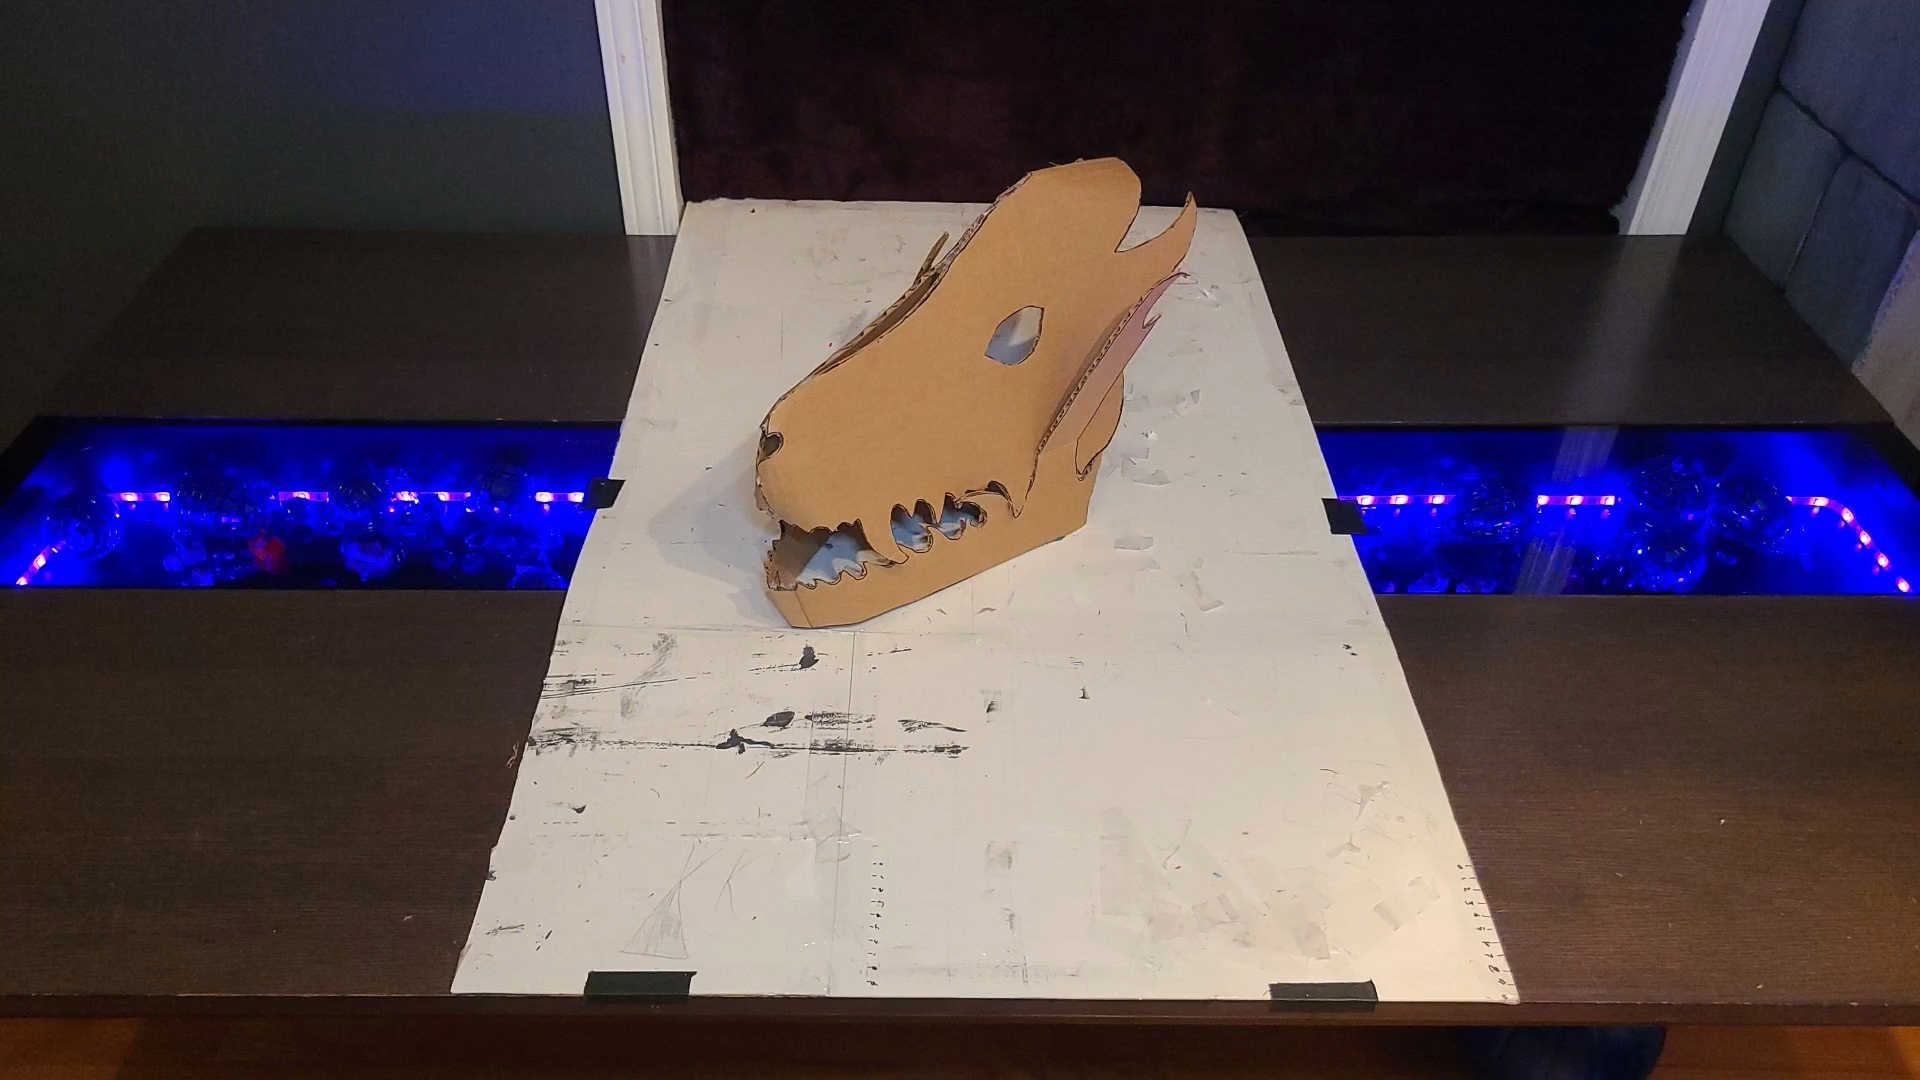
Our first steps were to draw up the skull on cardboard, cut it, and hot glued it into shape. It was a Jaw dropping start.
Steps
- Draw skull top outline on cardboard
- Cut, pop and glue into shape.
- Draw jawline on second cardboard piece
- Cut, glue into shape.
- Assemble top and jaw into full skull shell.
Tips
- Cutting Tip: Use a sharp craft knife or box cutter instead of scissors, it keeps the edges clean and avoids bending the cardboard.
- Scoring Curves: Lightly score (don’t cut all the way through) the back side of the cardboard where you need bends, helps it pop into shape more easily.
- Hot Glue Safety: Hot glue can bleed through thinner cardboard. Apply in short sections and press pieces together with a scrap stick or spoon handle instead of fingers.
- Reinforcement: For stronger seams, add a strip of tape or an extra glue bead inside the skull after the shape sets.
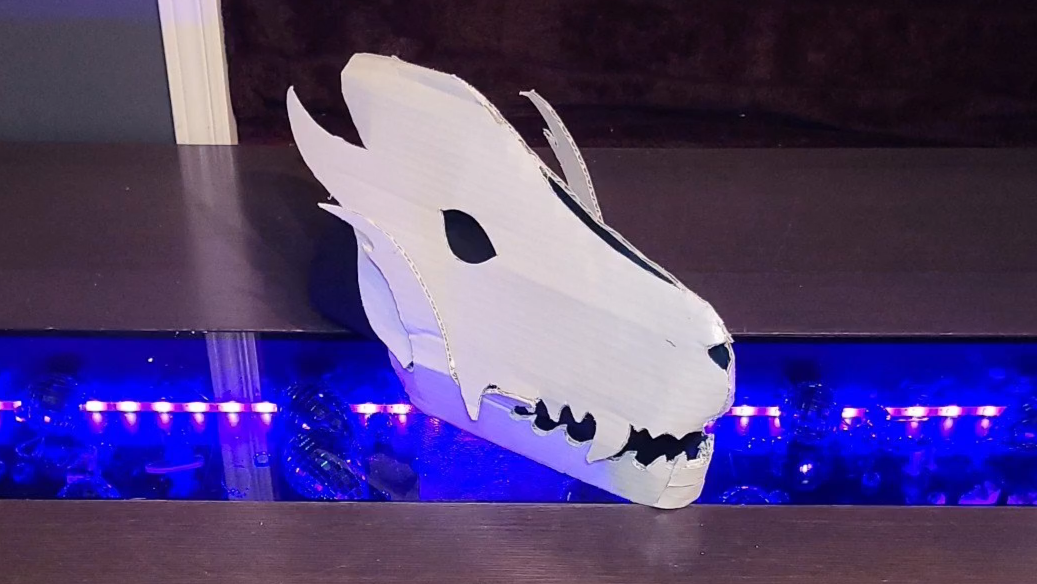
Paint

Then we painted the Gaster Blaster, inside and out. Ghoulishly good coverage, a paint job to die for.
Steps
- Spray paint shell white, let dry.
Tips
- Thin Layers: Apply several light coats instead of one heavy coat to prevent drips and warping the cardboard.
- Inside First: Spray the interior before the exterior to avoid overspray ruining the final outer coat.
Candy Bag Insert


We used black fabric we had and lined it with a roll of black construction paper, to hold it in shape, which we tacked in place with gaffer tape. I would guess it's about a half pillow case worth of dead serious candy storage.
Steps
- measure and cut a 35 cm by 80 cm rectangle from the black fabric
- fold in half, pin and sew sides leaving top open
- fold top rim and sew to prevent fraying
- Fit black fabric bag inside skull shell.
- Roll poster board into funnel/tube, insert inside bag (keeps fabric open and tight against shell.)
Tips
- Fabric Choice: If you don’t have black fabric, an actual pillowcase works perfectly, it’s almost the exact size needed.
- Fray Prevention: If you don’t want to sew, use pinking shears (zigzag scissors) or fabric glue along the rim to stop fraying.
- Poster Board Substitute: Thin cardboard (like from a cereal box) can also be rolled and taped if poster board isn’t on hand.
- Removable Liner: We didn't glue the fabric inside the head to make it removable and easier to take the candy out
Dress Up and Trick-or-Treat

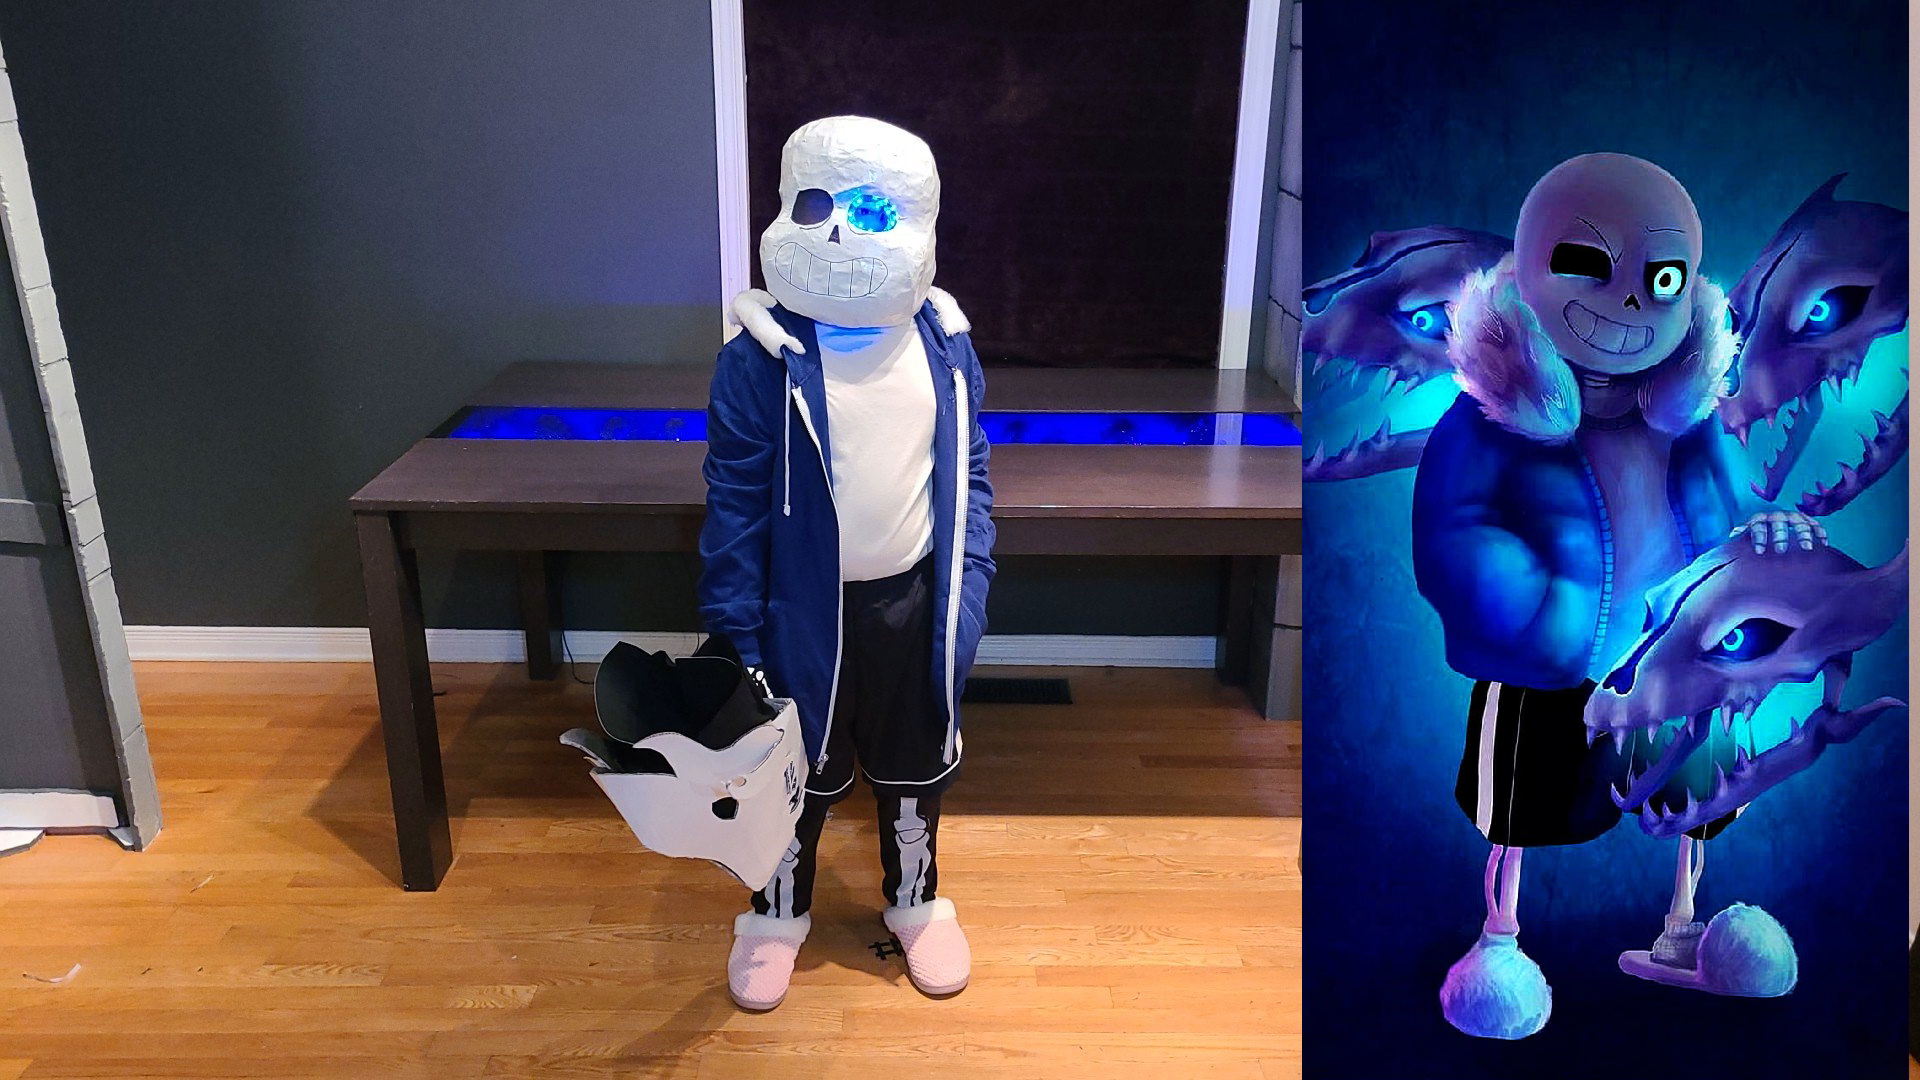
And that’s it, a skull-fully crafted Sans costume, complete with a Gaster Blaster candy cannon.
Drop your best puns in the comments. I promise I’ll be humerus about it.
Tips
- Comfort Check: do a quick test wear before Halloween night, make sure vision through the mesh is safe and the head sits comfortably.
- Photo Op: Always snap some finished pics in costume before Trick-or-treating or hitting the convention.