Untethered Speech Recognition and Synthesis Using MOVI With the Rasberry PI
by GeraldF6 in Circuits > Raspberry Pi
4776 Views, 20 Favorites, 0 Comments
Untethered Speech Recognition and Synthesis Using MOVI With the Rasberry PI
 with Rasberry PI)
The MOVI Arduino Voice Dialog Shield is an Arduino shield that allows to add speech dialog to any gadget that is Arduino controlled. You can train your own sentences and call sign, it comes with an audio front-end and doesn't need an Internet connection. It's great and it even beats the hell out of Jasper as people reportedly have trained it with hundreds of sentences.
It, however, has one major flaw: It was designed for Arduino, not Rasberry PI. ;-)
This Instructable shows you how to connect MOVI to the Rasberry PI and enjoy easy-to-use, highly accurate speech recognition on the next gadget you build. This tutorial will assume familiarity with MOVI on the Arduino, check out the Arduino MOVI Instructable first, if you need to get familiar with MOVI.
Ingredients
If you haven't used Rasberry PI before, read an instructable on Rasberry PI first.
You need:
- A Rasberry PI A/B, B+ (later version may work as well, but haven't tested) with keyboard, mouse, monitor
- A power supply for the Rasberry PI.
- Loudspeakers that plug into a headphone jack (no 4ohm or 8ohm)
- A MOVI shield. Get it from here.
- A second power supply, e.g. 12V 500mA or 4 AA alkaline batteries (rechargeables: use 5).
- 8-10 jumper cables (female -> male)
- An LED (for this Instructable)
- OPTIONAL: A breadboard that can mount an Arduino shield for mechanical stability
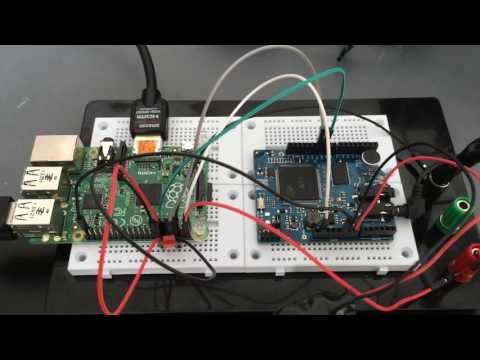
Wiring


- Rasberry PI
- (OPTIONAL) Place your Rasberry PI onto the breadboard. I use two push pins to secure it.
- Connect mouse, keyboard and monitor to your Rasberry PI, as well as the power supply (don't turn your power supply on yet)
- MOVI
- (OPTIONAL) Place MOVI on the breadboard by pushing it into it but making sure you sue two different (unconnected) section for each side of the header pins so that there are no short circuits.
- Connect the speakers to MOVI's headphone out.
- Connect the second power supply (here I use 4 AA batteries) to MOVI by using two jumper cables. Connect the red positive (+) to VIN and the black negative (-) to GND. Don't turn your power supply on yet.
- MOVI <-> Rasberry PI
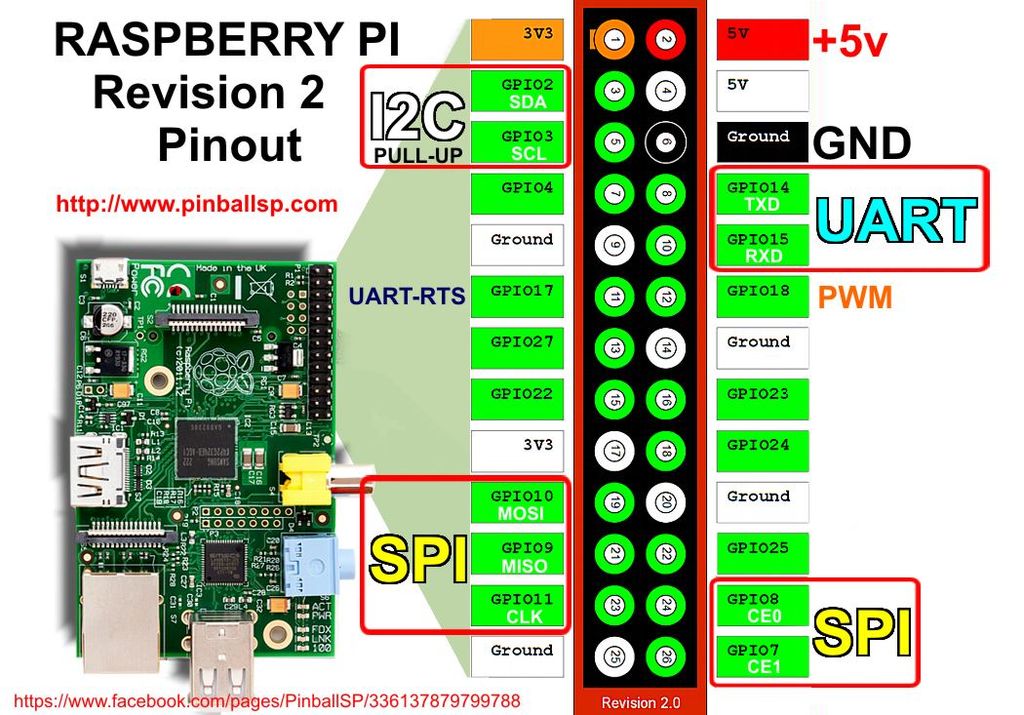
Connect the following using jumper cables:- Rasberry PI GPIO Pin 1 (3.3V) to MOVI's IOREF header
- Rasberry PI GPIO Pin 6 (GND) to MOVI's second GND header
- Rasberry PI GPIO Pin 10 (GPIO15) to MOVI's D10 (TX) header
- Rasberry PI GPIO Pin 8 (GPIO14) to MOVI's D11 (RX) header
- Rasberry PI -> LED
- For this Instructable, connect the longer pin of an LED to Rasberry PI GPIO pin 12 (GPIO18)
- and the shorter pin of the LED to Rasberry PI GPIO pin14 (GND)
Once you are done, with all the wiring, double check that everything looks like in the picture and connect the power supply to the Rasberry PI and then to MOVI. Both devices should boot up as normal. If that's not the case, disconnect the power supplies immediately and double check.
Configuring the PI
By default, the Rasberry PI is using it's UART (on GPIO pins 8 and 10) for kernel debug messages. This will mess up the communication with MOVI. To disable this feature, login to the Rasberry PI, start a command line and run
sudo systemctl disable serial-getty@ttyAMA0.service
then use an editor (such as vi or nano) and edit the file /boot/cmdline.txt and remove any references to ttyAMA0 or serial0.
For example, if your cmdline.txt looks like this
dwc_otg.lpm_enable=0 console=ttyAMA0,115200 console=tty1 root=/dev/mmcblk0p2 rootfstype=ext4 elevator=deadline rootwait
make it looks like this:
dwc_otg.lpm_enable=0 console=tty1 root=/dev/mmcblk0p2 rootfstype=ext4 elevator=deadline rootwait
Restart the Rasberry PI.
A First Test

If MOVI declared itself ready (for more information on MOVI, see this instructable) and the Rasberry PI is running, try the following commands:
stty -echo -F /dev/ttyAMA0 9600</p>cat /dev/ttyAMA0
Then, by pressing MOVI's button down for a couple of seconds, make sure that MOVI is in factory state (e.g. nothing new is programmed in).
Talk to MOVI in the following way:
You: Arduino
MOVI:
You: Let there be light.
MOVI:
You should see a screen that looks like the snapshot above.
If this try was successful, press CTRL+C to exit this cat. This tested that you can read from MOVI. Now let's test writing to MOVI.
echo "SAY hello world" >/dev/ttyAMA0
You should hear the speaker saying "hello world". This means you can write to MOVI and your speakers are connected correctly.
Now, optionally, copy, paste and save the following script with an editor, which I call lowlevel.sh. Invoking ./lowlevel.sh will allow you to type low-level commands and read MOVI's responses, just like using Arduino's Serial Monitor and the LowLevelInterface program, shipped with MOVI's Arduino Library. A good first command to enter would be 'HELP'.
#!/bin/sh
# lowlevel.sh# Set up device
stty -echo -F $1 9600
# Let cat read the device $1 in the background cat $1 &
# Capture PID of background process so it is possible to terminate it when done bgPid=$?
# Read commands from user, send them to device $1 while read cmd do echo "$cmd" done > $1
# Terminate background read process (eg. on CTRL+C) kill $bgPid
Programming MOVI

So for actually programming MOVI and building the light switch example shown in the video, let's use Python. The following Python code shows how to use the serial interface and the GPIO library to implement the a voice-based light switch, identical to the Arduino example sketch.
Copy and paste the following code into an editor and play around with it:
# LightSwitch.py
# LightSwitch example similar to the Arduino example sketch # https://github.com/audeme/MOVIArduinoAPI/blob/master/examples/beginner/LightSwitch/LightSwitch.ino# Imports: Rasberry PI GPIO (for LED), serial, time import RPi.GPIO as GPIO import serial import time
# Initialize serial line ser = serial.Serial ("/dev/ttyAMA0") ser.baudrate = 9600
# Change this method to be more intelligent. # Right now, it only checks for sentence one and two. def process(line): print line # Debug output if "#0" in line: # Sentence 1 GPIO.output(18,GPIO.HIGH) ser.write("SAY ...and there was light!\n") if "#1" in line: # Sentence 2 GPIO.output(18,GPIO.LOW)
def main(): # Initialize GPIO for LED GPIO.setmode(GPIO.BCM) GPIO.setup(18,GPIO.OUT)
# Initialize MOVI ser.write("INIT\n") # INIT #### The following commands are only executed by MOVI if needed ser.write("CALLSIGN rasberrypie\n") # Set callsign to rasberrypi ser.write("NEWSENTENCES\n") # Train MOVI ser.write("ADDSENTENCE Let there be light\n") # Sentence 1 ser.write("ADDSENTENCE Go dark\n") # Sentence 2 ser.write("TRAINSENTENCES \n") # Go train, if needed #### End lazy ser.write("SAY Mohvee on Rasberry Pi \n") # Say we are ready. data="" # stores one line of data from MOVI while (True): #loop enlessly like loop() on Arduino if (ser.inWaiting()>0): #if there is stuff on the serial port serchar=ser.read() # read it if (serchar=="\n"): # if a line was ending process(data) # process it data="" # make a new line else: # otherwise data=data+serchar; # just append time.delay(0.1) # Don't busy spin ser.close() # Will never be reached
# See: http://www.artima.com/weblogs/viewpost.jsp?thread=4829 if __name__ == "__main__": main()
Next Steps...
Congratulations, MOVI works with your Rasberry PI. You can now play around with the Python script in the previous step and change the sentences you train, or the call sign you program. For a list of commands to send over the serial line, check out MOVI's User Manual (Appendix C and D).
Moreover, the open source community has released an Elixir-based library that makes programming MOVI very easy (assuming you know Elixir): Check it out here.
I am pretty sure, the open source community will come up with a Python-based MOVI library soon. Also, check out the Rasberry PI version of Alexa. That would for sure be a fun playground. Alternatively, you could try to use MOVI as a backend for Jasper.
Another idea is to take the open source MOVI Arduino library (in C++) and port it to Rasberry PI.
I will update this Instructable as I see more ways and projects that use MOVI with the Rasberry PI. Have fun hacking!