VLC Player and Streaming TV Remote Receiver
by hausofpayne17 in Circuits > Arduino
94 Views, 0 Favorites, 0 Comments
VLC Player and Streaming TV Remote Receiver
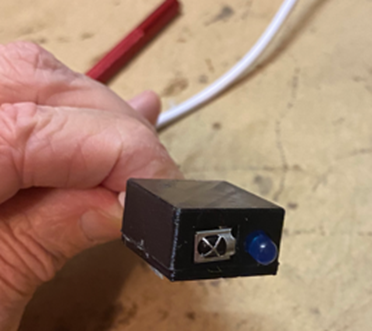
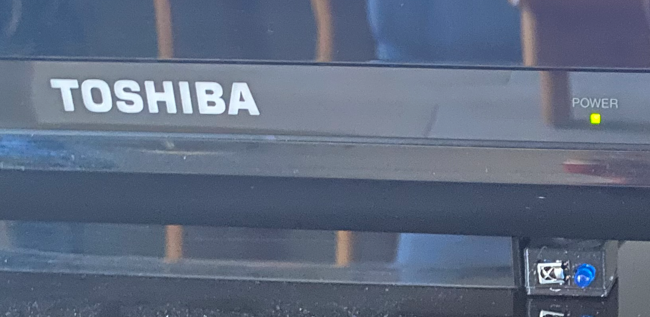
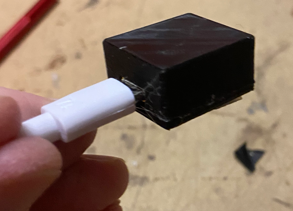
We have a Streaming TV provider and the receiver on the main tv has a custom remote control.
I watch TV on a mini Windows PC and have to use a handheld Bluetooth Keyboard/Trackpad to navigate the screens to get to the channel I wish to watch. It's a cumbersome way to navigate through TV channels / functions.
Similarly if we want to watch a saved family movie on the TV, we need to use the keyboard/trackpad to navigate through VLC Player. It's a less than idea way to navigate through the VLC player to watch media.
It would be great to use a Universal remote control to do these navigation / selection functions rather than using the keyboard/trackpad.
So this project constructs an Infrared Receiver that matches the codes coming from the remote control to the diffferent onscreen functions of the TV browser app or VLC Player, making it more convenient to watch TV or movies on my Windows PC.
A microcontroller that can emulate a USB input device (keyboard/mouse) is required. Such controllers include:
- Arduino Micro or Arduino Leonardo
- Seeeduino XIAO (used in this project)
- Raspberry Pi Pico
The project uses Windows keyboard shortcuts or mouse movement commands to interace with the browser interface to watch media.
As I can't really demonstrate this in operation without violating onscreen copyright rules, please take my pledge that this project works very well for watching browser-based TV or media files using VLC Player.
Lets get started!
Supplies
- Seeduino XIAO, (or Raspberry Pi Pico or Arduino Micro/Leonardo) microcontroller. The original design was done on an Arduino Micro but the lack of memory limited how many functions could be handled by the controller. I used a Seeeduino XIAO and it does all the functions for watching TV or VLC media in only 17% of the storage.
- VS1838B infrared receiver
- LED of your choice( and a suitable current limiting resistor (ex. 470 Ohms)
- 3D printer filament if you wish to print an enclosure for the XIAO.
- USB cable to connect your microcontroller to your computer.
Construct the Circuit
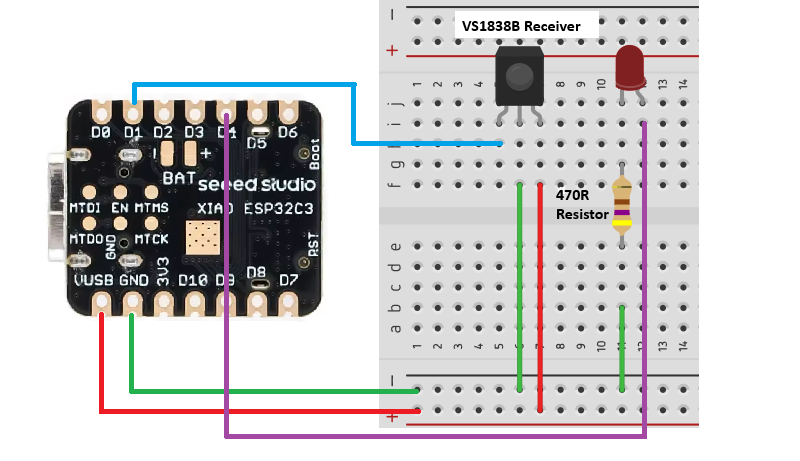
This is a very simple circuit. Construct it as you wish. In the final version, it's placed in a very small enclosure and the components are directly soldered to the microcontroller to save space.
Basic Operation
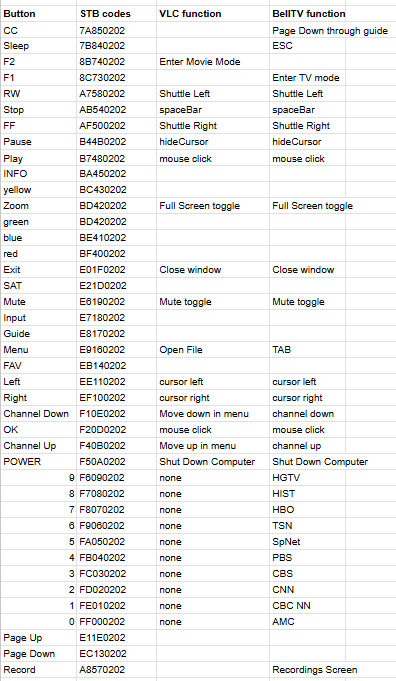
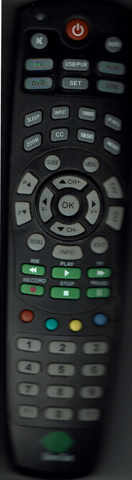
The table above shows the remote buttons, the codes each button generates (remote specific - these may not work for your remote) and the function that the receiver replicates to the computer for controlling the TV streaming interface or VLC player.
For my remote, I had to press the 'STB' button on the top right to get ALL the buttons sending codes to the receiver. Your remote may be different.
When the receiver gets a code, it executes the associated functions to make the streaming function work (ex. Channel Up or Down, Fullscreen on/off, shuttling left or right through the program/movie) etc.
Most importantly, as there are two 'modes' for this remote, the user presses the F1 button to be in TV watching mode (default at power up) or F2 which switches in to VLC Player mode.
TV Mode Overview:
The number buttons on the remote map to 10 preferred TV channel URLs that can be accessed by pressing one button. Otherwise, using the Guide button will open the channel list and the user may use the Arrow keys to navigate to their preferred channel (with Page Up/Page Down to jump ahead or back in the list). Then just press the 'OK' button or the 'Play' button to select the channel. The URL for that channel will open.
When a channel is being watched, the Up an Down buttons will move forward or backward to previous or next channels.
Pressing the 'Quit' button will close the currently open browser window.
Pressing the 'Zoom' button will toggle in and out of Full Screen mode.
Use the Fast Forward and Rewind buttons to shuttle forward a minute or back a minute through the program and click the 'OK' button to go to that place on the slider.
The 'Record' button will open the "Recordings" screen to show you programs that have been recorded so you can select and play them.
The Mute button will turn the sound on/off.
Pressing the STOP button will pause/restart the file playback.
Pressing the PAUSE button will move the cursor to the lower left corner of the screen so it's not distracting.
Pressing the Power button will cause a full Windows shutdown cycle to turn off the computer.
VLC Player Mode Overview:
Start by pressing 'F2' (or your similar remote button. The receiver LED will flash twice to tell you it's in VLC mode.
Press the Guide button will launch VLC. Press the 'Menu' button will do the File-Open operation so you can then use the Up and Down arrows to select the file you wish to watch. Pressing 'OK' will open the file and it will start running.
Pressing the 'Zoom' button will toggle in and out of Full Screen mode.
Use the Fast Forward and Rewind buttons to shuttle forward a minute or back a minute through the file.
Press the 'Info' button to cycle through subtitle languages.
Pressing the STOP button will pause/restart the file playback.
Pressing the PAUSE button will move the cursor to the lower left corner of the screen so it's not distracting.
Pressing the Power button will cause a full Windows shutdown cycle to turn off the computer.
The Quit button will exit the VLC Player application.
Different TV dimensions scale the HD pixels differently. So you'll likely have to adjust the variables like "xOff" and xBar etc so the cursor will land over the buttons as you need for them to be clicked. This is mostly necessary for the TV Browser interface.
VLC Player is more straightforward and just uses keyboard shortcuts that are defined inside VLC Player explicitly.
On the Remote used, the 'F1' button switches operations back to TV mode if you were previously in VLC Player mode.
Getting the Codes for Your Remote
Load the small 'codeReader.ino' sketch onto your microcontroller. You'll see several libraries in the #include statements at the top. You need to add these libraries to your Arduino IDE.
When uploaded, open the Serial Monitor and when you press the buttons on the remote, you'll see the associated code for each button displayed. Write this down. You may find it helpful to create a spreadsheet to keep track of the buttons, their codes and the associated function you'll have them perform.
Downloads
Upload and Modify the Receiver Code
Open the sketch and look at the variables at the top. You will likely have to adjust some of the (x,y) coordinate variables for your particular TV screen. As well, in the Channel Up and Channel Down functions, you'll need to modify the x and y offset values for both non-full screen (fSet = false) and full screen (fSet = true) conditions so the cursor will be over the button when a mouse click is sent to move to the next or previous channel.
At the top of the sketch you'll see a series of char arrays for all the preferred tv channel URLs that you can set up for the 0-9 buttons on your remote. These are stored in PROGMEM to minimize the global RAM space. On a XIAO you don't need to do it this way. But on an Arduino Leonardo/Micro you'll need to use PROGMEM if you want to have the TV Streaming part of the sketch to load and compile. If you try to compile on the Arduino, you'll get an error on the str_copy command in the goToChannel() function. The compiler will tell you how to change the command to work with the Arduino boards.
Down inside loop() you'll see where all the codes are mapped to different functions. Put in the codes you recorded in the previous step.
A note about Arduino Leonardo/Micro: Leonardo/micro boards have limited storage so they will not be able to store the code for BOTH TV control AND VLC Player control. If you're using a Leonardo/micro, you'll need to cut out part of the sketch if you want it to compile in the available RAM on the board.
Compile, upload and test your code to adjust x and y coordinate variables to match the Previous Channel/Next Channel buttons, the slider x and y starting coordinates etc for your particular TV. This can take a fair amount of time.
Downloads
Print the Enclosure and Finish
The provided .stl files will hold the XIAO, LED and IR Receiver, but it's a very tight fit. Resize/print as you wish. Keep any connection wires as short as possible. Also make sure the components are not shorting against the board, each other or the USB connector.
Enjoy Your Remote!
There's nothing new about sending infrared remote codes to a microcontroller. But this particular application of such simple functionality really makes viewing media much more convenient and enjoyable.
Your application will likely have differences from the sketch provided. With experimentation, you should be able to get it to work with your remote to facilitate convenient use of the apps on your PC/TV.
Have fun!
NOW GO AND MAKE SOMETHING WONDERFUL!