Vinyl Cutting a “Happy Thanksgiving” Sticker
by LucasTP76 in Design > Digital Graphics
72 Views, 0 Favorites, 0 Comments
Vinyl Cutting a “Happy Thanksgiving” Sticker

With October coming to an end and November upon us, it is never too early to start preparing for Thanksgiving because, let’s face it, once Thanksgiving is upon us, most of us will already have our Christmas decorations up. For that reason, I have designed a quick and easy instruction for people looking for something to do for this next post.
This sticker was created using Inkscape, a free alternative to Adobe Illustrator, using relatively basic tools, as I am admittedly not the most experienced Inkscape user. For those of you who just want to print out the sticker, the PDF of the design will be attached below. For people who want to learn how to design this simple model and learn a few techniques I have discovered for creating complex shapes, below, you will find a detailed set of instructions on how I designed the model and then printed it out using a vinyl cutter.
Downloads
Supplies
Designing the Body of the Turkey

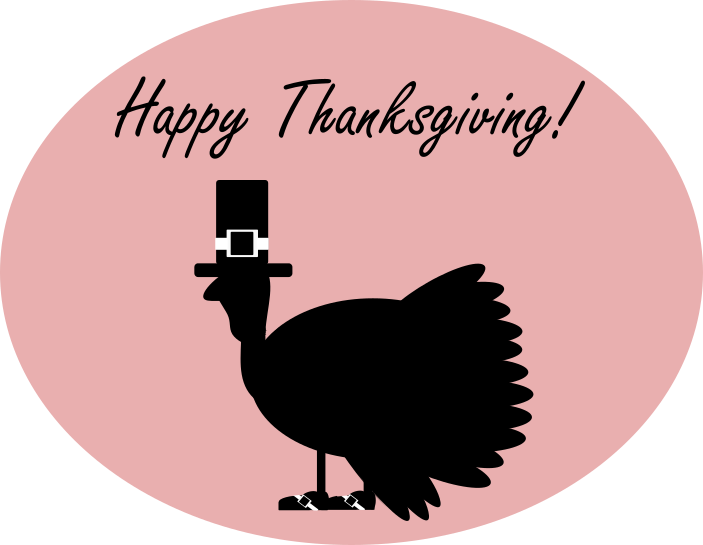
Creating the main body is one of the easier steps of the tutorial. First, use the circle tool on the left-side tool menu to create a moderately large oval. For the tail feathers, once again, use the oval function to create a smaller, narrower oval. Copy and paste this oval 11 times. Evenly distribute the 11 feathers throughout the rear of the oval. For this design, I kept most of the feathers in a horizontal position but then slightly angeled the top feather and bottom two feathers of the turkey.
Next, use the rectangle tool to create a narrow that is approximately a third the size of the main oval. Place one of the rectangles around the halfway point of the main oval, and then copy and paste a second leg, positioned slightly in front.
Finally, to create the wing, create an even narrower oval and then copy and paste it two more times. Evenly, space out the three ovals so they overlap, similar to the tail feathers. I would also move the center feather slightly in front of the two flanking feathers. Right-click on the three objects and then select the group setting to bind the ovals together. Angle and position the wings so that they are between the bottom tail feathers and the legs, partially covering up the back leg.
Fiddle with each shape until it looks how you want it to.
Designing the Head

The head is the most challenging part of the design. First, create a narrow oval. Then, with the oval selected, click on the “Path” tab and then “Path Effects.” This should open up a tab on the right side of your screen. From here, click on the down arrow next to the search bar and select “Envelope Deformation.” It may take a little bit of trial and error to get a shape that you are happy with, but what I found worked best was first to use the “Top Bend Path” function (Edit-on-Canvas setting) to warp the top section of the oval into a head-like shape. I then used the “Bottom Bend Path” function (Edit-on-Canvas) to warp the bottom section of the oval to give the neck a bit of a curve. Once I was happy with the shape, I positioned it so the neck partially bulged out of the main body.
The gobbler was created using the exact same technique as the head. Play around with the “Envelope Deformation” effect to warp the oval into a shape you are happy with. I then attached it to the bottom of the head, overlapping with the neck, so that the gobbler protruded out and was easily identifiable.
Designing the Colonial Apparel

The last step in designing the turkey is creating shoes and a hat. The hat is basic enough. Create a horizontal, narrow rectangle that extends a little beyond the head and to the back of the head. Then, create a larger rectangle to serve as the top part of the hat. To design the buckle, I would recommend assembling the pieces on a large scale in a different section of the canvas. First, create a rectangle that is any color besides the colors you are using. This will serve as a backdrop that will make the white section of the buckle easier to see. Then, use the rectangle tool to make a square. Within that square, create another square and change the inner square's color to black. Finally, on both sides of the overlay, create a narrow rectangle to serve as the strap. Group the components together and then scale the buckle to an appropriate size for the hat.
The shoes are slightly more complicated. First, create an oval. Then, create a rectangle that is around the same size as the oval. Overlay the rectangle with the oval to create a flat bottom. Then, create a small oval and angle it to serve as the tongue. Next, create another small circle to serve as the shoe's collar. Finally, take the buckle you created for the hat and then scale and angle it to fit the shoes. Group the different components of the shoe together, copy and paste, and then scale it to the size of your model.
Creating the Text

The final component of the sticker is to create the “Happy Thanksgiving!” text. This is pretty straightforward; simply select the text tool and type out your text. I used the “Freestyle Script” font at size 64 for the sticker I created. Position this slightly above the turkey. Then, create a large oval that encompasses all of the elements of the turkey. For convenience, on the right-hand menu, select Create another layer, and then move this layer to the bottom layer. Create the oval in this layer so that it appears behind the turkey. Manipulate it accordingly until you are happy with your final product.
Vinyl Cutting

Once you have created your model, navigate to the tabs at the top of your screen, select File, and then Export. The export menu should open up on the bottom right of your screen. Save this file as a pdf to your computer.
This next part of the tutorial will use Silhouette Studios. Open up Silhouette Studios, and then, on the top left of the screen, select File -> Open. From here, find your downloaded model and import it into the program. From here, navigate to the Panel tab and find the trace function. Highlight the model and then click “Select Trace Area.” Once the model has been traced over, select the Outline effect. From here, navigate to the Send tab, and then Send it to your vinyl cutter to be printed.
To load up the vinyl cutter, take your sticker material and palace it on a cutting mat. To load the cutting map, align it up against the machine and then click on the up arrow. The cutter should then take-up the material, and you are ready to cut.