Vive Tracker Wrist Mounts and Ring Actuators for DCS
by kikakuVR in Living > Video Games
1763 Views, 6 Favorites, 0 Comments
Vive Tracker Wrist Mounts and Ring Actuators for DCS
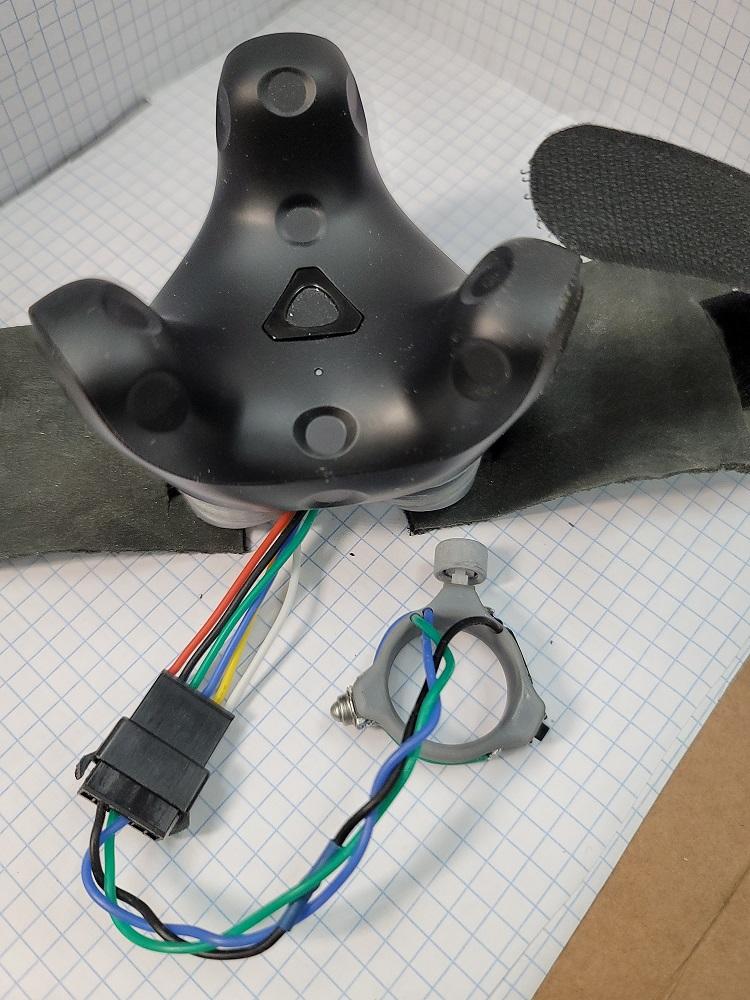
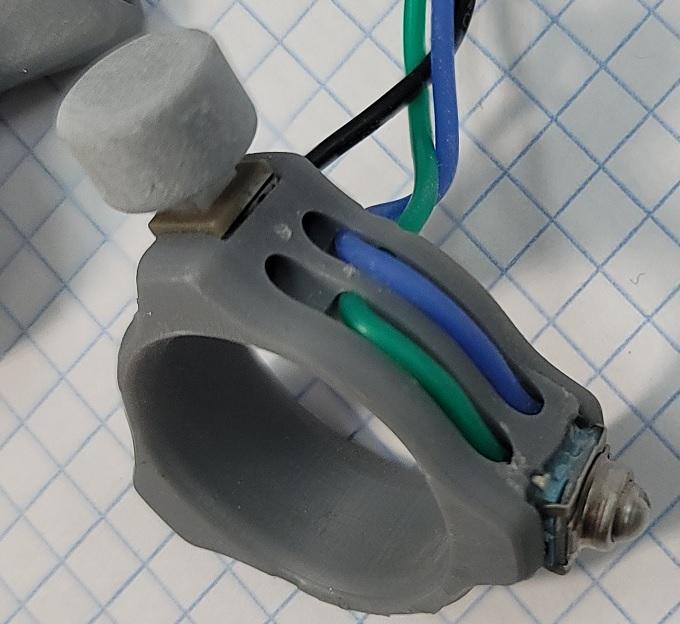


This is my most recent build (May 2021) of my Vive tracker wrist mounts with button actuators to use the hand interactors in DCS.
Story Time, feel free to skip:
I found DCS just after I had gotten my first Vive HMD so to me DCS and VR are inextricably linked. While I grew up playing Falcon 3.0 and Jane's ATF and other flight simulators on monitors, after trying VR I found the screen based flying provided a much shallower interaction. Of course this is just my opinion and I'm not that great at DCS anyways.
When flying in VR I found that using a keyboard and mouse to be nearly impossible. Slewing the mouse with the headset was incredibly hard to aim and I always had to hunt around to find the mouse. The keyboard is ok for really infrequent use like pausing or naming files or something but almost impossible for use in the heat of the moment.
I did build my own HOTAS setup for the hornet and viper and even adding extra buttons for simple key bindings didn't come close to meeting the vast array of switches and buttons in either cockpit. So...I built a cockpit...That was a labor of love, I implemented all the buttons and switches and levers and used something like 6 Arduino Megas and tied it to the simulation with DCS-BIOS...Unfortunately as closely as I tried to match the hornet cockpit I could never get all the bits to align correctly between reality and VR...fortunately by then ED had implemented VR hand controllers so I took to building a tracker based controller so I could avoid having to find and use the VR controllers while flying...I went through several iterations, some using gloves and hand positions, some using gloves and buttons attached to fingers, etc etc until I hit on this minimalist design that didn't interfere with gripping the stick or throttle.
End Story Time
Supplies
- 3D printer -- I used an SLA printer but it should be possible to print the components using an FDM printer. My SLA printer is fairly new so every previous iteration of this project was made on my Lulzbot Taz 6. The pictures in this project show the newest version printed using a Phrozen Sonic Mini 4k @ 50 micron layer height. >>THE STL FILES FOR THIS PROJECT CAN BE FOUND HERE: https://www.thingiverse.com/thing:4861503<<
- 2x Vive Trackers -- The ones shown in the pictures are the 3.0 versions, don't bother getting those unless you want to decrease size/weight...I got them because I was excited to use the USB interface but I still haven't gotten that working yet so save yourself $30/tracker and get the 2.0 ones. (Also if someone is familiar with USB communication please ping me because I'd love to get that working)
-
Shock absorbers: https://www.amazon.com/gp/product/B073LPTHCL/
-
JST/SM connectors: https://www.amazon.com/gp/product/B07CTKD7P4/
-
DPDT latching button: https://www.amazon.com/gp/product/B074BRHBVC/
-
SPST square temporary button: https://www.amazon.com/gp/product/B071KX71SV/
-
SPST rectangular temporary button: https://www.amazon.com/gp/product/B07H9ZSZD4/
-
Extra bits: 26 gauge wire, m3 screws and nuts, leather bits for padding
Understanding the Vive Trackers and How DCS Handles Input
Vive Tracker:
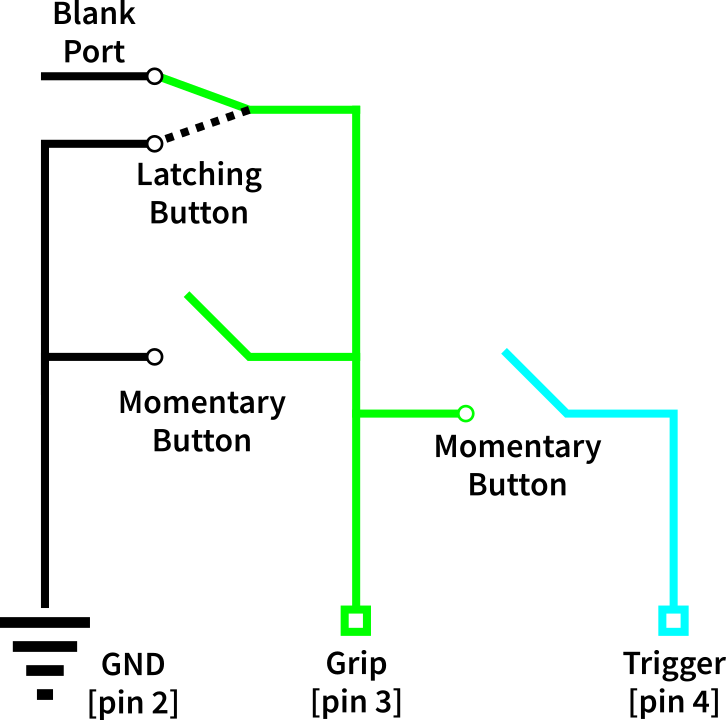
Please take a look at the Vive Tracker dev guide: [ PDF link ] In it you can find the above diagram describing the roles of the six pogo pins on the bottom of the tracker. While any of the pins can be connected to for the purposes of DCS we are concerned with pins 2, 3 and 4 -- ground, grip and trigger [explained below]. In order to send a button input through the tracker the button pin (pins 3-6) have to be shorted to the ground pin (2). A simple example of wiring the grip button is shown above.
DCS Input:
When sending input to DCS via tracker there are two key pins: Grip and Trigger. When the grip button is pressed a green pointing line is emitted from the index finger of the hand. This is the aiming line and will show the name of the switch or button at which it is pointing. Trigger is used to interact with the button or switch. For a three position switch (such as the countermeasures Off/On/STBY in the Hornet) the hand rotation dictates the direction the switch will be thrown. If the hand is flipped upside down the pointing line will be blue and tends to flip the switch upward and if the hand is right-side-up the line will be green and the switch will be thrown downward. I think one of the exceptions is the direction of the designation laser switch in the Hornet. There is an option in the VR sub-menu that limits the trigger interaction to when the grip button is also pressed -- I would suggest keeping this on as it prevents inadvertent button presses or grabbing of the stick or throttle by the VR hands.
Circuit for this project:
For the ring actuator I built the circuit seen in the third picture. In this case there are two ways to activate the grip (ie the pointing action), either through a latching button or through a momentary button. To prevent accidental trigger button presses, instead of allowing the trigger button to be shorted to ground when pressed it is shorted to the signal going to the grip pin. Therefore, only when the grip latching button is on or the momentary button is held down does a press of the trigger button register as a trigger press. I instituted this type of circuit after accidentally bumping the trigger button against the stick or throttle and flipping a random switch. If you prefer to not use this just tie the trigger to ground instead of the line feeding the grip pin.
Assembly of Tracker Mount

Materials:
- 3D printer or printed tracker mount [STL Files]
- Header pins at least 15mm in length [header pins]
- Shock Absorbing bumpers [bumpers]
- JST/SM Connectors (Optional) [connectors]
- Screws/Nuts: 6x[ M3 or #6 should work] countersunk screws and nuts and 2x[1/4"x20 1/2" long hex bolts] 2x[1/4" washers]
- Soldering Equipment
- Print the two halves of the tracker mount, STL files can be found here: [STL Files]
- Insert but don't solder 6 header pins with the last ~3-4mm bent into the ridges of the top half of the print. (A sloppy job of this can be seen in the first picture). I would suggest using pins of at least 15mm in length such as these [header pins]. The pitch of these aligns with the pogo pins on the tracker and so likely you will have to snip them and insert them one by one. If you retain the black square bumper it makes for a nice press fit into the slot for each pin, preventing wobbling.
- Between the two halves of each tracker mount, press fit the shock absorbing bumpers, 3 for each mounting set. Note that the two halves should be oriented correctly if the pins are aligned through the holes on the bottom half of the mount. At the end of this step the two halves should be loosely held together by the bumpers.
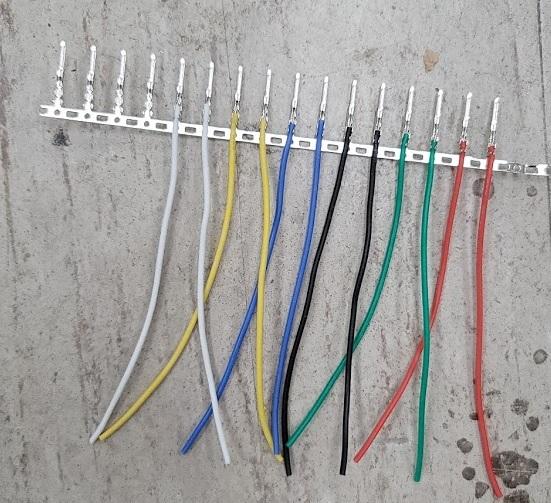
- [Optional] Assemble 6 pin JST/SM connector and prep for soldering. I chose to make contact to all 6 pins and use a 6 pin connector for 'future-proofing' any variations I make or additions. If desired wires can be soldered directly from the ring portion to the ground, grip and trigger header pins.
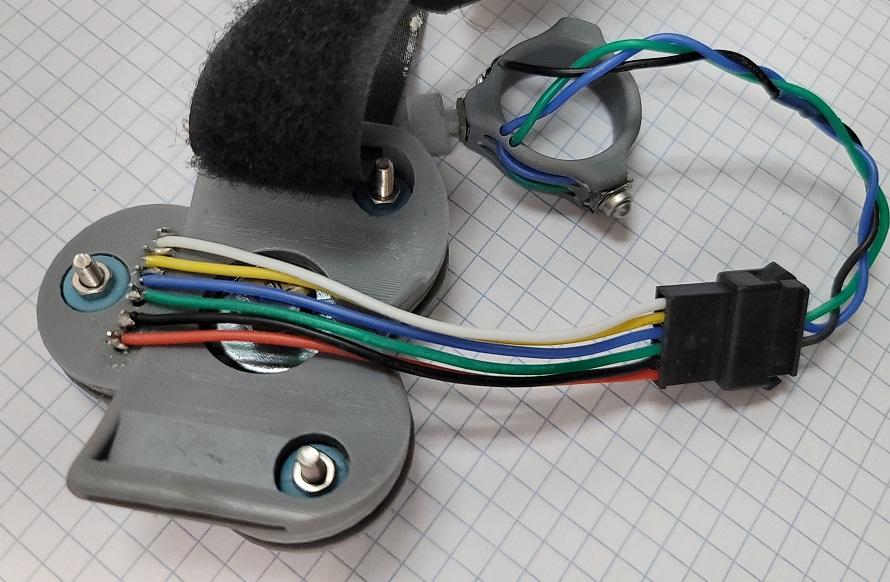
- Soldering: Solder the connector to the header pins ---- I chose to push the bottom portion of the header pins through the bottom half of the mount and solder them there rather than run wire through the holes and solder the header pins between the two halves. YMMV but I found that the 26 gauge wire I used occasionally would get pinched or stuck in the holes. The third picture shows the underside of the mount and where I did the soldering. Note the black dots in the first image -- these are the important pins to solder to, from L to R: GND, Grip, Trigger
-
Secure the two halves of the mount with screws and nuts. I used M3 countersunk screws with the heads on the tracker side of the mount. I found that this allowed for the best attachment of the tracker -- the countersunk heads would just get pushed into the rubber of the bumpers.
-
Add the 1/4" bolt (1/2" length) with a washer. Both should fit through the hole in the bottom half of the mount.
-
[Optional] Testing: (A) Fire up SteamVR, pair the tracker and on the steam VR window go to Devices>Manage Trackers> Manage Vive Trackers: Make sure the tracker role is set to "Held in hand" and pick Right or Left (Don't leave it on Any Hand, Steam VR is stupid and given an option it will find a way to screw things up) (B) In the same controller menu select "Test Controller" and make sure that the correct tracker is selected (C) Short Press the power button and make sure it registers, if it doesn't make sure that the correct tracker is selected or you may have to restart steamVR, to get it to register. As I said, steam VR can be stupid sometimes. (D) Once it is registering a short tap on the power button, use a paperclip or other metal wire to short the ground pin of the connector to the grip and trigger pins to make sure everything is connected well.
- [Optional Troubleshooting] If you are having poor or no indication when shorting the ground pin to grip/trigger I would suggest 1) Tightening the bolt holding the tracker to the mount to ensure good contact 2) Remove the tracker and using a multimeter to check continuity from end to end of each header pin to connector wire. 3) Restart SteamVR to make sure it is behaving
Assembly of Ring or Other Actuation Method




Background
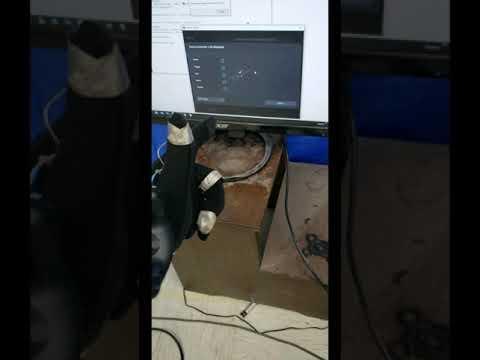
While I eventually settled on a minimalist approach using a ring with a couple buttons as my actuation device there are several options that you can select to activate the grip/trigger buttons. For example, in the simplest case you could just glue a couple buttons to the tracker or mount and use your other hand to press them. My original approach was to use strategically sewn conductive patches on a set of thin gloves to serve as my actuation method. Examples of this can be seen in picture two and the video. I set the glove up such that the middle/ring/pinky finger was attached to ground, the palm attached to grip and trigger attached to the thumb. When I curled my bottom three fingers into a fist it would register a grip press and touching my thumb to the side or end of my middle finger registered a trigger press. This type of setup works pretty well and is fairly intuitive but has a couple of drawbacks: 1) It is difficult (or I found it difficult) to make solid and lasting contact between fabric electrodes and wires. In the final iteration I ended up running a stitch with thin stranded wire to pull contact off the glove. Solder and fabric do not mix so some sort of glue or tape is required to secure the wires into place. Also some skill at sewing (which I lacked) is required. You can use conductive tapes but they will lose stickyness over time and should be secured using conductive thread. 2) As I increased the complexity of my HOTAS setup, especially when flying the Viper, I found that I lost fine tactile control over the numerous directional buttons on the stick.
Lastly, whatever method you end up choosing, keep in mind that it has to be one that is comfortable both while holding and not holding the stick and throttle. This si the big reason that I immediately dismissed the idea of using a controller because I had to pick it up, use it and put it down in an easily located place each time I wanted to flip a switch.
If there is sufficient interest regarding the glove version I am happy to upload schematics/plans for that. Drop me a line at kikakuvr AT gmail
Ring Actuator:
As I'm typing this I am realizing that everyone has differently sized fingers so the ring, while sized to fit my fingers may not fit yours. I know that Thingiverse has a method to make simple customizations to STL files and I will do my best to try and implement that ASAP.
Materials:
- 3D printer or printed Ring [STL files]
- Latching button (6x6mm) [link]
- Square pushbutton (6mm) [link]
- Rectangular pushbutton (3x6mm) [link]
- Optional JST/SM connectors [link]
- Solder, wire (26 gauge seems to fit for me)
After printing the ring the buttons can be wired following the above wiring diagrams (for the right hand ring).
Orientation is with the circular wire ports facing up
LB = latching button, MB = momentary (rectangular) button, TB = trigger button
Black = ground wire, green = grip wire, blue = trigger wire
circles are input holes, squares indicate solder contacts for the ring diagrams -- for the recolored circuit diagram the squares indicate pin attachments
Middle diagram corresponds to the wire groove closest to the top as oriented, right-most diagram corresponds to wire groove closest to the bottom as oriented.
Ground wire splits to reach both the latching and momentary button -- the output of both of those buttons is tied to the green wire which both feeds one port of the trigger button and is brought out to make contact to the grip pin of the tracker.
I hope the pictures and diagrams are sufficiently clear, suggestions on how I could improve the explanation, short of a step-by-step soldering diagram are appreciated!
Dealing With SteamVR
Correcting Hand Orientations
Previously I didn't have to do much once I built a tracker mount to get it to mostly work with DCS -- however, recently, for some reason DCS won't recognize trackers as controllers. I doubt DCS changed anything and I suspect that SteamVR has done something to make our lives more difficult, as usual. That being said, this is the workaround that I have used to make my trackers both register in DCS and have an orientation that corresponds exactly to my hand positions.
****NOTE**** THIS STEP REQUIRES YOU TO FLASH THE FIRMWARE ON YOUR TRACKERS and is therefore for ADVANCED USERS ONLY!!!
It is straightforward but if done incorrectly has the risk of bricking your tracker. I have not had any problems performing this but I am stating that this step is done at your own risk!
If your trackers show up in DCS great, skip this step.
If your trackers are not registering in DCS these are the steps I took to get them to work:
1) Reflash the firmware of the tracker to register as a controller. This is straightforward and this guide is perfect and is what I followed[Parts 1 and 2]:
https://www.reddit.com/r/beatsaber/comments/bn6e4u/ragesaqs_school_of_making_a_vive_tracker_maul/
2) Great, now the trackers should show up in DCS as controllers but they're pointed straight up instead of where you think they should be pointed --- to solve this I had to install OpenVR input emulator: [link] This software can be difficult to get up and running -- I found this DLL: [link] to be helpful, specifically by replacing the one found in
...\SteamLibrary\steamapps\common\SteamVR\drivers\00vrinputemulator\bin\win64\
3) Once you have inputemulator working you will want to open it in the steamVR overlay while running DCS and adjust the controller offsets. Specifically what I found was to adjust the "DriverFromHeadset" offsets (should be the middle set of options). I will try to get a screenshot of my settings but If i recall correctly I had to adjust all three (pitch, roll, yaw) to optimize the pointing direction. You can adjust these settings to your liking
>>>MY INPUTEMULATOR SETTINGS<<<
RHS: Yaw: 60deg, Pitch: -30deg, Roll: -90deg
LHS: Yaw: 60deg, Pitch: 30deg, Roll: 90deg