Web Controlled EggBot

Control the original EggBot via Web Browser!
Usually, the EggBot is controlled by Inkscape running on the host computer. To draw an image on an egg, Inkscape sends a bunch of commands via USB. As the EggBot is completely open source, the format of those commands is readily available. This allows us to control the EggBot in "real time", sending individual commands by clicking buttons in a remote Web-browser.
The computer connected to the EggBot no longer needs Inkscape. Instead, it hosts a small, custom Web service providing an HTML user interface and a simple REST API to change x, y and pen up/down, as well as a separate Web page to set up pen min/max.
Material
- Egg
- EggBot, assembled and tested with Inkscape
- Host computer (WinXP SP2 or higher, Mac & Linux might work with Mono but have not been tested)
- Client computer, iPad or smart phone with Web-browser
- Web cam (optional)
Infrastructure
- Internet access with DHCP, no public IP address needed
Get Familiar With EggBot Commands


(This step is mostly educational, but it might provide some extra fun and maybe some insight into how the EggBot works.)
As mentioned before, the EggBot is controlled with commands sent to it via USB. Here we'll try to send individual commands by hand .
The USB driver coming with the EggBot makes it available via serial COM ports. To find the corresponding COM port in Windows, press "-R" and type "devmgmt.msc" (without the quotes). Now you should see the "Device Manager" window. Open the "Ports (COM & LPT)" sub-tree and try to find an entry that starts with "USB Serial (UBW-based) communications port (COM...)". Write down the number of the COM port, e.g. "COM24".
In order to manually talk to the EggBot we also have to download a serial communication tool . There are several such tools. Here we'll use PuTTY which is available for free from: http://www.chiark.greenend.org.uk/~sgtatham/putty/download.html
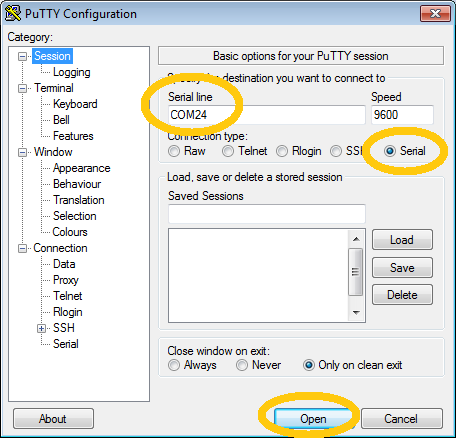
Start PuTTY.exe and configure it as follows: Select the "Terminal" node and set "Local echo" to "Force on". Then select the "Session" node and set the "Connection type" to "Serial". Above the radio buttons a new text box appears. Enter the exact COM port you wrote down before (*). Then, make sure the EggBot is powered and connected via USB and hit "Open" in PuTTY. Now you should see a command window.
To check the connection, type "TP" (which means "toggle pen") in the command window and hit . The command is immediately sent to the EggBot and confirmed with "OK". Then you can try "SM,1000,50,0" to move the X motor and "SM,1000,0,50" to move the Y motor. Another useful command is "EM,0,0" (disable motors). There are many more commands and parameters, but be aware that some of the commands might move the strong motors in unexpected ways that can break or damage the pen arm or one of your fingers. Anyway, the format of the EggBot commands is called "EBBCommands" (for "EiBot Board Commands") and documented here: http://www.schmalzhaus.com/EBB/EBBCommands.html
*) Note that the baud rate of the serial connection does not matter in this case, as the serial COM connection to the EggBot is merely emulated by the USB driver (see also http://www.schmalzhaus.com/UBW/Doc/FAQ.html ).
Setup a Live Video Stream (optional)

(This step is only needed if you want a remote person to operate the EggBot. It makes as much sense to use the Web-browser of an iPad or smart phone as a local, detached user interface without video.)
In order for the remote EggBot operator to get some visual feedback on what happens with the egg, we'll set up a live video stream.
There's a number of companies providing free video streaming. We'll use Justin.tv, because it's possible to embed their video player in our HTML user interface. Visit http://justin.tv/ to get a free account . Write down your Justin.tv user name, as you'll need it later on. Connect your Web cam to the computer, mount it onto the EggBot and start broadcasting. Move the cam until you see a good portion of the egg and the pen. Some Web cams even allow you to adjust the focus by turning a ring around the lens.
Pro tip: the Web based video encoder provided by Justin.tv works fine for short experiments. But to get a reliable video stream over a long period of time it's a lot better to use a stand alone encoder. Download the free Flash Media Encoder and a config file specific to Justin.tv from http://www.justin.tv/broadcast/adv_other and after installing the encoder, use "File > Open Profile" to load the config file.
Download, Configure and Run the Web Service
In order to make your EggBot accessible from outside your local network the EggBotWebApi uses a relay service called Yaler. Visit http://yaler.net/ to get an account. Write down the Relay Host and Relay Domain, as you'll need it later. If you don't feel like registering for an account that's fine. Your EggBot will still be accessible inside your local network.
Download EggBotWebApi.zip (requires .NET 2.0; source included for educational purpose) and unzip it.
You should see a directory named EggBotWebApi with the following contents
- Build.bat
- Clean.bat
- EggBotWebApi.cs
- EggBotWebApi.exe
- EggBotWebApi_local.bat
- EggBotWebApi_yaler.bat
- index.html
- setup.html
- Yaler.Net.Sockets.cs
- Yaler.Net.Sockets.dll
Edit EggBotWebApi_yaler.bat (right click, "Edit") to match your Yaler Relay Host and Relay Domain and (optional) your Justin.tv user name, e.g. EggBotWebApi try.yaler.io tamberg-eggbot tamberg. If you don't have a Yaler account, edit EggBotWebApi_local.bat instead. Then save the changes.
If you did not set up a live stream, edit index.html (right click, "Edit") with a text editor to delete the Justin.tv specific part of the file.
Finally, you're ready to run the Web service: plug in the EggBot and start EggBotWebApi_yaler.bat by double clicking it. Alternatively, start EggBotWebApi_local.bat to run the local version. In both cases, a command shell should open. The program should automatically detect the COM port assigned to your EggBot. As soon as the Web service is up and running, its URI is displayed. Visit the displayed URI, e.g. http://tamberg-eggbot.try.yaler.io/ (including the last slash) to access the Web service.
Downloads
Setup and Calibrate the EggBot

(This step assumes that your Web service started in the previous step is still up and running.)
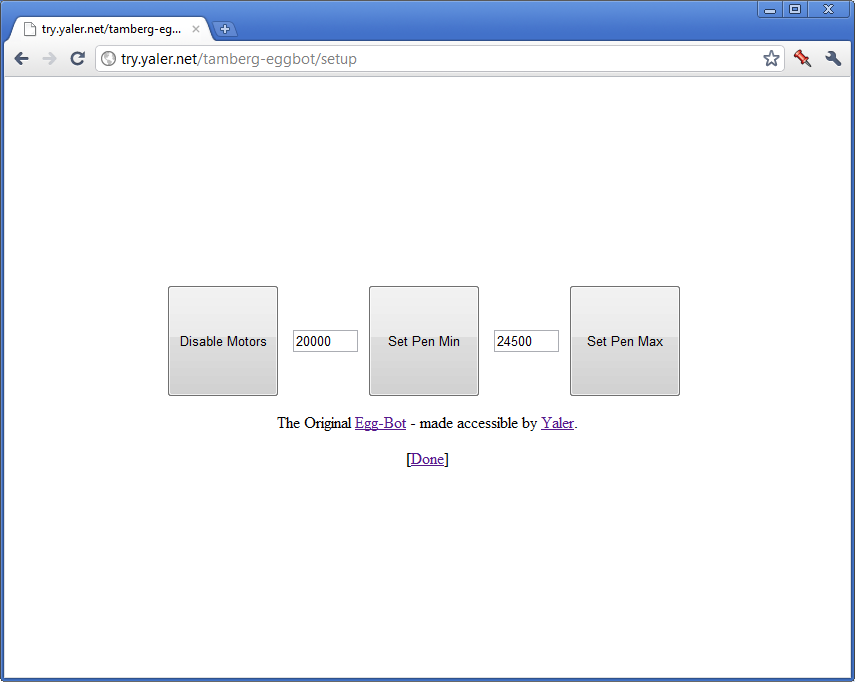
Visit the setup Web page of your EggBot by following the [Setup] link, e.g. http://tamberg-eggbot.try.yaler.io/setup
The Setup page allows you to disable the EggBot motors. This can be helpful to get an egg in position. Once the egg (or ping pong ball, as in the pictures) is fixed, you'll have to calibrate the pen up/down position. Just enter a min value into the first text box and click Set Pen Min, then repeat the procedure with max (second text box). You'll notice that with each adjustment the pen motor moves right away to the new position, so you don't even need a pen up/down or toggle button.
Once the pen's min/max has been set right, click the [Done] link to proceed.
Control the EggBot Via Web Browser

(This step assumes that your Web service is still up and running.)
That's it. Your EggBot can now be controlled from any device with a Web browser. Note that the embedded video player requires Flash, but the buttons just need Javascript which is supported on many mobile devices as well. This means you now have a handy remote control for your EggBot. Just visit the EggBotWebApi URI, e.g. http://tamberg-eggbot.try.yaler.io/. Enjoy!
Oh, and in case something doesn't work or could be done in a better way, just let me know in the comments.
Regards,
tamberg