Wire Mesh Birdfeeder
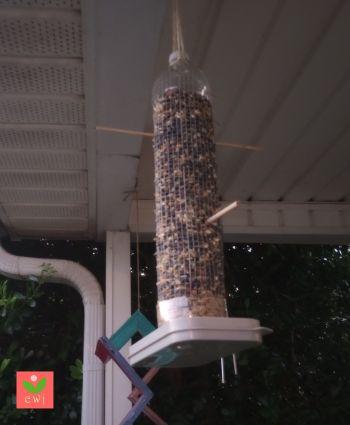
Have you ever seen (or owned) one of those mesh wire constructed birdfeeders? Do you notice how sturdy and accessible they are for birds to get all that tasty seed? There 's a lot of different designs for birdfeeders out there but not all of them are designed to be optimal for them to eat and perch, in addition to being easy to refill. I always loved the wire mesh style and thought it was off the table until I figured out how to construct one inspired by this design. The best part, it's not that complicated! Here's what you need:
Supplies
- An empty 1-liter bottle (the kind that club soda and seltzer water come in)
- Piece of wire mesh with a tight weave (I am using 1/4" it needs to be a tight weave so the birdseed doesn't spill out!)
- Wire cutters
- Length of fishing line and needle
- 2-3 wooden dowels (1/4" - just like the weave of the wire mesh)
- Thin gauge length of craft wire, needle nose pliers, (optional) jute cord
Creating the Base
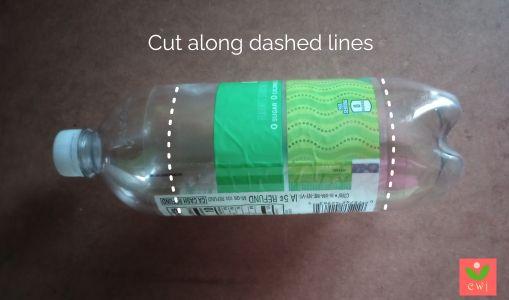
Rinse out your empty bottle and remove the label. Cut off the top and the bottom, following the guidelines here. Try to cut about an inch past the point where the label was. Save the bottlecap, we'll be using it too!
Forming the Mesh Body
The inside circumference of the water bottle is about 10.5". Take your length of wire mesh and mark it off at this point. This will form the body of your birdfeeder. Use your wire cutters to cut at this point, better yet, leave a fourth inch extra so it can overlap slightly.
The height is up to you...the longer you cut it the taller your feeder will be. I chose to cut mine at about a foot (12"). That seemed reasonable to me. With a taller birdfeeder you could insert more perches and feed more birds, obviously, but I think 12-14" is a good height. Use your wire cutters to trim the wire mesh piece to the desired size, use caution as the ends may be sharp, I used gloves for this step.
Carefully wrap the wire mesh piece you have just cut into a round cylinder shape. Stick the end into the bottom piece of the soda bottle you cut earlier, and insert the top into the bottle top. If you cut the wire at at least the 11" mark there will be slight overlap and it will fit inside the bottle parts easily. Wire at this stage can be kind of stiff to work with.
Now cut a small length of your craft wire and wrap it around the ends of one corner grid square so it will not move around for the next step.. Obviously you want to keep it in its form, if there's a gap and it comes undone it may not fit into the bottle parts.
Connecting the Base and the Body Together
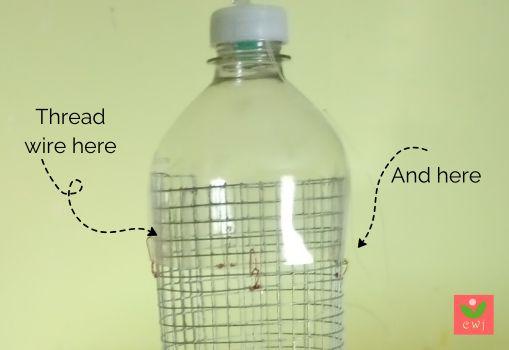
Take a long length of fishing line and thread it through a needle, Start at the bottom of the wire mesh cylinder shape and make like you're "sewing" them together. Start at the bottom and work your way up by looping a length of fishing line through each grid square. When you reach the top tie your end off.
Now take your empty bottle bottom piece from earlier, and using a thumbtack, pierce a tiny hole in two opposite ends on the bottle. insert your finished wire piece into them. Cut two short legths of craft wire. Thread it through the tiny holes you created along with the wire grid, go around a few times and use the wire pliers to wrap it off. This will keep these parts secure.
Creating the Hanger and Perches
To make the hanger, which we want to do now because it will be very difficult to do once we assemble the parts together and start filling it with birdseed you want to create it with a length of fishing line. Cut a length of fishing line/twine...it should be enough so that there is at least 10-12" inches of twine hanging out on both ends, this will give you enough length to secure and hang it up. You could always use something else like jute cord but it will be harder to thread through unless you make bigger holes (in that case use an awl instead of a thumbtack to pierce the holes)
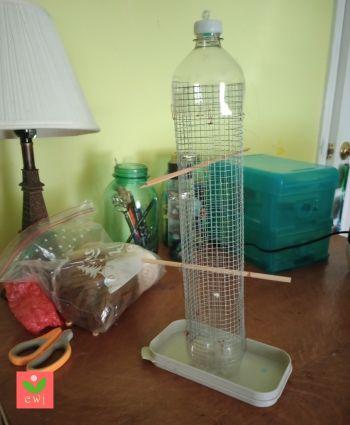
To form the perches, take a couple of wooden dowels, make sure they are the same width as the grid weave (mine is 1/4" and poke them through the feeder at the top, one in the middle, or near the bottom. Try to insert the second dowel perpendicular to the other one so it will be easy for multiple birds to feed at once.
Filling Up (And Hanging) Your Feeder
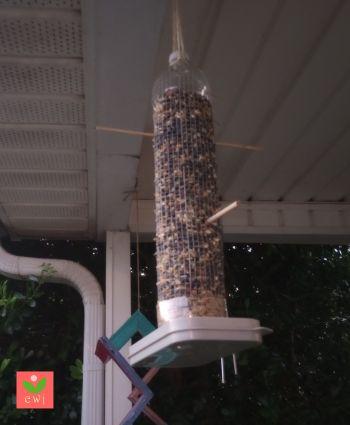
To make it easeir to fill your feeder with seed without spilling it, use a funnel and insert into the soda bottle opening. Keep a paper plate below to catch any loose seed that might fall.. Put the bottle cap back on and tighten it. Voila...yuo are ready to hang up your feeder!
This part is strictly optional, but entirely up to you. You can add a platform to the bottom to catch loose seed (plus give your avian friends an extra resting spot) I used an old paint palette tray and some Krazy Glue on the bottom.
Hang your feeder in a good spot, it could be from the gutter of your house, a tree branch or shepherd's crook. Choose a spot that's high off the ground enough so if you're like me and you've got cats, (or squirrels) they won't have easy access to it.
That's it, enjoy!! You and the birds, too...they'll love this nice sturdy design, and you'll love watching them.