How to Make a Wireguard VPN Server on Linux Ubuntu / Linux Mint
by williamruckman in Circuits > Linux
4550 Views, 3 Favorites, 0 Comments
How to Make a Wireguard VPN Server on Linux Ubuntu / Linux Mint

This instructable will tell you how to setup Wireguard VPN.
BY: William Ruckman (https://ruckman.net)
WHAT IS WIREGUARD (https://www.wireguard.com/)
WireGuard is an extremely simple yet fast and modern VPN that utilizes state-of-the-art cryptography. It aims to be faster, simpler, leaner, and more useful than IPsec, while avoiding the massive headache. It intends to be considerably more performant than OpenVPN. WireGuard is designed as a general purpose VPN for running on embedded interfaces and super computers alike, fit for many different circumstances. Initially released for the Linux kernel, it is now cross-platform (Windows, macOS, BSD, iOS, Android) and widely deployable. It is currently under heavy development, but already it might be regarded as the most secure, easiest to use, and simplest VPN solution in the industry.
ADDITIONAL GOOD RESOURCES:
https://www.wireguard.com/install/
https://www.wireguard.com/quickstart/
Supplies
- Ubuntu or Linux Mint Server/Desktop Installed
- SSH login with root password / access
Setup Considerations

This setup considers that your Wireguard VPN server is on your LAN subnet behind an internet router.
YOU WILL NEED TO BE LOGGED IN AS ROOT
Wireguard is a layer 3 VPN on the OSI Model. Which means that it exist at the network level. All traffic through it is routed.
To make this work properly after setup, you will need to do UDP port fowarding to the port you select for the Wireguard VPN server on your LAN. Unfortunately, this step will depend on your router manufacturer and you will need to look up port forwarding for your make/model.
You may also have the need to add an internal static route to your new wireguard IP Subnet that you will create. One way around this is to NAT or Masquerade your traffic from the Wireguard VPN so that all traffic looks like it is coming from your internal network. Then you won't need to add static routes. I will show you how to do do this.
This also works great on ODroids or Raspberry Pi devices if you want a cheap small low power computer for this function.
Thanks and enjoy,
William
Install Wireguard

CODE:
apt-get install wireguard wireguard-tools -y
Create the Wireguard Interface

CODE:
ip link add dev wg0 type wireguard
ip link
Add IP Address to Wg0 Interface

You can choose any IP subnet you wish. You can use what I post or make your own.
I choose to use the second option. Multiple peers.
For a single peer
ip address add dev wg0 192.168.2.1 peer 192.168.2.2
ip a
For multiple peers in a subnet
ip address add dev wg0 10.100.100.1/24
ip a
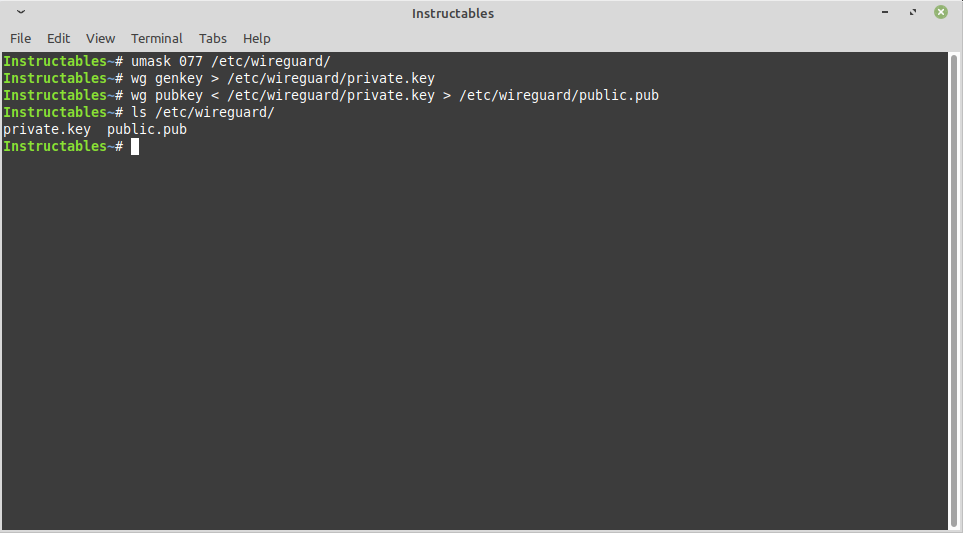
Create the Private and Public Keys for the Server

Do not give, copy, display your private key for any server or client. It is secret for that device only. The below code will create a unique key for you. DO NOT USE THE KEYS LISTED IN THIS TUTORIAL.
Public keys can be shown anywhere. They are not secret.
PSK (Pre-Shared Keys) are secret as well. Only give it to devices that are part of the VPN. Clients and Servers.
We will generate a PSK later for extra security.
CODE:
umask 077 /etc/wireguard/
wg genkey > /etc/wireguard/private.key
wg pubkey < /etc/wireguard/private.key > /etc/wireguard/public.pub
ls /etc/wireguard/
Assign the Public and Private Keys to the Wg0

CODE:
wg set wg0 private-key /etc/wireguard/private.key
wg
Generate a Pre-shared Key That Will Be Used on the Clients and Server

CODE:
wg genpsk > /etc/wireguard/psk.psk
ls /etc/wireguard/
Set the Peer/clients Information

You will need the PUBLIC KEY of a client for this step. Basically a second system.
That can be another server or device such as a cell phone. You can download the wireguard app and generate the public and private keys for that device. You can then copy the public key from your other device into this command.
You will also select the IP address for your peer. 10.100.100.1 is the server. We select 10.100.100.2 as the client or peer.
wg set wg0 peer [PASTE IN PEER PUBLIC KEY] preshared-key /etc/wireguard/psk.psk allowed-ips 10.100.100.2/32
wg
EXAMPLE:
wg set wg0 peer qmDkdFiOw29yriq/yhW2Nm8g3ch73jT7Lf68sNhMqFc= preshared-key /etc/wireguard/psk.psk allowed-ips 10.100.100.2/32
wg
Save Configuration and Display It

CODE:
wg showconf wg0 > /etc/wireguard/wg0.conf
wg showconf
Add More Configuration

This is the step where you customize the configuration. This will be used by the service in the next step to launch your VPN server.
CODE:
nano /etc/wireguard/wg0.conf
Add the below under [Interface], you can tweak this as you wish.
Address = 10.100.100.1/24
ListenPort = 47732
MTU = 1500
Enable the Service to Start on Boot and Start the Service for Wg0

CODE:
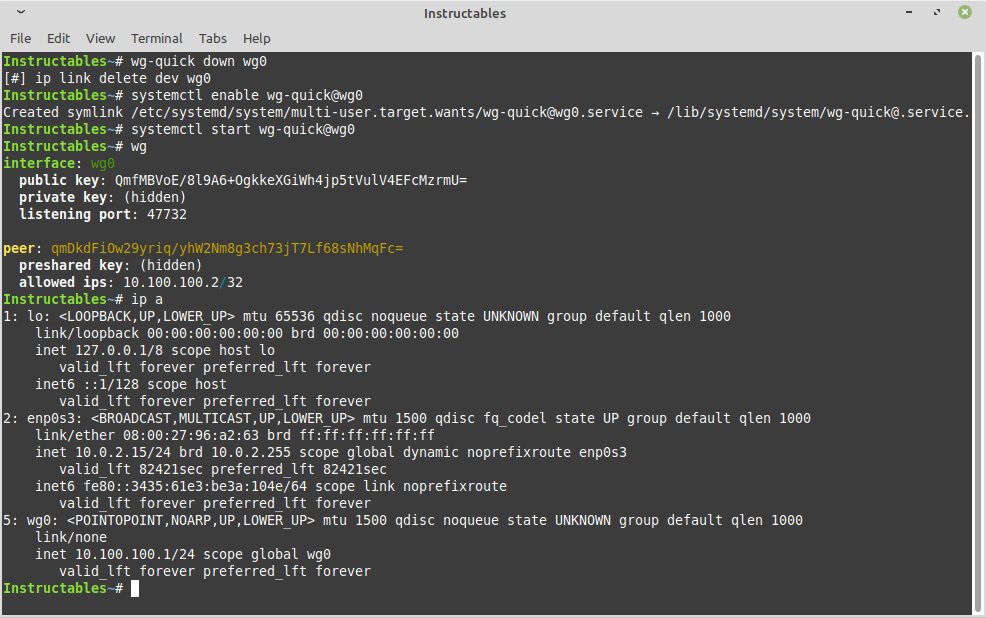
wg-quick down wg0
systemctl enable wg-quick@wg0
systemctl start wg-quick@wg0
wg
ip a
For reference, you can manually start or stop the server with:
wg-quick up wg0
wg-quick down wg0
Optional, If You Have or Want a Firewall With NAT Masqurade


Install the firewall, if it isn't already.
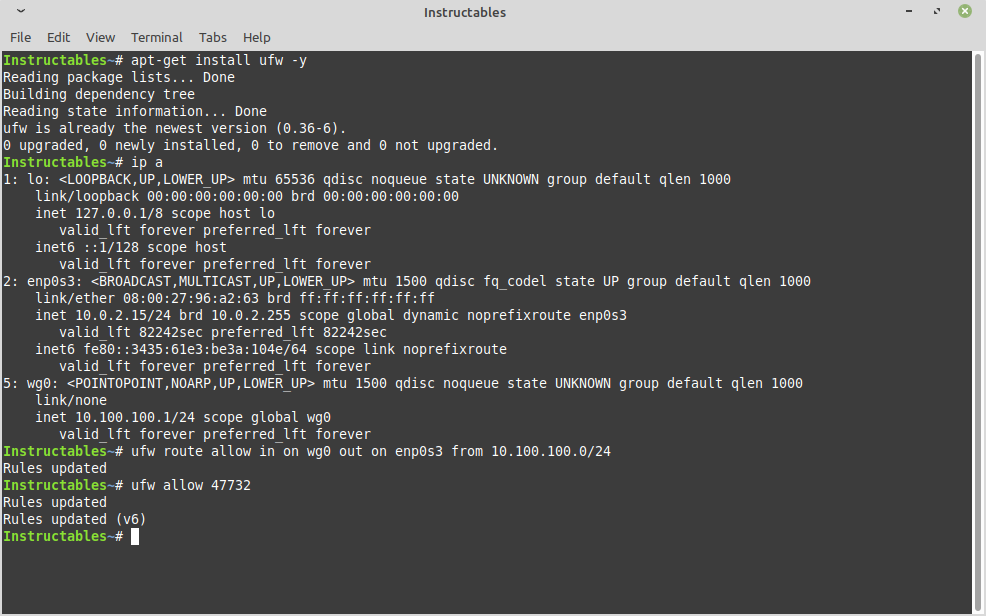
apt-get install ufw -y
ip a
Allow IP routing for Wireguard and allow the port for Wireguard. In this case, it is 47732 as seen in the 'wg' command output as 'listening port'. Also, from the 'ip a' command, I will use my ethernet interface as my outbound traffic interface which is 'enp0s3'
ufw route allow in on wg0 out on enp0s3 from 10.100.100.0/24
ufw allow 47732
Edit the file /etc/ufw/before.rules and add the following code to the top as seen in the screenshot.
Using nano:
nano /etc/ufw/before.rules
CODE TO ADD:
# nat Table rules
*nat
:POSTROUTING ACCEPT [0:0]

#Forward traffic from the alias range through eth0
-A POSTROUTING -s 10.100.100.0/24 -o enp0s3 -j MASQUERADE

# don't delete the 'COMMIT' line or these nat table rules won't be processed
COMMIT
ENABLE FIREWALL AND DISPLAY STATUS:
ufw enable
ufw status
Final Thoughts
At this point, your server is ready. It can take traffic and NAT it to your network or internet.
You will need to connect a client which you could test on your own network and you may need to enable port forwarding on your router. As shown in step 8, you can add more peers/clients to wg0. Just keep keys and IP addresses unique. Make sure all clients have the PSK.
IP addresses, ports, private keys, public keys, and PSK can and should be different.
Also, never share your private keys with anyone.
Enjoy and stay safe and secure!