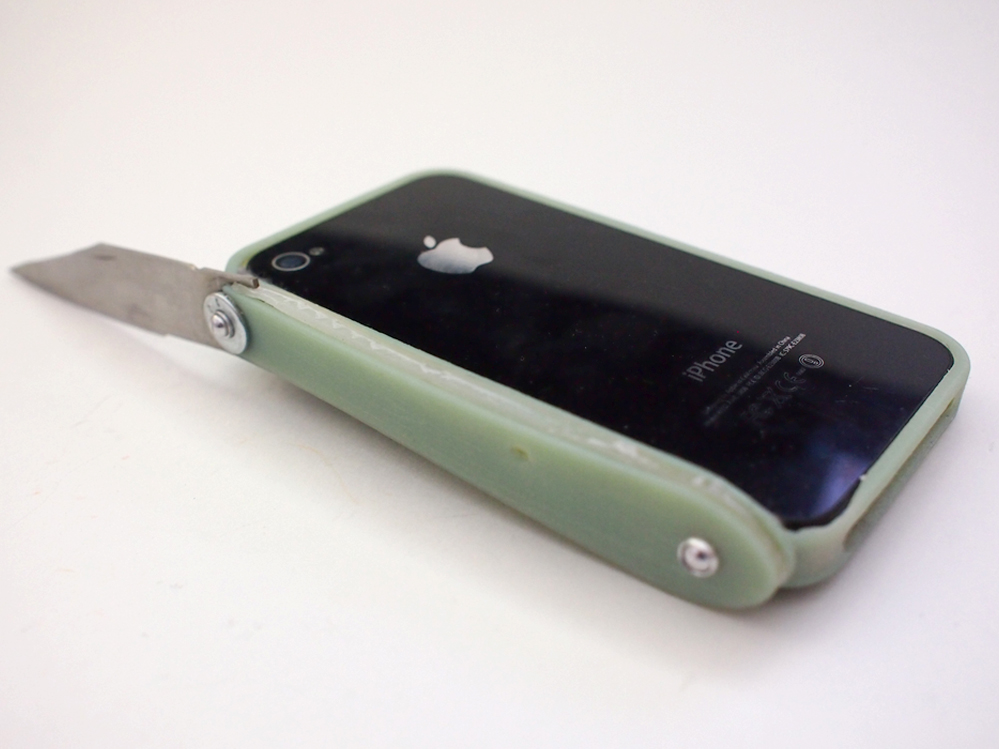
.iStab


The models I based this idea from are free, and the programs needed edit the 3D files are also free: Netfabb and MeshMixer.
The iStab is a great way to keep a cutting implement on hand at all times. This can be used as a weapon for self-defense for the next time you're in a knife-fight like Michael Jackson in Beat It, or harmlessly used for everyday actions like opening packaging or cutting items to size. Forget highly-contentious 3D printed firearms and flimsy iPhone knuckle dusters, the iStab has you covered for all your cutting needs.
Here's what I used to make my iStab:
materials:
|
tools:
|
Find Models

I found a folding knife and iPhone case model for free on Thingaverse:
- folding knife: http://www.thingiverse.com/thing:4725
- iphone 4 case: http://www.thingiverse.com/thing:24734
If you've downloaded .STL files you'll need to convert them to .OBJ files before you can edit them. After you've found the models you want open each model separately in Netfabb and export as an OBJ file: Part > Export Part > As Wavefront OBJ. Next, we'll combine the models in MeshMixer.
Combine and Print


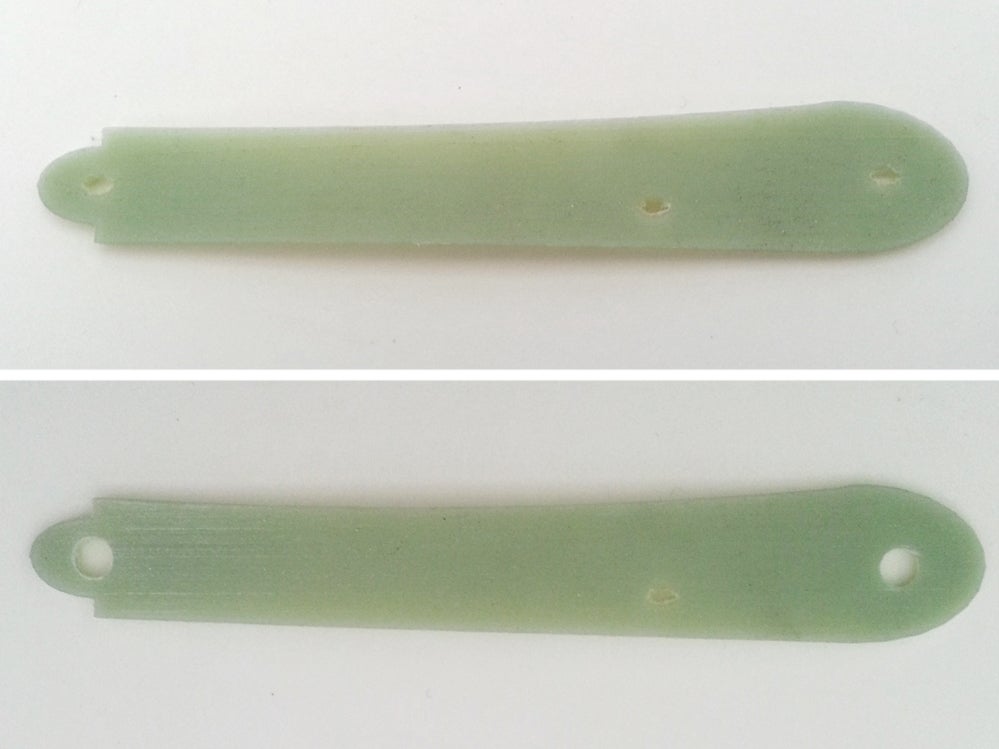
Following the directions in this Instructable, I combined the folding knife side plate with the side of the iPhone case.
Once you have your .OBJ files, I followed ShadyLogic's steps on how to edit with MeshMixer and was able to quickly import 2 models. Import one model, then import another making sure to "append" the project to have both models in the same environment.
Using the alt+right-click/alt+left-click mouse button(s) I was able to navigate around the MeshMixer environment and line up my models. I placed the inside edge of the folding knife and lined it up with the inside of the iPhone case. Pay attention to where the knife siding penetrates the plane of the inside of the iPhone case.
Merge the two models by selecting one model then Shift+Click the other model (they should both turn white). Then go to Edits > Combine to merge the models into one.
Now we can export the merged model back to NetFabb so we can make it watertight before sending it to print. In Netfabb go to Extras > Repair then find Automatic Repair on the bottom right, then execute the repair. You now have a watertight, custom 3D model to send to the printers. Save the model as an .STL or .OBJ (depending on what the printing service requires).
After you've got your .STL or .OBJ file you'll need somewhere to print it. A great new product to hit the desktop 3D printer market is the Creality 3D printer, inexpensive and works great!
I included the .STL file you'll need to print your own iStab here ↓
Downloads
Clean Prints

When your 3D prints are finished there may be some additional cleaning required.
There was still support material attached my prints in the nooks and openings. With a damp cloth, a sharp pokey-tool, and a hobby knife, clean all surfaces, grooves, and openings of all your 3D prints.
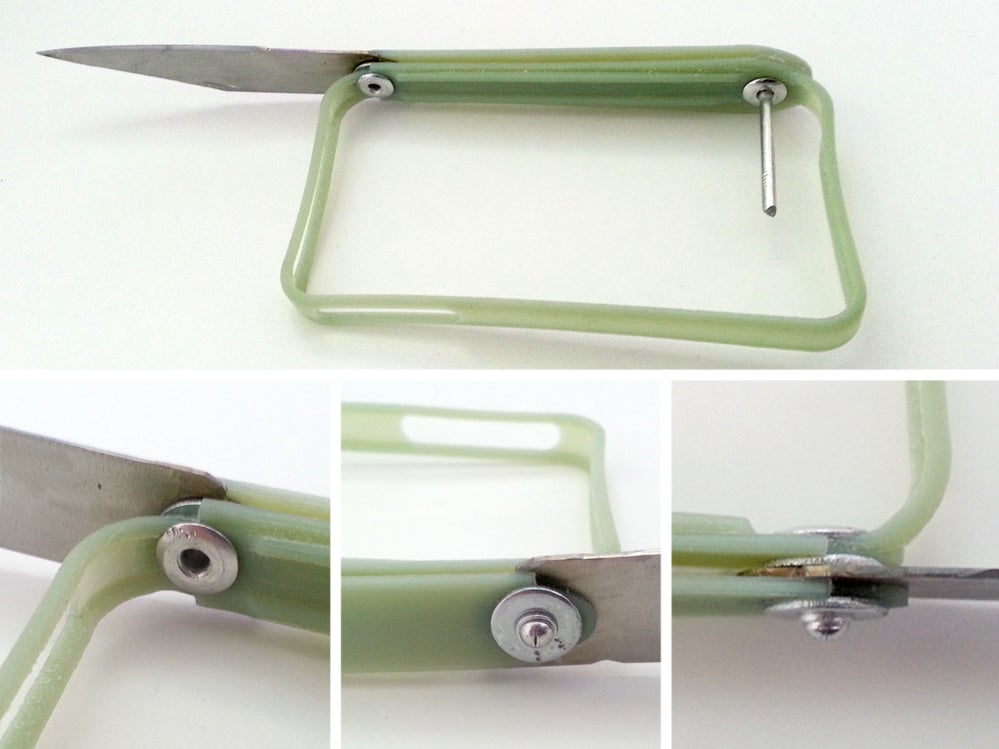
Make Blade and Lock


blade:
Sharped printed 3D plastic isn't very threatening, even after sharpening the blade was brittle and flimsy. I found an inexpensive paring knife at my local Dollar Store, the blade was steel and slightly larger than the profile of the 3D printed blade.
I didn't like the profile of the 3D knife blade. Instead of modifying it in Meshmixer I decided to freehand a portion of the blade profile after tracing the basic outline onto the steel blade. The steel knife handle was disassembled so just the blade and tang were left. Using a rotary tool, the traced knife blade was craved from the steel knife.
I gave the knife a sharp edge with the rotary tool, the final edge can be honed later. A small notch was also carved into the top edge of the knife in both sides, this will allow a fingernail to be used to pry the knife out of the sheath when it's folded closed.
lock:
The taper on the blade lock was tapers so fine that it wouldn't have held the blade at all. A plastic cutting board was used in place of the 3D printed piece. I traced the 3D printed blade lock onto the cutting board, then used a sharp hobby knife to cut the shape.
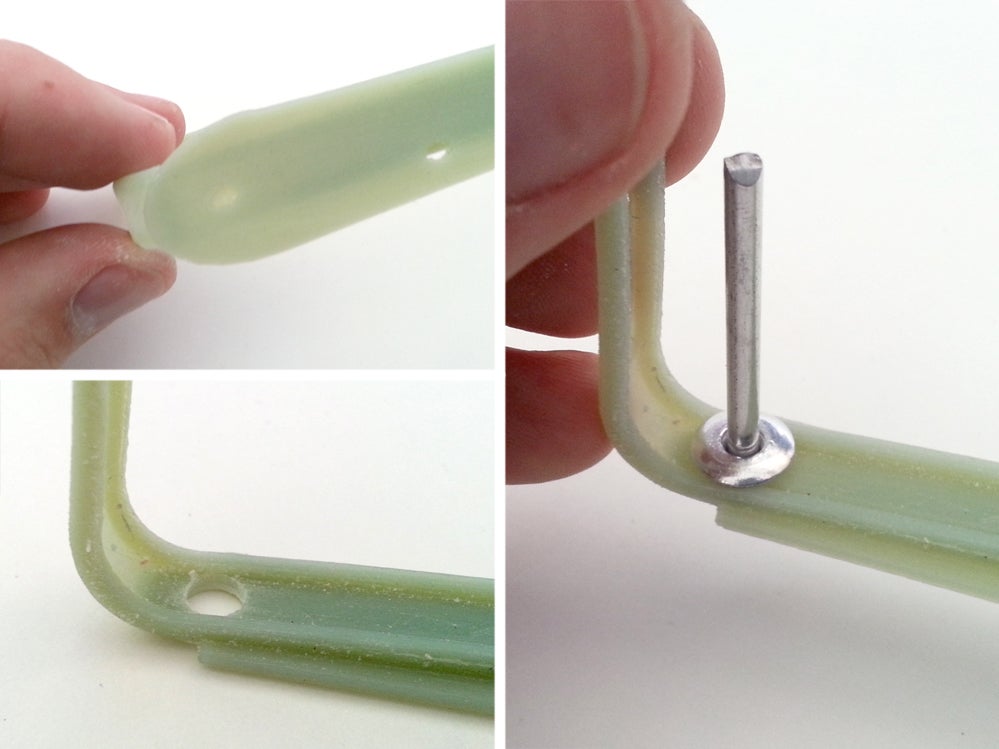
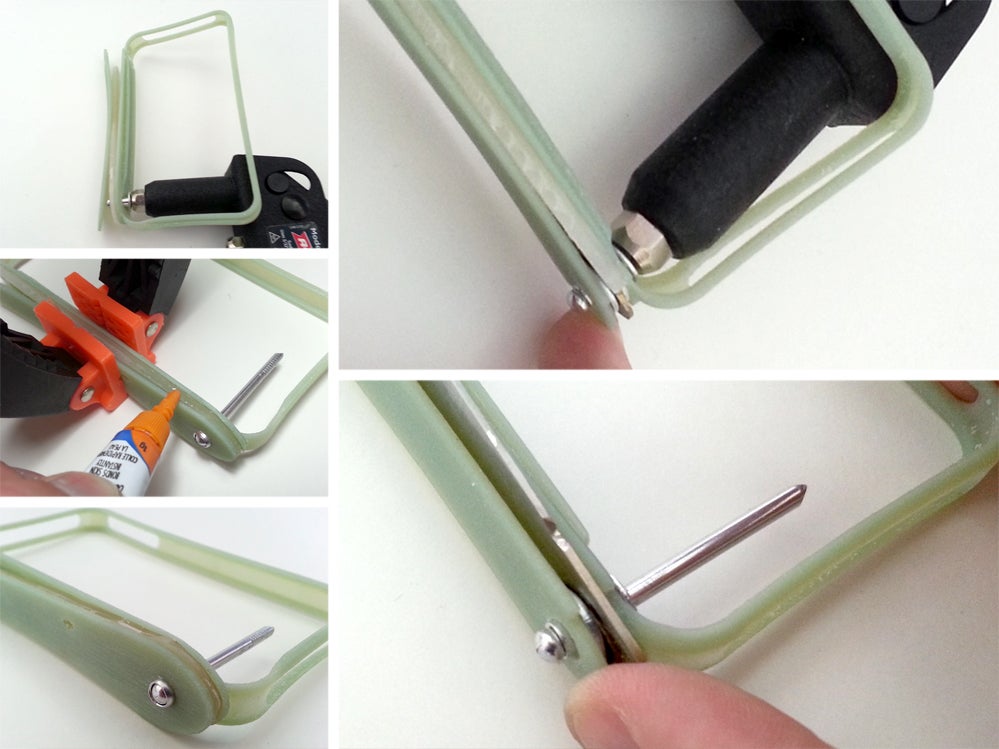
Widen Openings, and Then Rivet

Rivets are a great way to attach pieces together without leaving a bulky fastener. However, rivets work on compression and can crush your work if your material is soft.
crushed print - attempt 1 (above):
proper rivet - attempt 2 (below):
Small washers and a dab of superglue were used in between elements of the print/lock/blade sandwich, then a rivet was pressed onto both ends of the handle to secure both sides of the folding knife. With finesse, you can get the riveter to pop the rivets with a tight bond and without crushing your 3D prints. The type and composition of your prints will play a factor in this (a more rubberized ratio of printing medium will have a greater compression allowance).
If the rivets don't pop and snap off it's better to back off the rivet once it's tight enough and just trim it down with a rotary tool. More on this in the next step.
Refine the Action

Make any final adjustments to the blade and action now. Rivets can be lightly hammered to increase tension, minding not to shatter the brittle casing. Or, a sharp knife can be pried inside one of the rivet joints to loosen the action if it's too tight.
Padding Protection


After the interior has been smoothed down, scraps of felt were cut into squares and placed over any sharp/metal pieces that might come in contact with the phone body. This will reduce any damage to the phone from the sharp metal when inserted.
Two pads were located on top of the interior head of the rivet and hot glued in place.
Add Phone, Commence Stabbing
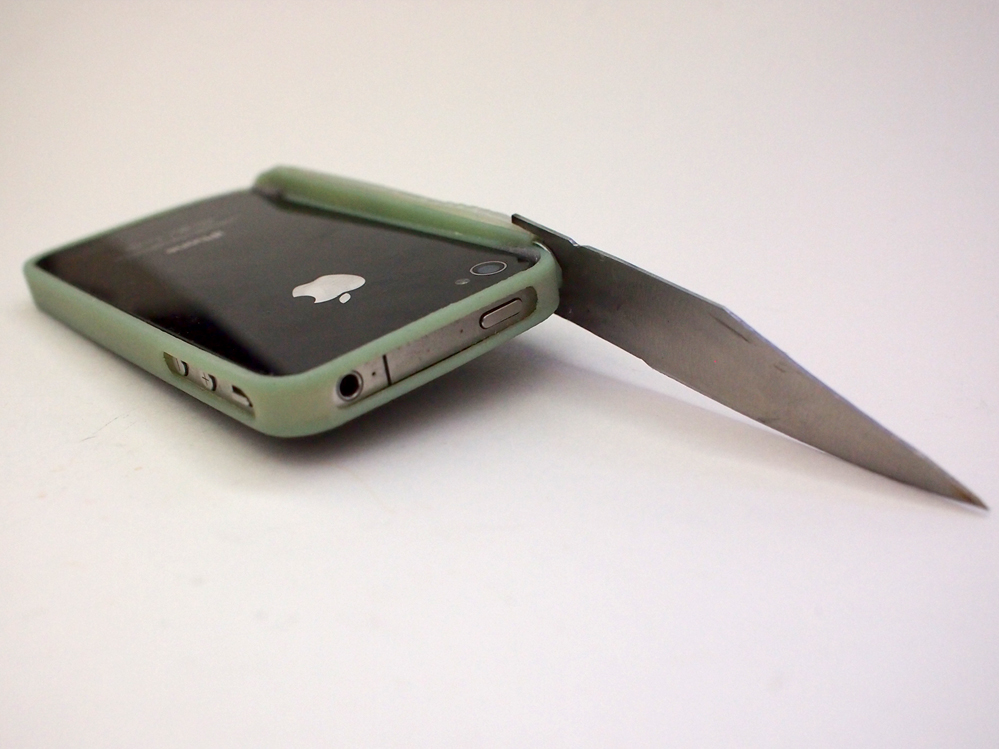
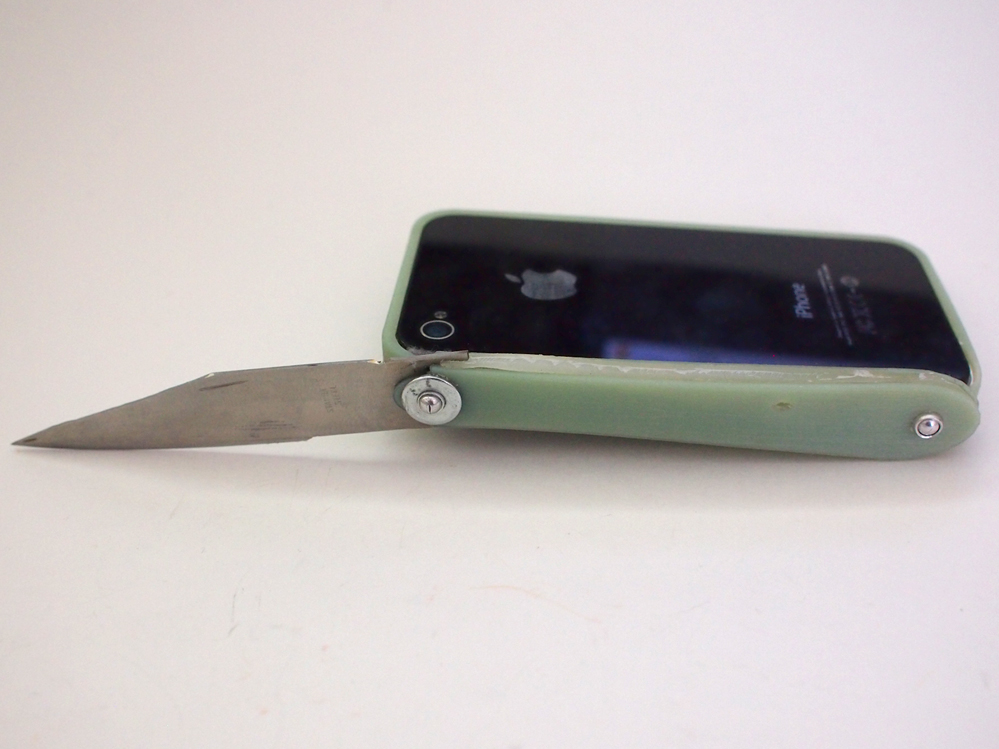
After refining the action, the blade deployed perfectly and can easily be flicked out or folded away. The iStab is perfect for the next time you need a blade for that project you just looked up on your mobile phone, or protecting yourself from an electronic device thief while you're on the phone.
Be safe, and be awesome!